Today I'm sharing the Oscar Easter Crochet Pattern, a sweet little stuffed bunny that's just the right size to tuck into an Easter basket or set out as a springtime decoration. He's small, he's soft-looking, and he's got those long floppy ears that make him instantly recognizable as an Easter bunny.

Jump to:
Behind the Pattern
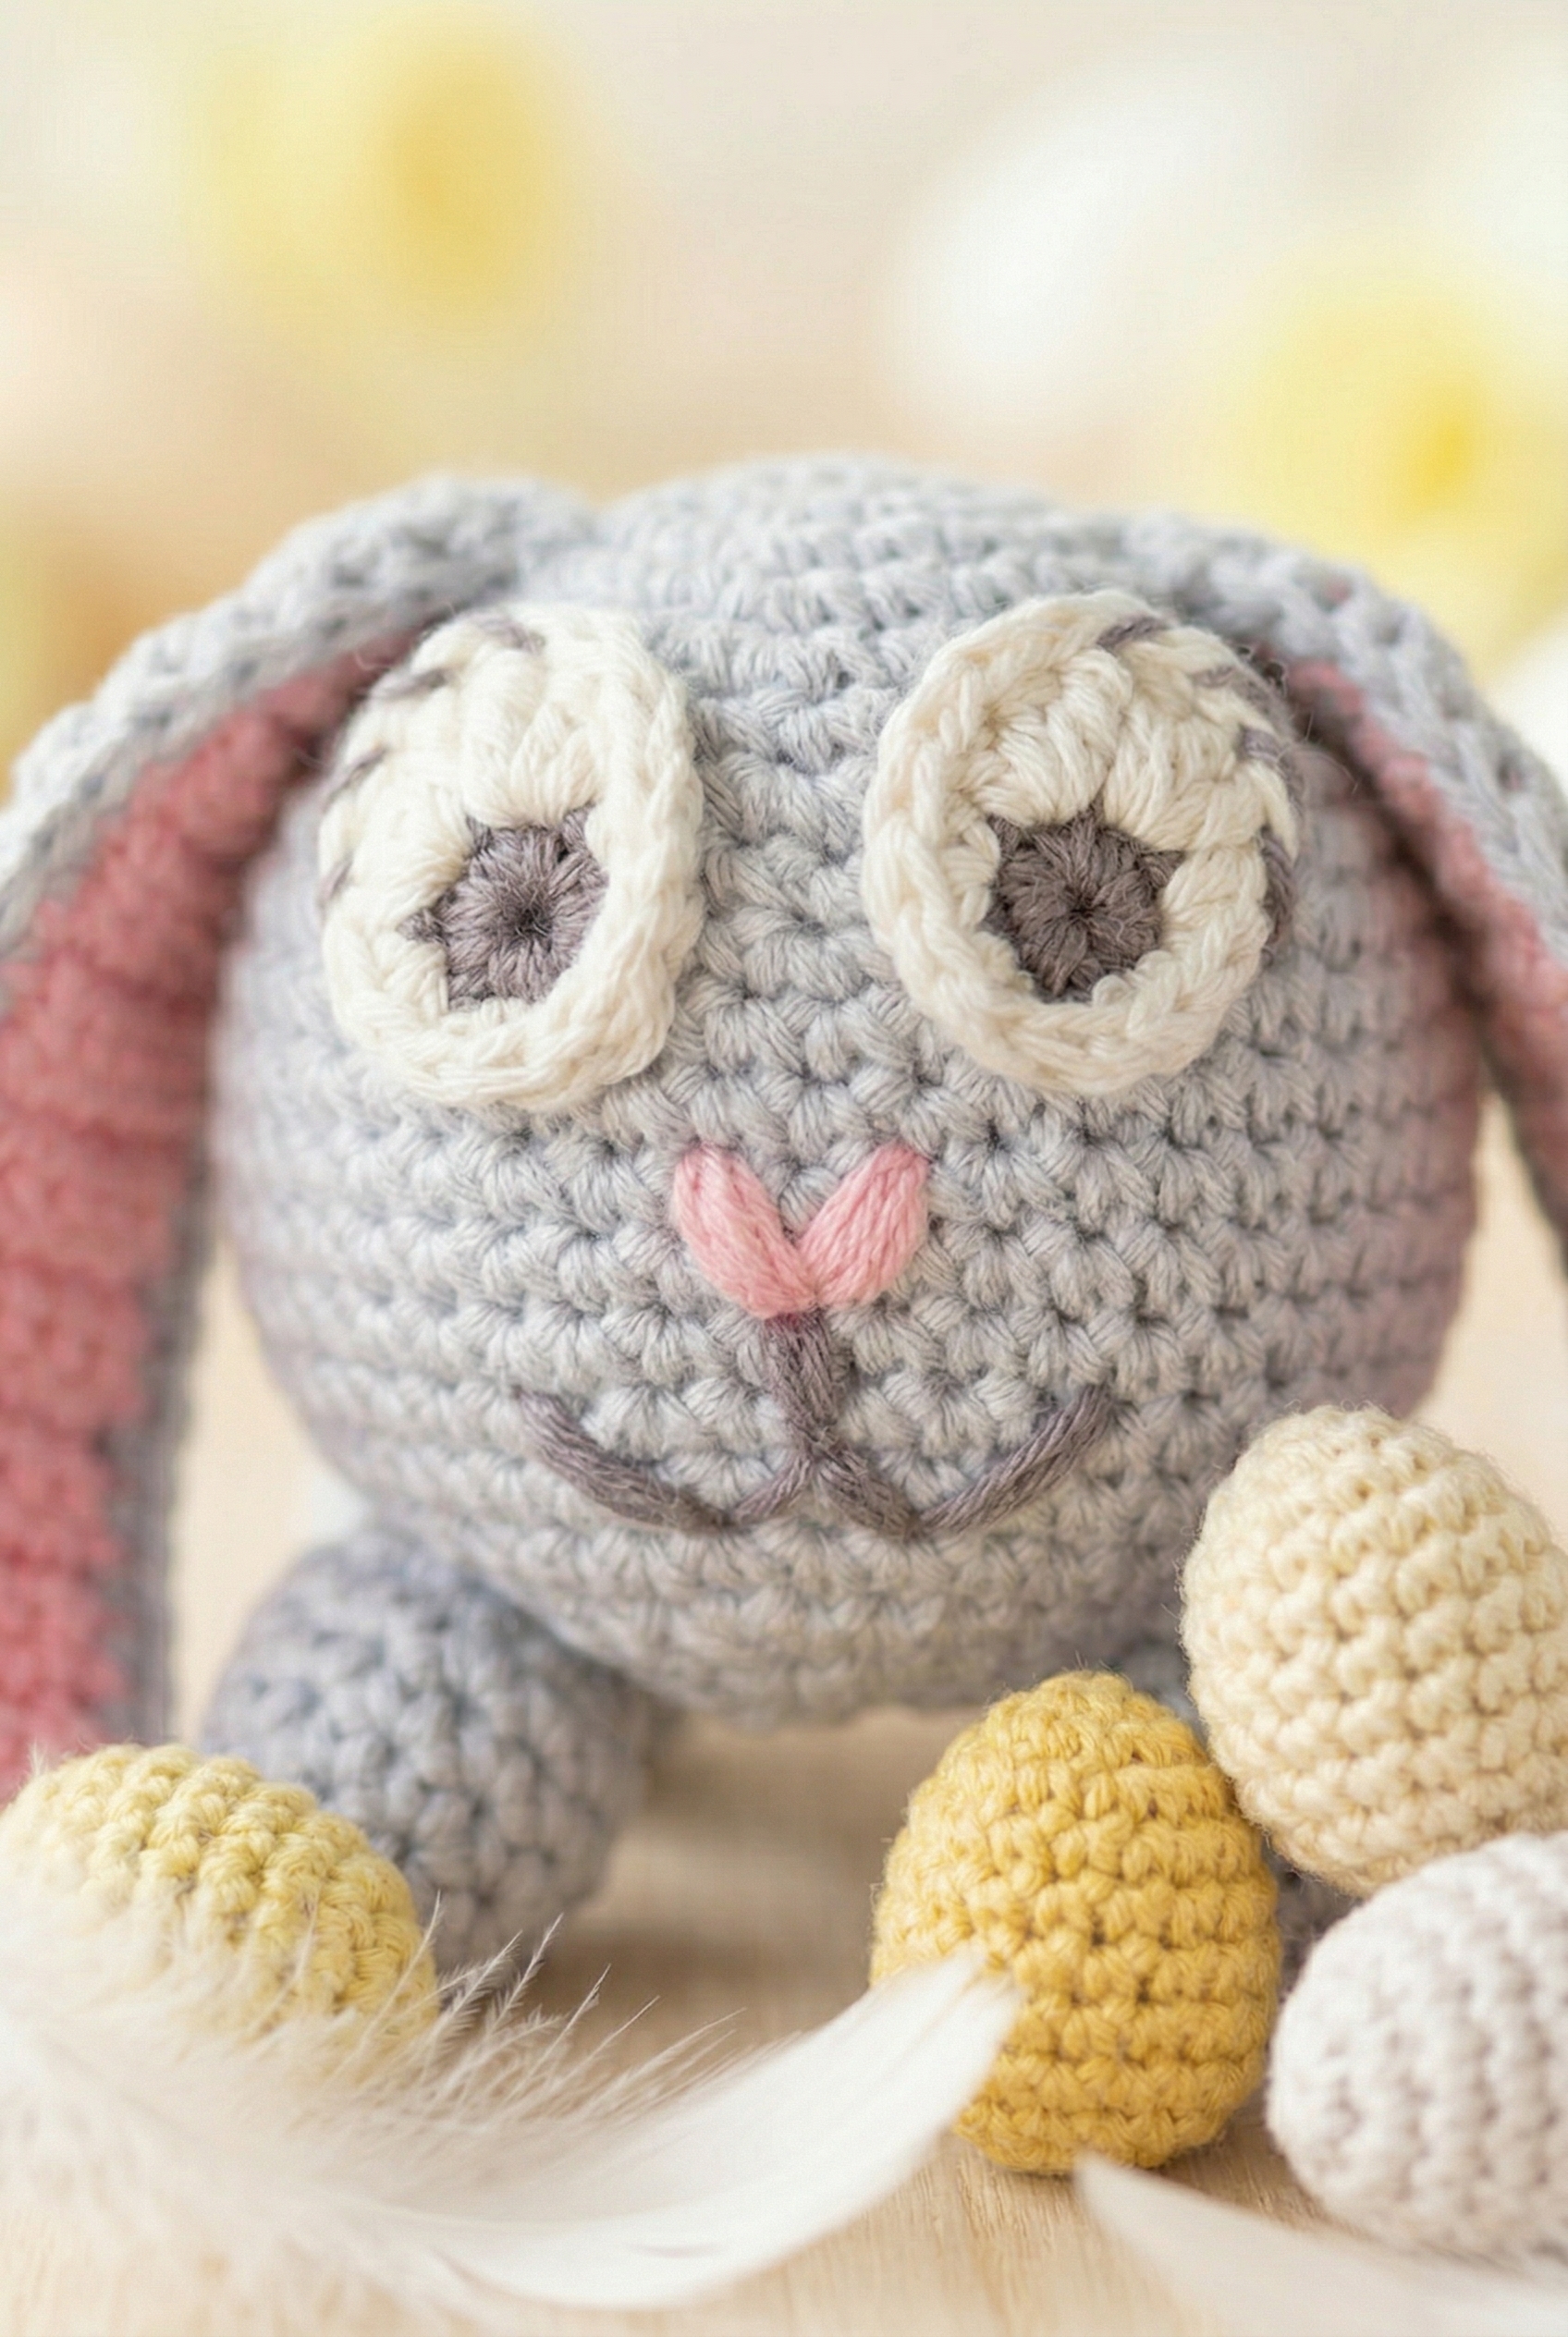
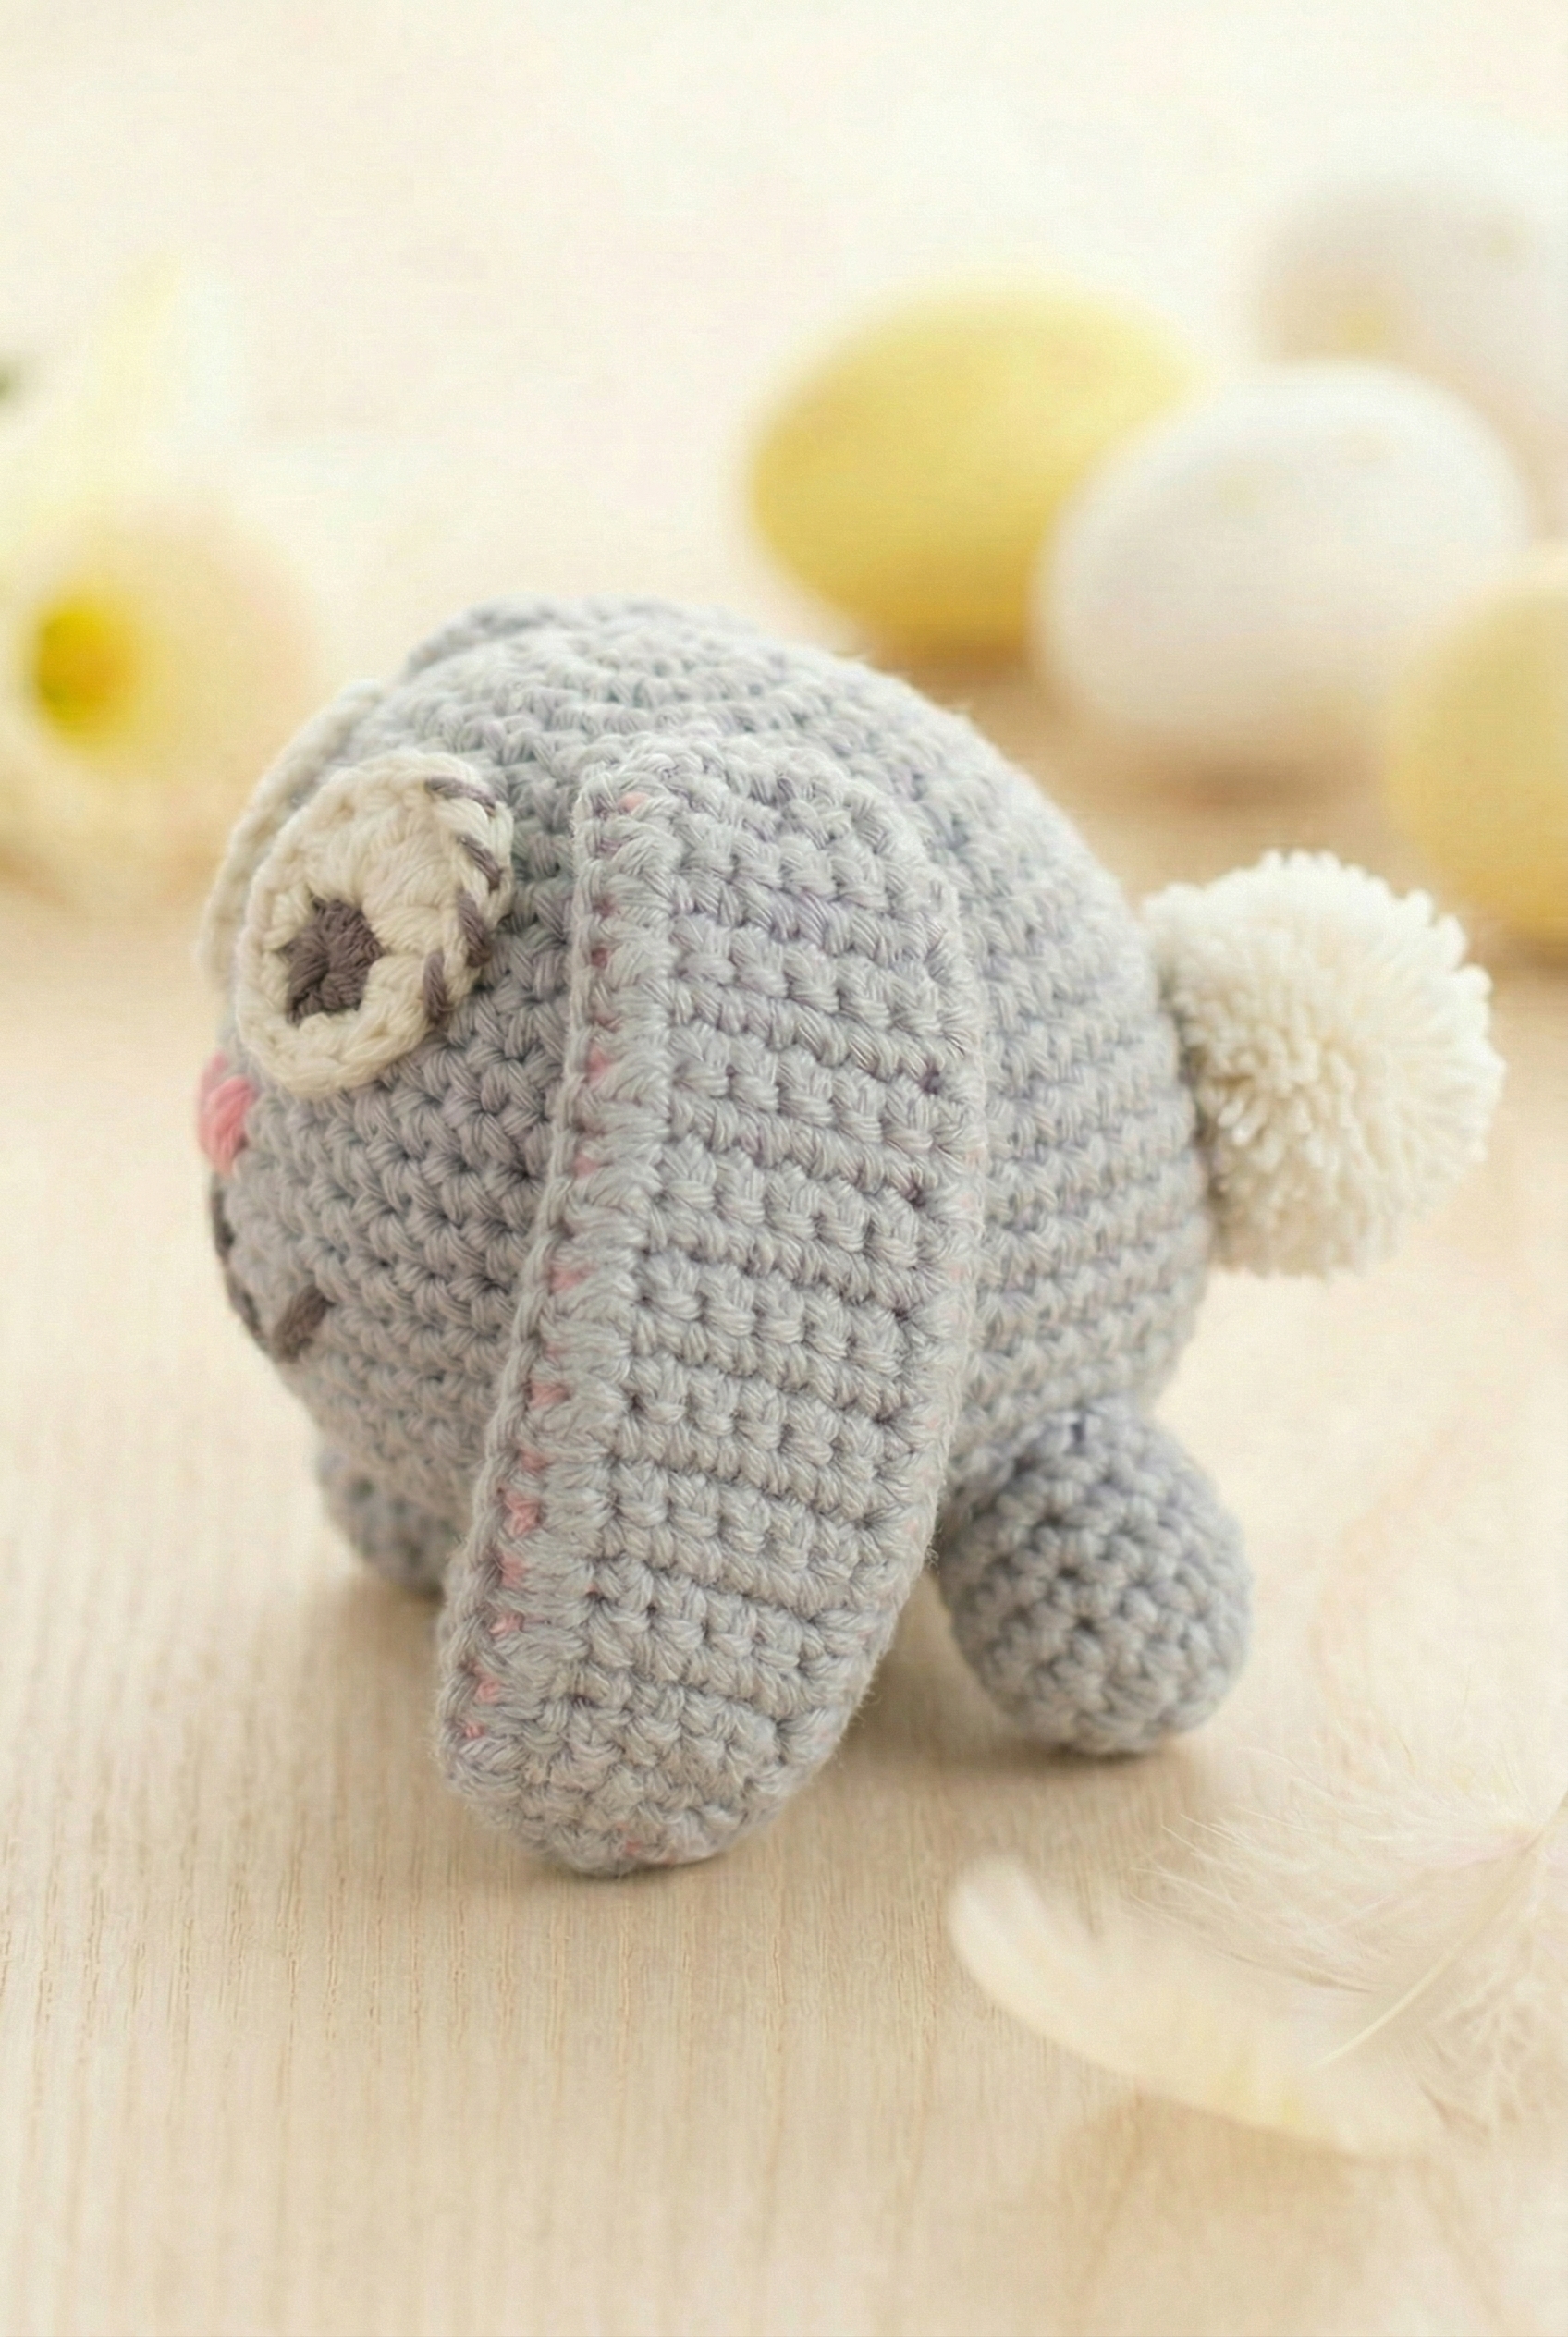
Oscar is a rounded little guy with a light gray body, four small stubby feet, and the most satisfying floppy ears. The outside of the ears is that same soft gray, and the inside is a pale pink, which gives him that classic bunny look without being over the top. His face is really what pulls it all together: big circular eyes with off-white rings and gray centers, a tiny pink nose, and a simple stitched mouth. He looks calm. Content. Like he has nowhere to be, I think.
Oscar looks great sitting next to my stuffed crochet chicken — they're about the same size and work as a matched pair. Add my Easter egg ornaments and hanging Easter chickens and you've got a full handmade Easter collection.
Why You'll Love This Pattern
Oscar works up fast and finishes looking polished without much effort at all.
- Beginner-friendly construction: The shapes are simple and rounded, so there's no complicated shaping to wrestle with.
- Perfect Easter sizing: At just under 11 cm tall, he fits right into a standard Easter basket without taking over the whole thing.
- Minimal color changes: The neutral gray and pink palette keeps things straightforward, with no constant yarn swapping to slow you down.
What You'll Need
Most of the yardage goes into the main color, and the other three are really just small amounts you might already have sitting around.
- DK weight cotton yarn, four colors: For amigurumi I really do reach for cotton over acrylic most of the time. It holds its shape better, the stitch definition is cleaner, and it doesn't have that stretch that can make your stuffed pieces look a little lumpy or uneven. You'll want about 100 g of your light blue purple for the main body work, around 50 g of medium pink for the ear inner parts and nose embroidery, and just small scraps of dark gray and off white for the eyes, mouth, eyelashes, and tail pompom.
- 4.5 mm / US 7 crochet hook: A slightly smaller hook than you'd typically pair with DK weight keeps your stitches tight enough that the stuffing doesn't show through.
- Poly stuffing: You'll be stuffing the head, body, and legs as you go, so keep the bag close. Don't wait until the opening is almost closed to start adding it.
- Pompom maker: This is for the tail. Optional, the hand method works fine, but a pompom maker does give you a rounder, more even result with less fussing around.
- Also needed: stitch marker, tapestry needle, scissors
Color Sequence & Yarn Changes
The dark gray and off white are both used within the eye rounds, so you'll be switching between them mid-round rather than at the end of a round. It's worth leaving a longer tail when you join those colors so you have enough yarn to weave in cleanly later without the ends working loose.
Project Summary
Everything you need to know before you start your first stitch.
| Skill Level | Level 2 — Easy |
| Pattern Gauge | 16 sc = width 10 cm / 4'' |
| Finished Size | Height: approx. 11 cm / 4½'' |
| Yarn Weight | 3 Light / DK |
| Fiber | 100% Cotton |
| Terminology | US |
Abbreviations & Stitches Used
Keep this list open while you work.
- beg = beginning
- ch = chain
- dc = double crochet
- hdc = half double crochet
- sc = single crochet
- sl st = slip stitch
- st(s) = stitch(es)
- tog = together
- tr = treble crochet (US)
- 2 sc tog = single crochet 2 stitches together (decrease)
- Sc2tog = single crochet 2 stitches together (decrease)
Special Stitches
- 2 sc tog: Insert hook in next st, yo and pull up a loop; insert hook in next st, yo and pull up a loop; yo and pull through all 3 loops on hook.
The Critical Details
The head/body and legs are worked in the round in a continuous spiral. I don't join at the end of each round. Instead, after the last sc of a round, I just continue straight into the next round with 1 sc in the next st, and that becomes the first sc of the new round. Place a stitch marker at the beginning of each round, between the last sc and the first sc, and move it up as you go. That's the only way to keep track of where you are.
The ears and eyes are worked differently. Every row and round begins with 1 ch, and that chain does not replace the first sc. Finish each round with 1 sl st into that first ch. So the construction method actually changes between pieces, which is worth knowing before you get started.
The Oscar Easter Crochet Pattern Pattern Steps
Here's how I work through each piece of Oscar, from the top of his head down to his little pompom tail.
Head and Body
This is the main piece of Oscar, worked in the round from the top of the head downward. You'll increase out to full size, work a long even section for the body, then decrease back down to close everything up.
Round 1: With light blue purple, ch 3 and form a ring with 1 sl st in first ch. Work 6 sc in circle. [6]
Round 2: 2 sc in every sc. [12]
Round 3: *1 sc in next sc, 2 sc in next sc* repeat around. [18]
Round 4: *1 sc in each of the next 2 sc, 2 sc in next sc* repeat around. [24]
Round 5: *1 sc in each of the next 3 sc, 2 sc in next sc* repeat around. [30]
Round 6: 1 sc in every sc. [30]
Round 7: *1 sc in each of the next 4 sc, 2 sc in next sc* repeat around. [36]
Round 8: 1 sc in every sc. [36]
Round 9: *1 sc in each of the next 5 sc, 2 sc in next sc* repeat around. [42]
Rounds 10–17: 1 sc in every sc. [42] These eight even rounds form the body. Keep your tension consistent through here.
Round 18: *1 sc in each of the next 19 sc, 2 sc tog* repeat once more. [40] This is a very gentle decrease — just two decreases across the whole round, so the shaping starts gradually.
Round 19: *1 sc in each of the next 3 sc, 2 sc tog* repeat around. [32]
Round 20: 1 sc in every sc. [32]
Round 21: *1 sc in each of the next 2 sc, 2 sc tog* repeat around. [24]
Round 22: 1 sc in every sc. [24]
Round 23: *1 sc in next sc, 2 sc tog* repeat around. [16]
Round 24: 1 sc in every sc. [16]
Fill the bunny with some poly stuffing.
Round 25: Sc2tog around. Finish with 1 sl st in next sc. Cut the thread and pull it through the remaining sts and tighten tog, fasten tightly. [8] After stuffing, work this final decrease round and then close the opening by threading the tail through all remaining loops and pulling snug.
Cut the thread and pull it through the remaining sts and tighten tog, fasten tightly.
Legs
Make 4. Each leg is worked in the round starting from a small circle, the same way you started the head. They're simple little tubes and they go quickly once you've made the first one.
Round 1: With light blue purple, ch 3 and form a ring with 1 sl st in first ch. Work 6 sc in the circle. [6]
Round 2: 2 sc in every sc. [12]
Rounds 3–6: 1 sc in every sc. [12]
Fill leg with some poly stuffing.
Round 7: Sc2tog around. Finish with 1 sl st in next sc. Cut the yarn and pull it through the remaining sts and tighten tog, fasten tightly. [6] Stuff before you close this round — once you've worked the decreases it's too tight to get filling in.
Cut the yarn and pull it through the remaining sts and tighten tog, fasten tightly.
Ears — Outer
Make 2. These are worked back and forth in rows rather than in the round. You'll start narrow, increase out to a flat strip, work a long straight section, then decrease back down to a point at the tip.
Row 1: With light blue purple, ch 5. Turn and sc in 2nd ch from hook, sc in each of the next 3 ch. [4]
Row 2: Ch 1. 2 sc in first sc, 1 sc in each of the next 2 sc, 2 sc in next sc. [6] The ch 1 at the start of each row turns your work but does not count as a stitch here.
Rows 3–21: Ch 1. 1 sc in every sc. [6] Nineteen straight rows. This is the long body of the ear.
Row 22: Ch 1. 2 sc tog, 1 sc in each of the next 2 sc, 2 sc tog. [4]
Row 23: Ch 1. 1 sc in every sc. [4]
Row 24: Ch 1. Sc2tog twice. Fasten off. [2]
Fasten off.
Ears — Inner
Make 2. Work another part in medium pink the same way. The inner ear is identical in construction to the outer ear — same row count, same shaping — just in a different color. These two pieces will be joined together in the next section.
Row 1: With medium pink, ch 5. Turn and sc in 2nd ch from hook, sc in each of the next 3 ch. [4]
Row 2: Ch 1. 2 sc in first sc, 1 sc in each of the next 2 sc, 2 sc in next sc. [6]
Rows 3–21: Ch 1. 1 sc in every sc. [6]
Row 22: Ch 1. 2 sc tog, 1 sc in each of the next 2 sc, 2 sc tog. [4]
Row 23: Ch 1. 1 sc in every sc. [4]
Row 24: Ch 1. Sc2tog twice. Fasten off. [2]
Fasten off.
Joining the Ear Pieces
Now you work the two ear pieces together using light blue purple. Place the outer and inner ear pieces together with the medium pink side facing up, and work through both layers at once to join them and create a neat edging around the entire ear.
Starting at the cast-on edge, work 1 sc in each of the first 4 sts on the cast-on edge, then 1 sc in every row along the side, then 2 sc + 3 ch + 2 sc around the tip of the ear to turn the corner, then 1 sc around every row back down the other side. Working through both layers at once is what bonds the two pieces together — keep your tension even so the ear lies flat. The 3-chain corner at the tip gives a clean point without puckering.
Fasten off.
Eyes
Make 2. Each eye starts with a small dark gray center ring, then you switch to off white and work a shaped round using a mix of stitch heights to create the oval eye shape.
Round 1: With dark gray, ch 3 and form a ring with 1 sl st in first ch. Ch 1. Work 6 sc in ch-ring. Switch to off white. Finish round with 1 sl st in first ch. [6] Switch to off white before that final slip stitch so the join blends into the off white section cleanly.
Round 2: Ch 1. 2 sc in first sc, 1 sc + 1 hdc in next sc, 1 dc + 2 tr in next sc, 2 tr + 1 dc in next sc, 1 hdc + 1 sc in next sc, 2 sc in next sc. Fasten off. [14] The progression from sc through hdc, dc, and tr across the round is what shapes the eye — the taller stitches in the center create the oval. Work each stitch into its own stitch unless two are listed for the same sc, in which case both go into that single stitch.
Fasten off.
Tail
Make 1 pompom with an approx. diameter of 4 cm / 1½'' with off white. A cardboard pompom maker or the two-finger wrap method both work fine here. Tie it off tightly in the center so it holds its shape, and trim it into a neat round before attaching.
Fasten off, weave in ends.
Finishing & Assembly
This is where Oscar actually comes together, and the order matters. I do the ears first, then legs, then face details, then the tail.
For the ears: place the cast-on edge of each ear edge to edge with the 4th round on the head, one on each side, and fasten with neat little stitches. I also sew a few cm / ½'' down along the edge of each ear on the back of the head to hold them in place and keep them from flopping forward. That little extra line of stitching makes a real difference in how the ears sit.
Sew the legs under the body. Space them evenly — two at the front and two at the back — and make sure the closed end of each leg faces downward. Sewing through the flat closed top of each leg and into the body gives a secure attachment.
For the eyes: sew each one on with neat little stitches on the back to avoid visible stitches on the front of the eye. Once each eye is secured, sew 4 stitches on each eye with dark gray for eyelashes. I bring the needle up from behind the head, work the lash stitches, and finish off at the back so there's nothing visible from the front.
Embroider the nose with medium pink and the mouth with dark gray. A simple satin stitch works well for the nose — a small oval or triangle shape, just a few threads wide. For the mouth, two short straight stitches meeting at a center point give a clean result. Take your time with placement before committing the first stitch.
Finally, sew the tail to the back. Center it and stitch through the tied-off center of the pompom and into the body a few times so it sits firmly and doesn't pull away with handling.
Baby & Child Safety Notes
Oscar is an amigurumi toy, so if he's going to a young child, a few things are worth thinking about. The eyes in this pattern are embroidered and crocheted rather than plastic safety eyes, so there are no hard pieces to work loose — that's already a good starting point. Even so, check that all sewn-on pieces (eyes, ears, legs, tail) are fastened very securely before handing the toy to a child under three. The pompom tail in particular should be tied and sewn tightly, since loose fibers can be a hazard. Weave in all ends thoroughly and trim them close so there are no long tails to pull on.
Frequently Asked Questions
What hook size do you use for Oscar?
I use a 4.5 mm hook for this one. It gives a tight enough fabric that the stuffing doesn't show through, which matters a lot with amigurumi this small.
What yarn weight works best for this pattern?
DK weight is what I reach for here. It keeps Oscar at that approx. 11 cm finished size. Go heavier and he'll come out noticeably bigger, lighter and he starts to feel a bit flimsy for a stuffed piece.
How firmly should I stuff Oscar?
I stuff mine pretty firmly, especially the body. If you go too light, he won't hold his shape and the sides start to cave in a little. Not a disaster, but it looks better packed.
Is this pattern suitable for a beginner?
It's listed as Level 2, so there's a small step up from absolute beginner. If you've crocheted in the round before and you're comfortable with increases and decreases, you'll be fine. First-time crocheters might want one simpler project under their belt first.
How long does Oscar take to make?
For me, a couple of hours in one sitting. The finished size is only about 4.5 inches tall, so the pieces work up fast. Assembly takes a bit of time if you're being careful about placement, so I wouldn't rush that part.
Final Thoughts
Oscar is one of those quick makes that punches above its weight come Easter basket time, and I keep coming back to this one every spring. If you make him, I'd love to see how yours turns out. Tag me on Instagram or drop a photo in the comments below. And if you want to save this for later, pinning it to your Easter crochet board is the easiest way to find it again when the season rolls around.


Leave a Reply