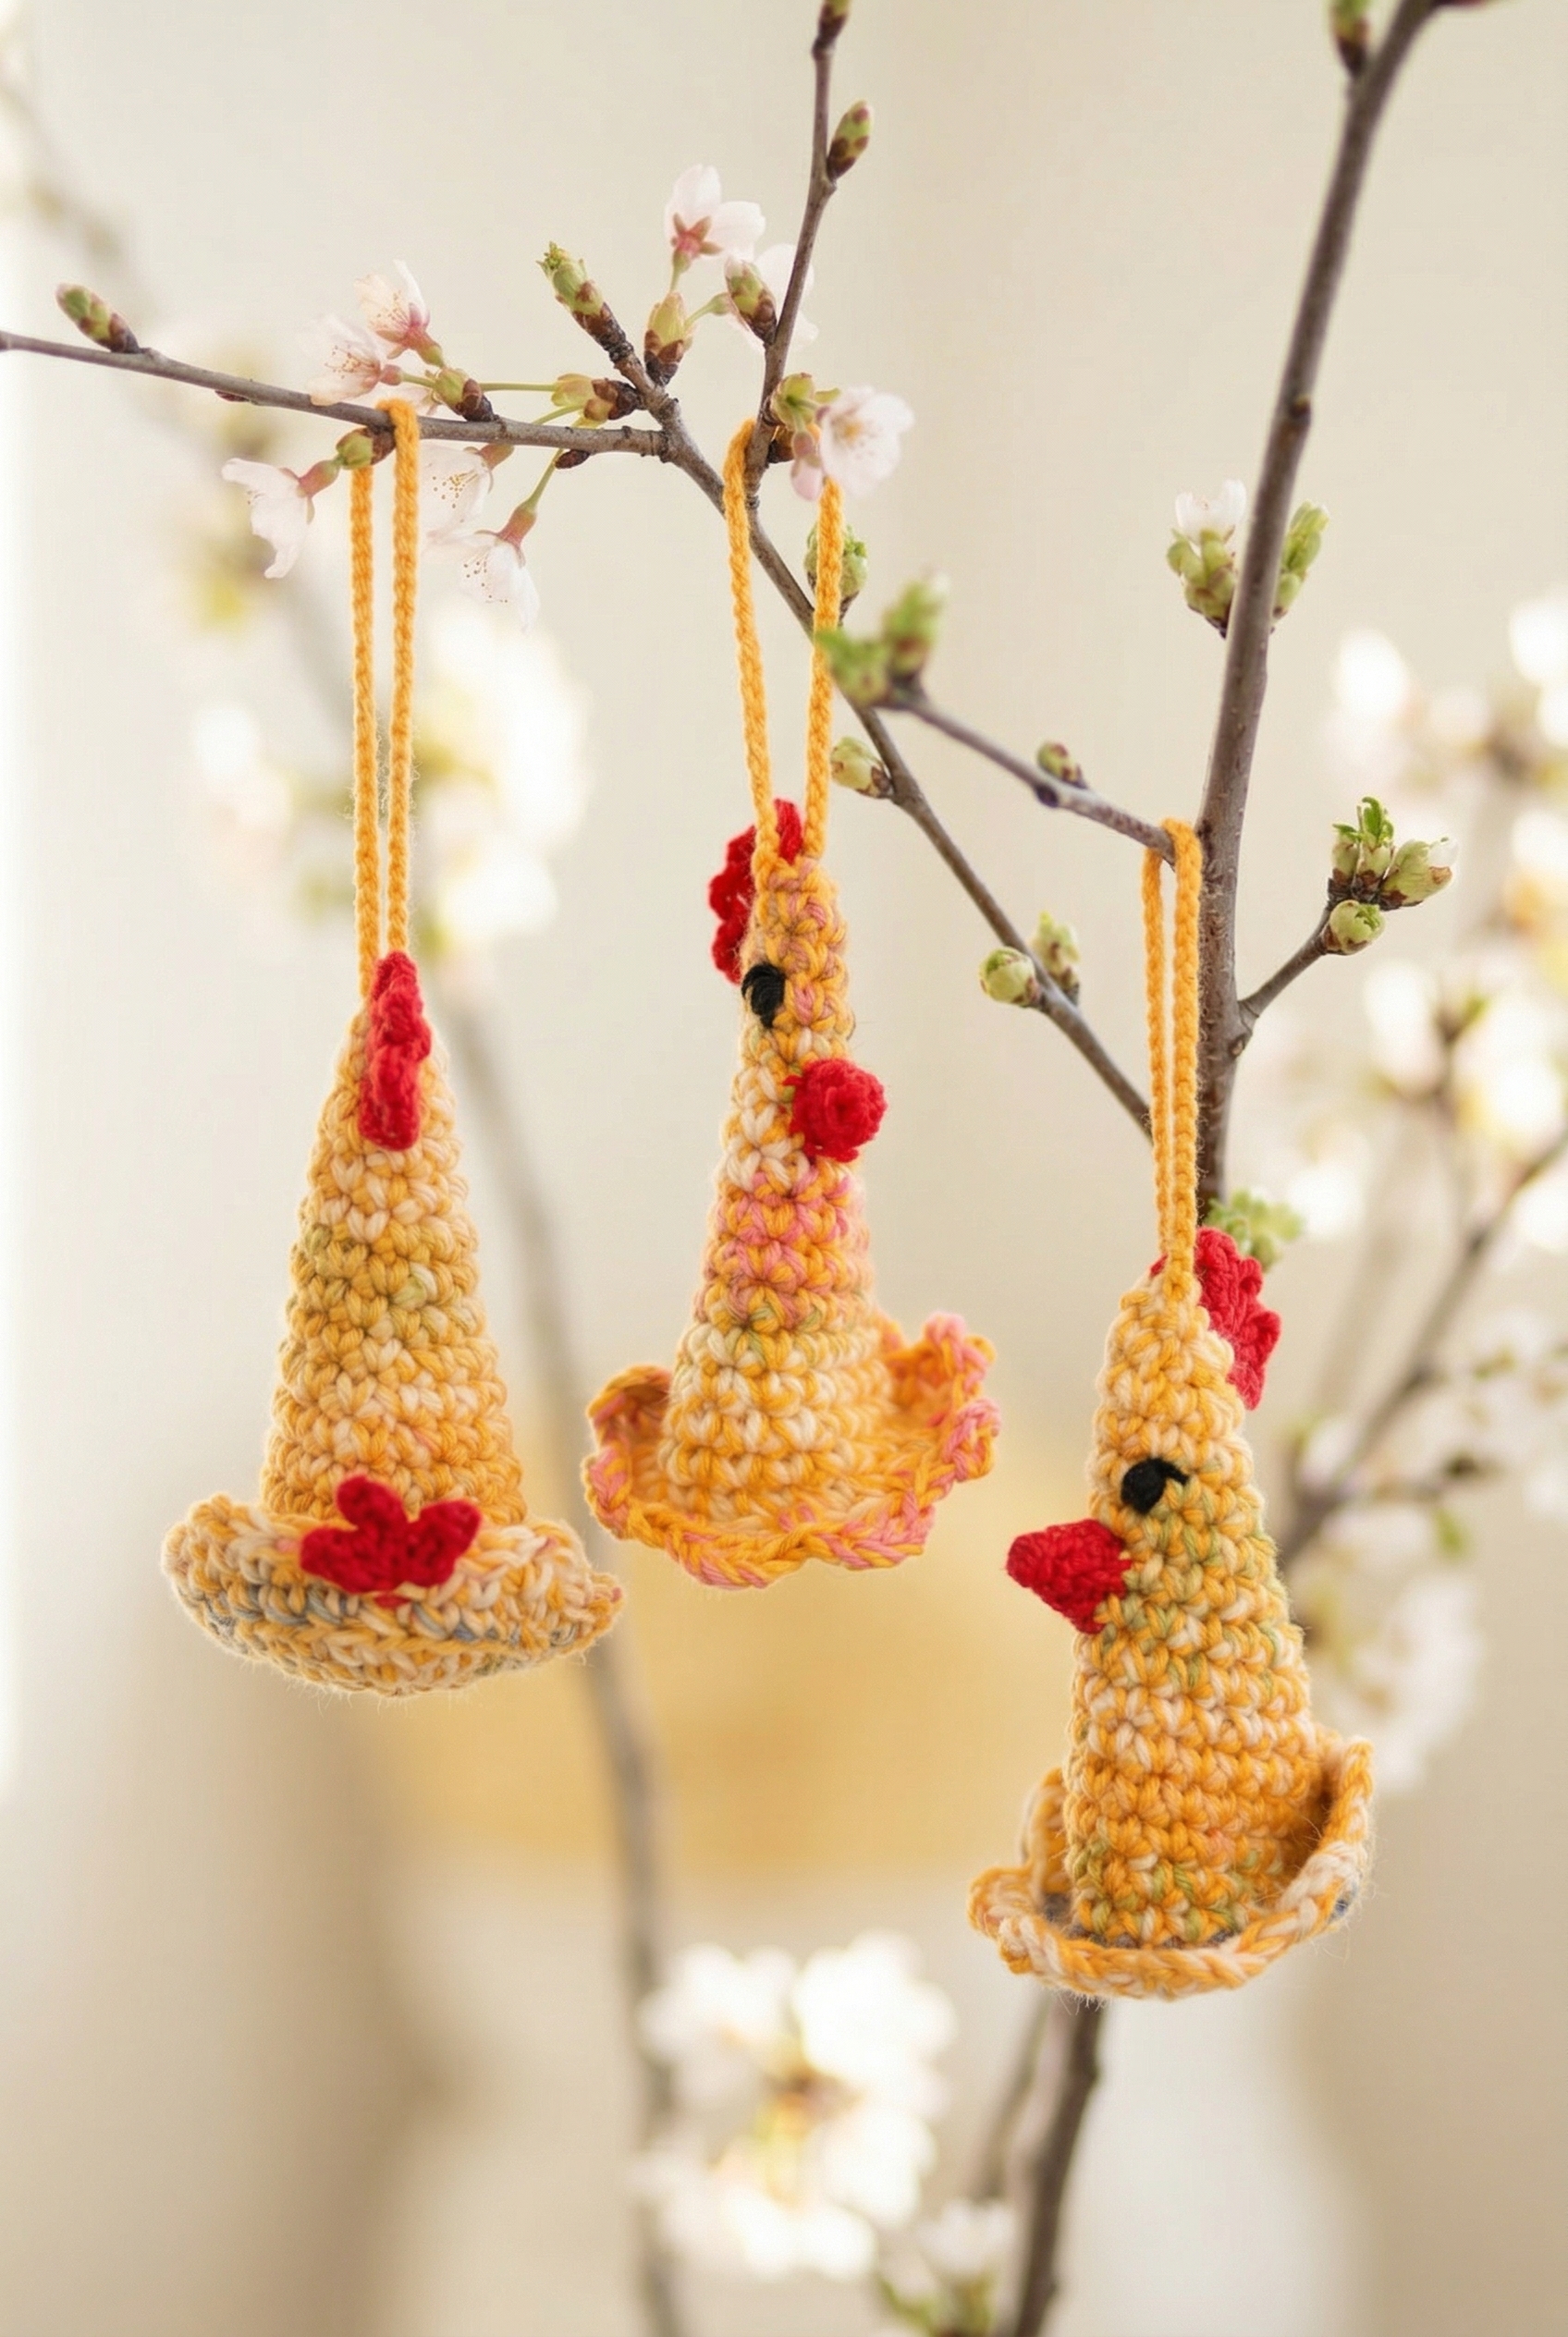
This free Easter Chicken Crochet Pattern gives you a pair of sweet little hanging ornaments that are perfect for decorating your home at Easter, filling a basket, or gifting to someone who appreciates a handmade touch.
These hang beautifully alongside my Easter egg ornaments on a branch or Easter tree. If you want a stuffed version instead, my chicken crochet pattern is perfect for filling a basket underneath.

Jump to:
Behind the Pattern
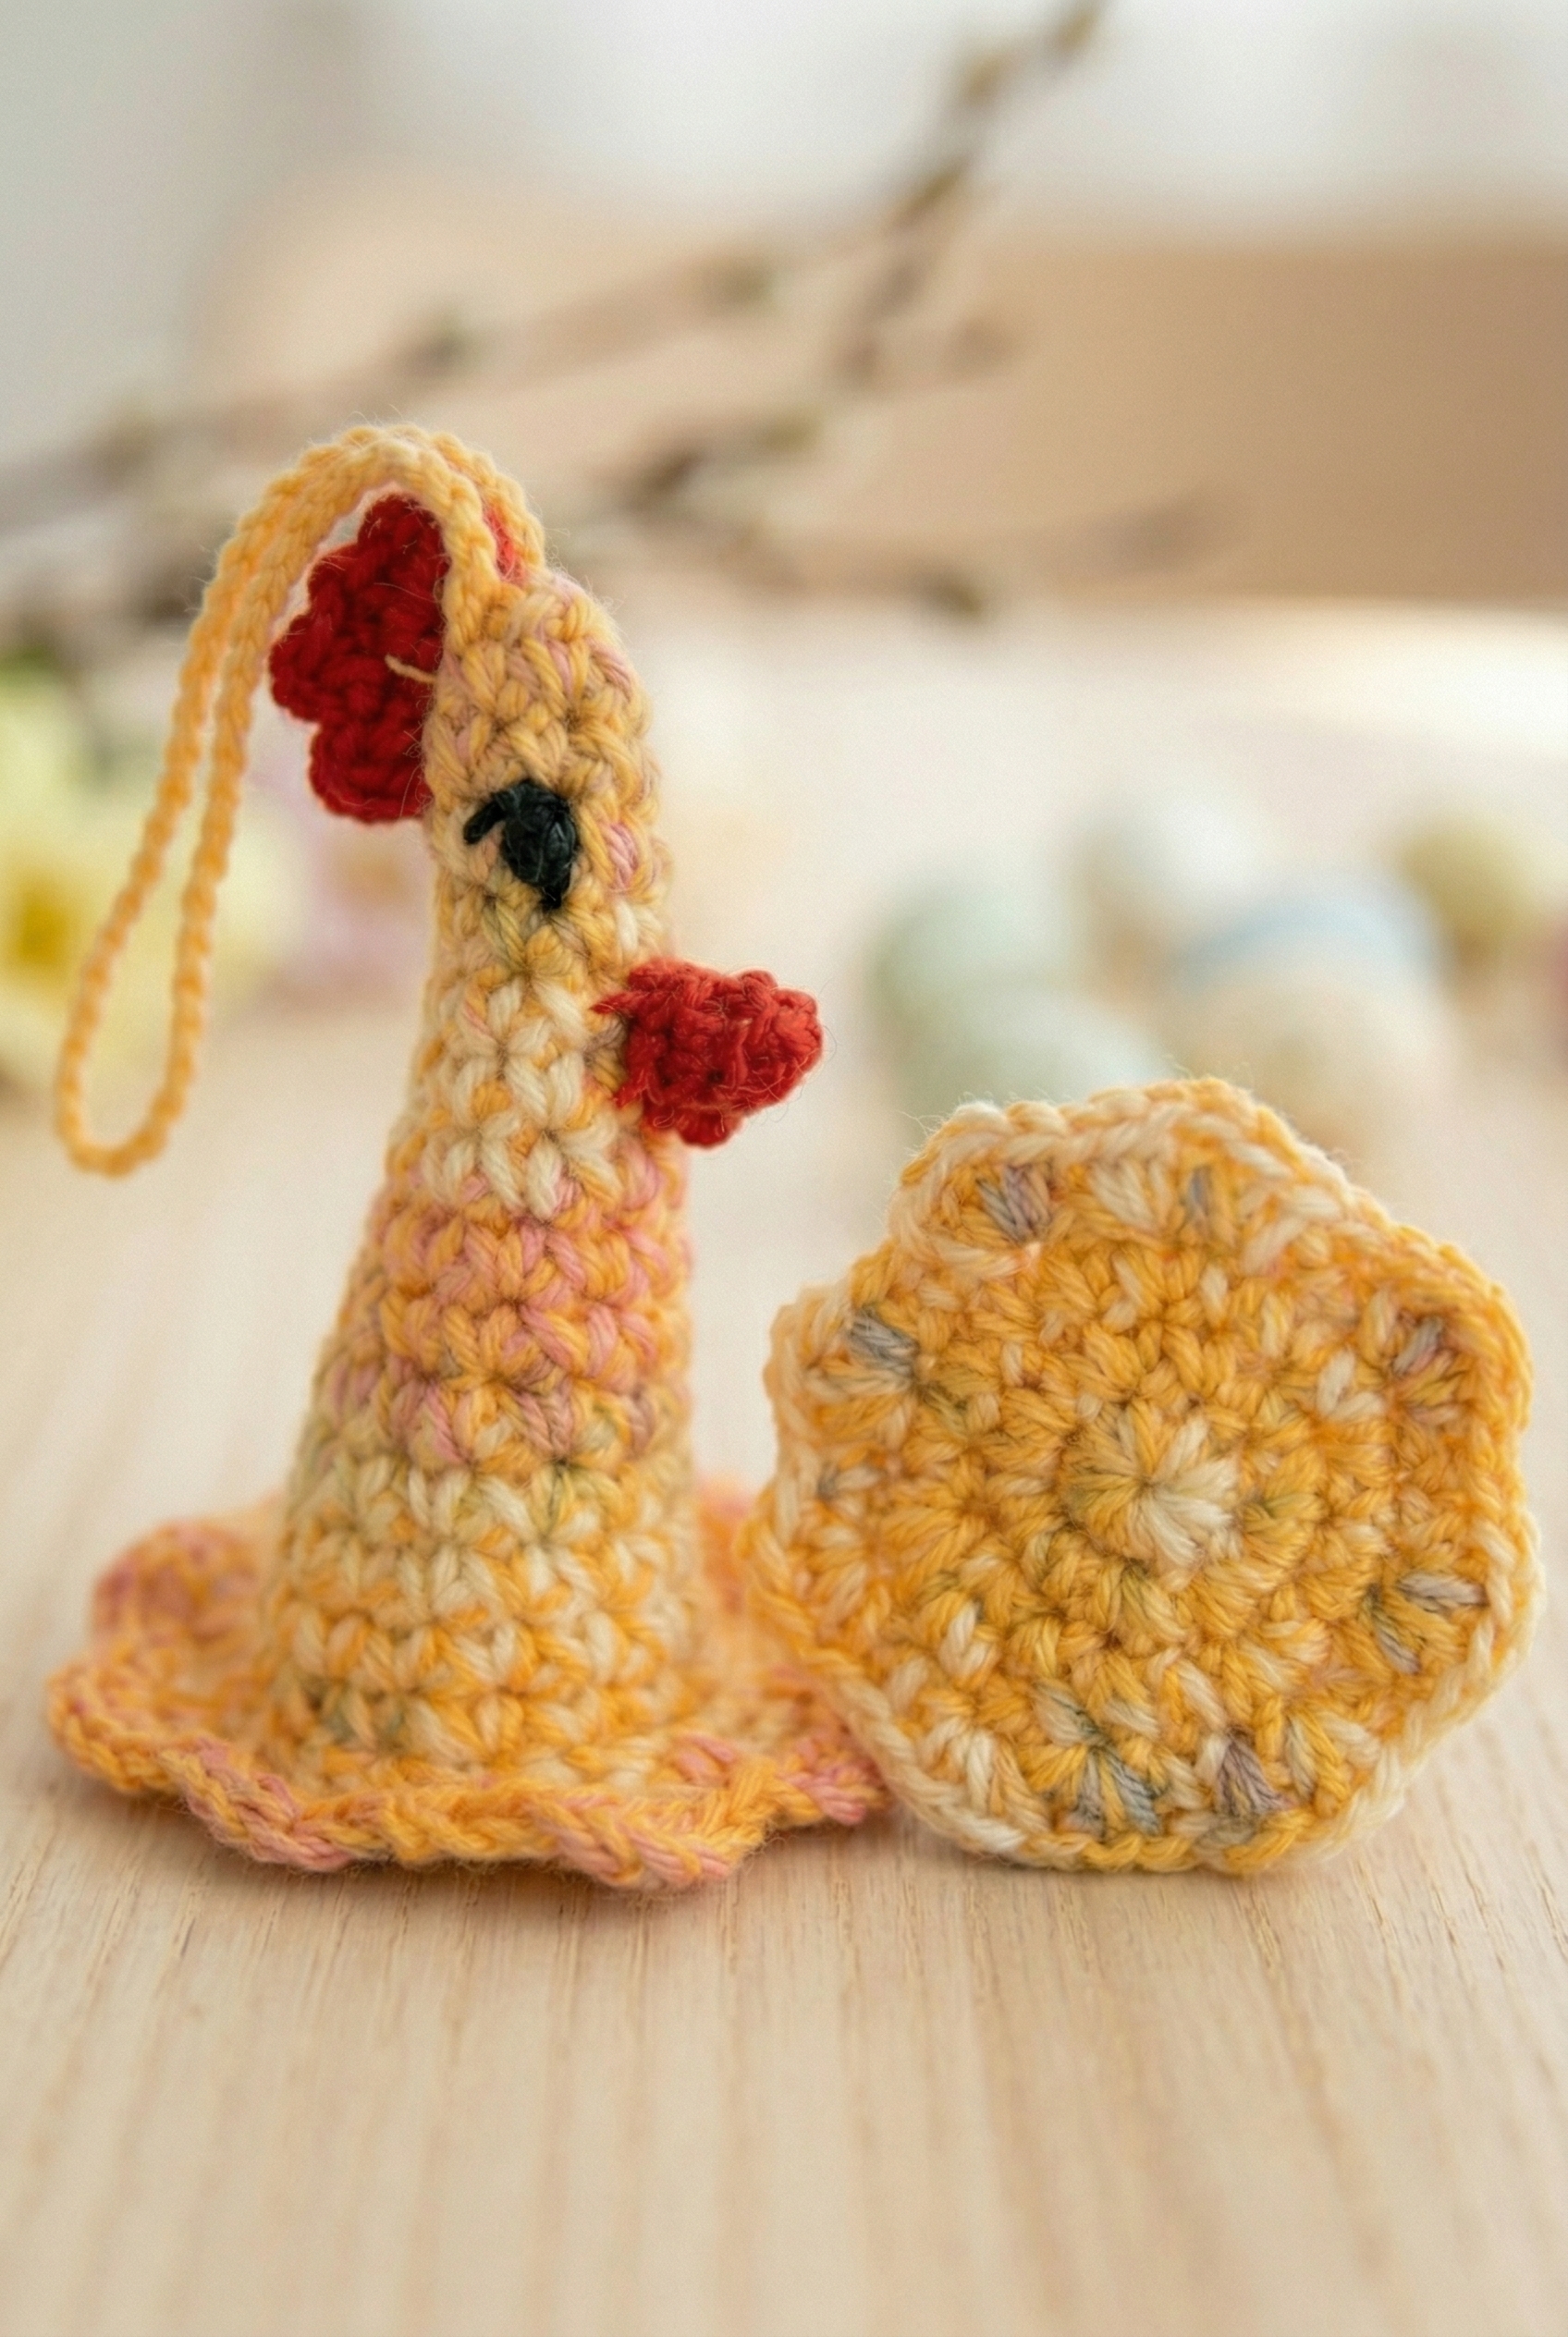
These little chickens came together pretty quickly, and I'm really pleased with how they turned out. Each one has a cone-shaped body worked in variegated yarn that shifts through yellow, cream, and pale pink, so no two look exactly the same. The red comb and beak give them that instantly recognizable chicken look, and the small black eyes stitched onto the sides add a lot of character for very little effort. They each sit in a shallow, ruffled nest base with a scalloped edge, and there's a simple loop at the top so you can hang them wherever you like.
I designed these as ornaments, but honestly they work just as well sitting in a little bowl or nestled into an Easter display. The variegated yarn does a lot of the visual work for you, so there's that.
What Makes This Pattern Special
The variegated yarn does the decorating for you, no color changes required.
- Beginner-friendly shaping: The cone body is worked in simple rounds, so there's no complicated construction to follow.
- Built-in variety: Variegated yarn means each chicken comes out looking a little different, even from the same skein.
- Doubles as a decoration: The hanging loop makes these just as useful as ornaments as they are as toys or basket fillers.
What You'll Need
Two colors are held together for the chicken body, so you'll want both wound and ready before you start.
- Fingering weight yarn, wool-blend and cotton: The chicken body uses two strands of fingering weight yarn held together the whole time, which is why I reach for a wool-blend for one and a cotton for the other. The wool-blend gives the fabric a little stretch and bounce, so the stuffed body holds its shape nicely, and the cotton keeps things crisp where it counts. You'll need about 50 g each of a yellow-pink mix and a strong yellow for the body and head, plus small remnants of black and red for the embroidered eyes, beak, and comb. The strong yellow does double duty on the strap and bottom border as well, so don't cut into it too soon.
- 3.5 mm (E/4) hook: This is the hook you'll use for the main body sections. Holding two strands of fingering weight together brings the fabric up to a workable thickness, and a 3.5 mm keeps the fabric tight enough that the stuffing doesn't show through.
- 2.5 mm (C/2) hook: The smaller hook is for the finer detail pieces. Fingering weight on a 2.5 mm gives you a dense little fabric, which matters a lot for small parts like the beak and comb where you want clean edges.
- Also needed: stitch marker, tapestry needle
Alternative Yarns
Held-together fingering weight is a slightly specific setup, so it's worth knowing what else works if you don't have a wool-blend and a cotton on hand at the same time.
- Two strands of fingering weight wool: If you skip the cotton entirely and just hold two strands of a plain fingering weight wool together, that works fine. The fabric will be a touch softer and stretchier overall, but for a small stuffed chicken that's not really a problem by any means.
- Fingering weight cotton for both strands: All-cotton held double is another option. It won't have quite the same springy feel, and cotton is a little less forgiving to work with at small gauges, but the finished piece will still look sharp and the colors tend to be very clear, so there's that.
Color Sequence & Yarn Changes
The yellow-pink mix and the strong yellow are always held together for the body and head sections, so think of them as one combined yarn rather than two separate colors making stripes or changes. The strong yellow then continues on its own for the strap and bottom border, still paired with the yellow-pink mix, so keep both balls accessible rather than cutting and weaving in early.
The Quick Stats
Everything you need to know before you pick up your hook.
| Skill Level | Level 2 — Easy |
| Pattern Gauge | Gauge is not critical for this project. Use a hook size that creates a tight, firm fabric so stuffing does not show through. |
| Finished Size | height approx 10 cm / 4" |
| Yarn Weight | 1 Super Fine / Fingering |
| Fiber | Fabel: 75% Wool, 25% Polyamide; Safran: 100% Cotton |
| Terminology | US |
Stitch Guide & Abbreviations
Keep this list close. You'll want it.
- beg = beginning
- ch = chain
- dc = double crochet
- sc = single crochet
- sl st = slip stitch
- st(s) = stitch(es)
- tog = together
- sc2tog = 2 sc tog (single crochet 2 together)
Special Stitches
- 2 sc tog (sc2tog): Insert hook in next st, yarn over, pull up a loop; insert hook in next st, yarn over, pull up a loop; yarn over, pull through all 3 loops on hook.
Helpful Tips
I work this chicken entirely in the round, starting from a chain ring. No flat pieces for the main body. The body and head are worked as one continuous piece using a held double strand: one strand of Fabel and one strand of yellow Safran together. That combination gives the fabric a nice density, which matters here since you'll be stuffing it.
In Round 2, place a stitch marker at the beginning of the round. That marker sits at mid back and stays relevant throughout. The decreases happen at that mid back point on every round, continuing until 5 sc remain. So don't lose track of it.
The strap is a separate step. I make it with a 2.5 mm hook in yellow and attach it to the opposite side of the head from the mid back marker. Worth noting that the hook size shifts for this piece specifically, so set your main hook aside when you get there.
Easter Chicken Crochet Pattern Instructions
Here's how I work through each piece of this little Easter chicken, from the body down to the finishing details.
The Chicken Body
This is the main piece — a small egg cozy worked in rounds that tapers closed at the top to form the chicken's head. I work it holding 1 strand of Fabel together with 1 strand of yellow Safran on a 3.5 mm (E/4) hook. Place a stitch marker at the beginning of Round 2, because that point becomes the mid back and you'll be returning to it every round for the decreases.
Round 1: With 1 strand Fabel + 1 strand yellow Safran and hook 3.5 mm (E/4), ch 24. Join with 1 sl st in first ch to form a ring. [24]
Round 2: Ch 1, *sc in next 3 ch, skip 1 ch* repeat around. Place a marker at beg of round = mid back. [18] The skips in this round are evenly spaced, so the tube closes in slightly and the fabric starts to take shape. Move your marker up each round so it always sits at the first stitch of the round.
Round 3: Sc in each sc. [18]
Round 4: Sc in each sc, but at mid back (at marker) work 2 sc tog (sc2tog). [17] This single decrease at the back is what shapes the top of the head without pulling the front out of line. Keep the marker on the sc2tog stitch so you always know where you are.
Round 5: Repeat the dec at mid back on every round until there are 5 sc left on round. [5] You're continuing to work sc in each stitch around, placing one sc2tog at the marker position each round. Keep going until only 5 stitches remain total.
Cut the Fabel strand, pull through remaining sts and tighten.
The Hanging Strap
After closing the top of the head, I switch to hook 2.5 mm (C/2) and continue working with just the remaining yellow Safran strand — the Fabel has already been cut. This strap lets the chicken hang as a decoration or sit over a basket handle.
Chain a length measuring approximately 20 cm / 8", then cut the yarn and attach it to the opposite side of the chicken's head, approximately 0.5–1 cm / ¼"–½" from where you started the chain. The attachment point matters here — too close and the loop won't sit evenly, so take a moment to find the spot directly across from your starting point before you fasten off.
Fasten off, weave in ends.
The Bottom Border
This decorative border runs along the cast-on edge at the bottom of the chicken, worked back into the foundation chain. I use 1 strand of Fabel held together with 1 strand of yellow Safran and the 3.5 mm (E/4) hook again. It gives the opening a finished, slightly scalloped edge.
Round 1: Sc in first sc, *ch 3, dc in first ch, skip 1 st, sc in next st* repeat around, finish with 1 sl st in first sc. The "dc in first ch" means you're working back into the first of the 3 chains you just made — this creates a small picot point at each repeat. Keep your tension relaxed here so the border lies flat rather than pulling inward.
Fasten off, weave in ends.
The Comb
The comb sits along the top of the head, worked in rows with red Safran and the 2.5 mm (C/2) hook. I crochet it directly from the top of the head and down along the mid back, so there's no separate piece to sew on later.
Row 1: Sc 5, turn. [5]
Row 2: Ch 3, dc in first sc, sc in next sc, *ch 3, dc in same sc, sc in next sc* repeat from *-* a total of 3 times. The repeat clause here is specific: after the first ch-3/dc/sc set, you work the brackered repeat 3 more times. That gives you 4 comb points total across the row. "Dc in same sc" means you're working back into the same stitch as the sc you just made, not advancing to the next one.
Cut and fasten yarn.
The Beak
The beak is a small separate piece worked in rounds with red Safran and the 2.5 mm (C/2) hook. It starts as a small ring and decreases down to a tight point.
Round 1: Ch 12. Join with 1 sl st in first ch to form a ring. [12]
Round 2: Ch 1, *skip 1 ch, sc in each of next 3 ch* repeat around, finish with 1 sl st in first ch. [9]
Round 3: Ch 1, *skip 1 sc, sc in each of next 2 sc* repeat around, finish with 1 sl st in first ch. [6]
Round 4: Ch 1, *skip 1 sc, sc in next sc* repeat around, finish with 1 sl st in first sc. [3] At this point the beak has pulled into a small, firm point. Leave a tail long enough to sew it onto the chicken.
Cut yarn and sew beak to front of chicken.
The Eyes
Simple embroidered eyes are all this chicken needs. I use black yarn for this.
Embroider 2 eyes with black. Position them symmetrically on either side of the beak before committing to the placement — a stitch marker or pin can help you find the right spot.
Fasten off, weave in ends.
Finishing
Once all the pieces are done, it comes together quickly. The head is already closed — I cut the Fabel strand after Round 5, pull it through the remaining 5 stitches, and pull tight to close the top. That's the first thing I do before moving on to anything else, so the body is fully shaped before I start attaching details.
For the beak, I sew it to the front of the chicken using the tail I left when cutting the yarn. I position it centered on the front face, just below where the head rounds over. A yarn needle and a few secure stitches through the base of the beak into the body fabric is all it takes. I knot the tail on the inside and weave it in.
The strap gets attached last, or close to it. After chaining the approximately 20 cm / 8" length, I attach the free end to the opposite side of the chicken's head, approximately 0.5–1 cm / ¼"–½" from where the chain began. I find the spot by holding the chain across the top of the head and marking where it lands naturally. Fasten off and weave in both strap ends.
The eyes go on after the beak is in place, so I can judge the spacing relative to it. I embroider 2 small eyes in black, one on each side. A couple of satin stitches worked close together gives a solid dot. Fasten off and weave in the ends on the inside of the body.
Baby & Child Safety Notes
This chicken is intended as a decoration or egg cozy, not a toy. The embroidered eyes are safe for small children since there are no hard plastic parts, but the strap loop is a strangulation hazard and the piece should be kept out of reach of babies and young children. If you're giving this as a gift to a household with little ones, just flag that it's for display, not play.
Frequently Asked Questions
What yarn weight works best for this Easter chicken?
I use fingering weight yarn (size 1 super fine) for this one. It's what gives the finished chicken that neat, defined stitch look at such a small size. A heavier yarn will make it come out noticeably larger than the 10 cm height, so if you want it to match the pattern, stick with fingering.
Why does this pattern use two different hook sizes?
The 3.5 mm hook is for the main body sections, and the 2.5 mm hook is for the smaller details. Using a tighter hook on the smaller pieces keeps everything proportional on a toy this little. Swapping them by accident is easy to do, so I keep them both out on the table so I don't grab the wrong one.
How big does the finished chicken come out?
Mine came out right around 10 cm tall, which is about 4 inches. It's a pretty compact little thing. Stuffing tension can affect this slightly, so if yours is coming out bigger or smaller, your gauge or stuffing firmness is probably the reason.
Is this pattern suitable for a beginner?
It's listed as Level 2, so there's a small step up from absolute beginner territory, but nothing dramatic. If you've finished at least one or two small amigurumi projects before, you'll be fine here. Someone crocheting their very first toy might find the assembly a bit fiddly, so that's worth knowing going in.
Can I make this chicken as a gift or sell finished items?
For personal gifting, go for it. If you're looking to sell finished chickens, check the licensing terms in the pattern itself, as those details are specific to each designer and I don't want to speak for them on that.
Now It's Your Turn!
I'd love to see how your little Easter chicken turns out, so if you make one, tag me on social media or drop a photo in the comments below. These are the kind of small makes that are SO satisfying to finish in a single sitting, and I think they look absolutely adorable lined up in a little Easter basket. If you're saving this for later, go ahead and pin it to your Easter crochet board so you can find it again when the season rolls around. And if you have questions I didn't cover above, just ask in the comments. I check them and I'll do my best to help.


Leave a Reply