
This Reindeer Amigurumi Crochet Pattern is genuinely one of those projects that comes together faster than you expect and ends up looking so much cuter than you planned for. Perfect for the holidays, perfect as a handmade gift, perfect for absolutely no reason at all.

Jump to:
About the Design
What I really love about this one is how the construction works. The body comes together in separate pieces that you sew on at the end, and there's something so satisfying about that process. You finish each little part, set it aside, and then watch the whole thing come to life when you start assembling. It feels like a puzzle in the best way.
This is the kind of project I'd make for a kid on a Christmas list, honestly. Or as a little handmade ornament for someone who appreciates that sort of thing. It's small enough to finish in a sitting or two, which makes it really practical when the holiday crunch hits and you've got a list of people to make things for.
Why This Pattern Stands Out
A beginner-friendly holiday amigurumi you can actually finish before December 25th.
- Beginner Friendly: No advanced techniques here, so it's a great first amigurumi if you've been on the fence about trying one.
- Quick to Complete: The small size means you can realistically finish this in one or two crochet sessions.
- Great for Gifting: Handmade amigurumi make genuinely thoughtful gifts, especially for kids or anyone who collects cute things.
- Holiday Versatility: Works as a gift, a decoration, a stocking stuffer, or just a fun seasonal make for yourself.
- Technique Practice: Assembling the separate pieces is a solid way to get comfortable with sewing amigurumi parts, a skill that carries over to every future project.
Your Supply List
Most of what you need is probably already in your stash, especially if you work with DK weight regularly.
- DK or Light Worsted Weight Yarn in Purple and Pink: A DK cotton or bamboo blend works really well for amigurumi this size. It holds its shape without being stiff, and the stitch definition makes those color-change rounds read cleanly. You'll need a decent amount of both purple and pink for the main body, so plan on at least 100–150 yards of each as a rough starting point, plus small amounts of dark pink or red and black for the embroidered details.
- 3.50–4.00 mm Crochet Hook: This range keeps the fabric tight enough that stuffing won't show through the gaps, which matters a lot with lighter-colored yarns like pink. Start at 3.75 mm and adjust based on how your tension runs.
- Toy Stuffing or Yarn Scraps: Either works. Stuff as you go on the body, especially once you're past the widest rounds and the opening starts to close up. Yarn scraps are a perfectly fine substitute if you don't keep polyfil on hand.
- Also needed: yarn needle, scissors, stitch marker
Color Sequence & Yarn Changes
Purple and pink alternate through Rounds 8–22, and the good news is you don't have to cut and rejoin every time. Carry the unused color loosely along the inside of the work as you go. It saves a lot of ends to weave in later, and the floats stay hidden inside the stuffed body anyway.
Quick Details
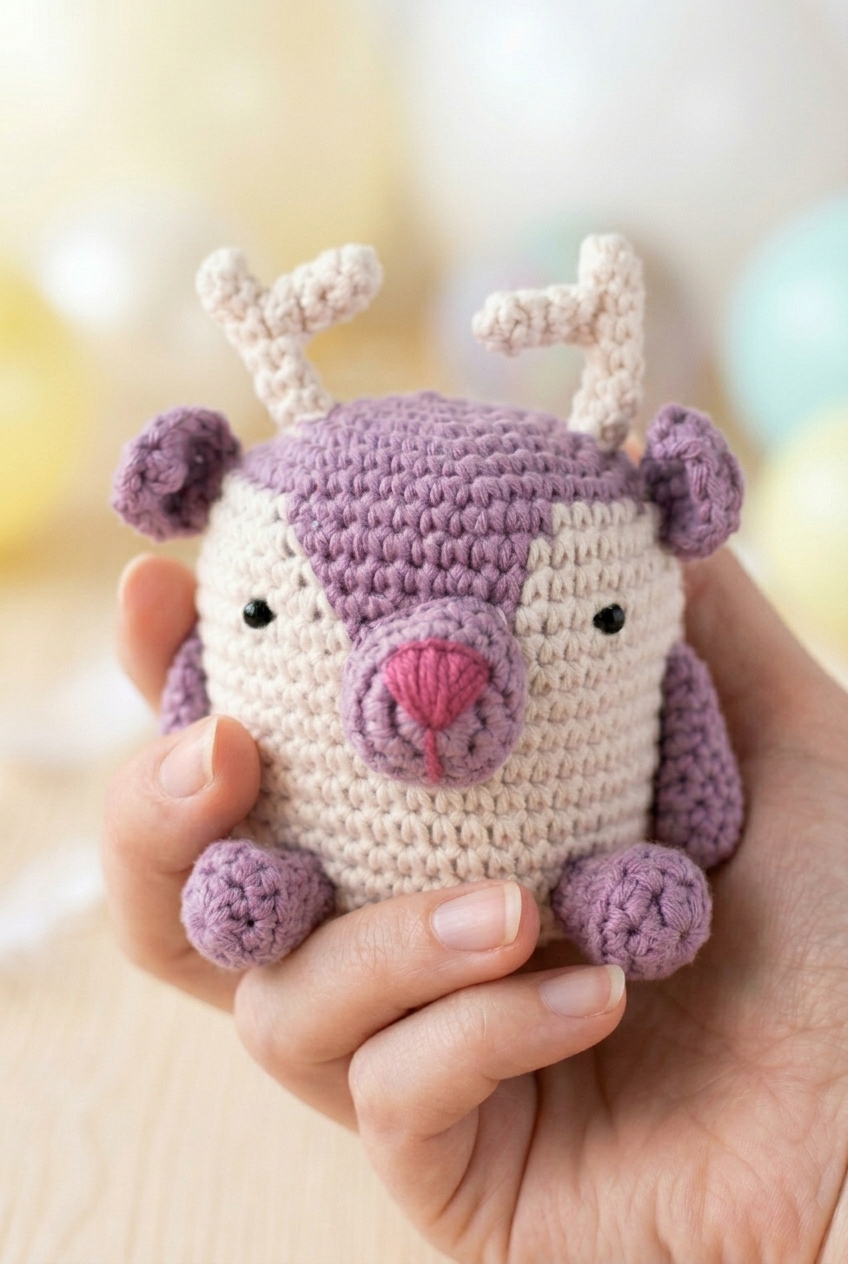
A stuffed amigurumi reindeer worked in DK weight yarn with color changes, separate antler tubes, and a BLO hoof ridge.
| Skill Level | Beginner |
| Pattern Gauge | Gauge is not critical for this project. Use a hook size that creates a tight, firm fabric so stuffing does not show through. |
| Yarn Weight | 3 Light / DK |
| Fiber | Not specified (cotton or bamboo works well) |
| Terminology | US |
Stitch Guide & Abbreviations
All standard stitches you've probably used before, plus one decrease.
- ch = chain
- sl st = slip stitch
- st(s) = stitch(es)
- sc = single crochet
- hdc = half double crochet
- dc = double crochet
- sc2tog = single crochet 2 together (decrease)
- BLO = back loop only
- * * = repeat between asterisks as stated
The Critical Details
A few things worth knowing before you start. During the color-change rounds (Rounds 8–22), carry the unused color loosely along the inside rather than cutting and rejoining every round. It saves a lot of ends and keeps the inside tidy enough. The BLO round on the feet (Round 3) is what creates that little ridge defining the top of the foot and hoof, so don't skip it even if it feels fiddly at that scale.
The antlers are each made of two tubes: a longer one and a shorter one, sewn together at an angle. You'll make them separately and attach them once the head is assembled. If you prefer a magic ring over the ch-4 loop method, you can swap that in at any point in the pattern.
I work this project in continuous rounds throughout. Do not join rounds unless the instructions specifically say to. A stitch marker in the first stitch of each round will keep you from losing your place, especially during the decrease rounds near the end of each piece. Stuff firmly as you go rather than all at once at the end. It's much easier to get even shaping that way, and you won't be fighting the opening to get stuffing in later.
Reindeer Amigurumi Crochet Pattern Instructions
Work through each piece in order, then bring your reindeer together at the end.
Main Body
The body is worked in the round from the bottom up, starting in purple for the first seven rounds before the color work begins. Do not join rounds — you're working in a continuous spiral throughout. The color changes in rounds 8–22 build the pink patch across the belly, so keep your bobbins or yarn lengths ready before you start round 8.
Round 1: In purple, ch 4, sl st in first ch to form a loop, 7 sc in center of loop. [7 sc] Do not join rounds.
Round 2: 2 sc in each st around. [14 sc]
Round 3: 1 sc in next st, 2 sc in next st repeat to end. [21 sc]
Round 4: 1 sc in next 2 sts, 2 sc in next st repeat to end. [28 sc]
Round 5: 1 sc in next 3 sts, 2 sc in next st repeat to end. [35 sc]
Round 6: 1 sc in next 4 sts, 2 sc in next st repeat to end. [42 sc]
Round 7: 1 sc in next 5 sts, 2 sc in next st repeat to end. [49 sc]
Round 8: 1 sc in first 14 sts, join pink in end of last st, 1 sc in next 6 sts, join purple in end of last st, 1 sc in next 10 sts, join pink in end of last st, 1 sc in next 6 sts, join purple in end of last st, 1 sc in last 13 sts. [49 sc] This is where the color work starts. Each color join happens at the end of the last stitch before the switch — pull the new color through on that final yarn over so the transition sits cleanly.
Round 9: 1 sc in first 13 sts, join pink in end of last st, 1 sc in next 8 sts, join purple in end of last st, 1 sc in next 8 sts, join pink in end of last st, 1 sc in next 8 sts, join purple in end of last st, 1 sc in last 12 sts. [49 sc]
Round 10: 1 sc in first 12 sts, join pink in end of last st, 1 sc in next 10 sts, join purple in end of last st, 1 sc in next 7 sts, join pink in end of last st, 1 sc in next 10 sts, join purple in end of last st, 1 sc in last 10 sts. [49 sc]
Round 11: 1 sc in first 12 sts, join pink in end of last st, 1 sc in next 11 sts, join purple in end of last st, 1 sc in next 5 sts, join pink in end of last st, 1 sc in next 12 sts, join purple in end of last st, 1 sc in last 9 sts. [49 sc]
Round 12: 1 sc in first 12 sts, join pink in end of last st, 1 sc in next 29 sts, join purple in end of last st, 1 sc in last 8 sts. [49 sc] By round 12 the two pink sections have merged into one continuous patch.
Round 13: 1 sc in first 12 sts, join pink in end of last st, 1 sc in next 29 sts, join purple in end of last st, 1 sc in last 8 sts. [49 sc]
Round 14: 1 sc in first 12 sts, join pink in end of last st, 1 sc in next 30 sts, join purple in end of last st, 1 sc in last 7 sts. [49 sc]
Round 15: Repeat Round 14. [49 sc]
Round 16: Repeat Round 14. [49 sc]
Round 17: Repeat Round 14. [49 sc]
Round 18: 1 sc in first 12 sts, join pink in end of last st, 1 sc in next 31 sts, join purple in end of last st, 1 sc in last 6 sts. [49 sc]
Round 19: Repeat Round 18. [49 sc]
Round 20: Repeat Round 18. [49 sc]
Round 21: Repeat Round 18. [49 sc]
Round 22: 1 sc in first 12 sts, join pink in end of last st, 1 sc in last 37 sts. [49 sc] From here the color work is done and you can set aside any extra yarn lengths.
Round 23: 1 sc in next 5 sts, sc2tog repeat to end. [42 sc]
Round 24: 1 sc in next 4 sts, sc2tog repeat to end. [35 sc]
Round 25: 1 sc in next 3 sts, sc2tog repeat to end. [28 sc]
Round 26: 1 sc in next 2 sts, sc2tog repeat to end. [21 sc]
Round 27: 1 sc in next st, sc2tog repeat to end. [14 sc] Stuff now.
Stuff now.
Round 28: sc2tog until end. [7 sc] Drawstring to close hole. Fasten off and weave in all tails.
Drawstring to close hole. Fasten off and weave in all tails.
Feet
Make 2. The feet start with hdc stitches to build a little oval base before switching to sc for the upper portion. Do not join rounds.
Round 1: In pink, 8 hdc in a ch 4 loop. [8 hdc] Do not join rounds.
Round 2: 2 sc in next st, 2 hdc in next 2 sts, 2 sc in next st, 1 sc in last 4 sts. [12 sts]
Round 3: In BLO, 1 sc in each st around. [12 sc] Working through the back loop only here creates a small ridge that defines the sole edge of the foot.
Round 4: sc2tog 4 times, 1 sc in last 4 sts. [8 sc]
Round 5: 1 sc in each st around. [8 sc] Fasten off and sew onto body, stuffing slightly at base of foot.
Fasten off and sew onto body, stuffing slightly at base of foot.
Arms
Make 2. These are simple tubes worked in the round in pink — straightforward to work up and stuffing is optional, so you can decide on firmness once you see how they sit on the body. Do not join rounds.
Round 1: In pink, 8 sc in a ch 4 loop. [8 sc] Do not join rounds.
Round 2: 1 sc in each st around. [8 sc]
Round 3: 1 sc in each st around. [8 sc]
Round 4: 1 sc in each st around. [8 sc]
Round 5: 1 sc in each st around. [8 sc]
Round 6: 1 sc in each st around. [8 sc]
Round 7: 1 sc in each st around. [8 sc] Fasten off and sew onto body. Stuffing is optional.
Fasten off and sew onto body. Stuffing is optional.
Nose
The nose is worked in purple and stays open at the end so you can stuff it lightly before sewing it on. Do not join rounds.
Round 1: In purple, 8 sc in a ch 4 loop. [8 sc] Do not join rounds.
Round 2: 2 sc in each st around. [16 sc]
Round 3: 1 sc in each st around. [16 sc]
Round 4: 1 sc in each st around. [16 sc] Fasten off. Using dark pink or red yarn, sew on a nose and mouth. Sew nose onto body, stuffing slightly as you go.
Fasten off. Using dark pink or red yarn, sew on a nose and mouth. Sew nose onto body, stuffing slightly as you go.
Ears
Make 2. The ears are worked flat along a foundation chain, then back along the other side to create a leaf shape in one pass.
Round 1: In purple, ch 6, 1 sc in 2nd ch from hook, 1 hdc in next ch, 2 dc in next ch, 1 hdc in next ch, 1 sc in next ch. Now crochet back along chains in the opposite direction: 1 sc in first ch just used, 1 hdc in next ch, 2 dc in next ch, 1 hdc in next ch, 1 sc in last ch. [12 sts] When you reach the end of the first pass and turn to work back, you're working into the unused loops on the underside of the starting chain.
Round 2: sl st in next st, 1 sc in next 5 sts, ch 2, sl st in top of previous sc, 1 sc in next 5 sts, sl st in last st. Fasten off and sew onto head.
Fasten off and sew onto head.
Antlers: Large Piece
Make 2 full sets. Each complete antler is built from two separate tubes — this larger piece forms the main branch, and the small piece will attach to it at an angle. Do not join rounds.
Round 1: In pink, 5 sc in a ch 4 loop. [5 sc] Do not join rounds.
Round 2: 1 sc in each st around. [5 sc]
Round 3: 1 sc in each st around. [5 sc]
Round 4: 1 sc in each st around. [5 sc]
Round 5: 1 sc in each st around. [5 sc]
Round 6: 1 sc in each st around. [5 sc] Fasten off, stuff if desired, and sew onto head.
Fasten off, stuff if desired, and sew onto head.
Antlers: Small Piece
Make 2 full sets. This shorter tube is the branching tine that joins to the large antler piece once both are complete. Do not join rounds.
Round 1: In pink, 5 sc in a ch 4 loop. [5 sc] Do not join rounds.
Round 2: 1 sc in each st around. [5 sc]
Round 3: 1 sc in each st around. [5 sc]
Round 4: 1 sc in each st around. [5 sc] Fasten off, stuff if desired, and sew onto the larger antler piece at an angle.
Fasten off, stuff if desired, and sew onto the larger antler piece at an angle.
Finishing Details
Just one last detail before assembly.
Step 1: In black, sew on eyes using tiny knots. Keep the knots small and tight so they sit flush against the surface.
Fasten off, weave in ends
Final Touches
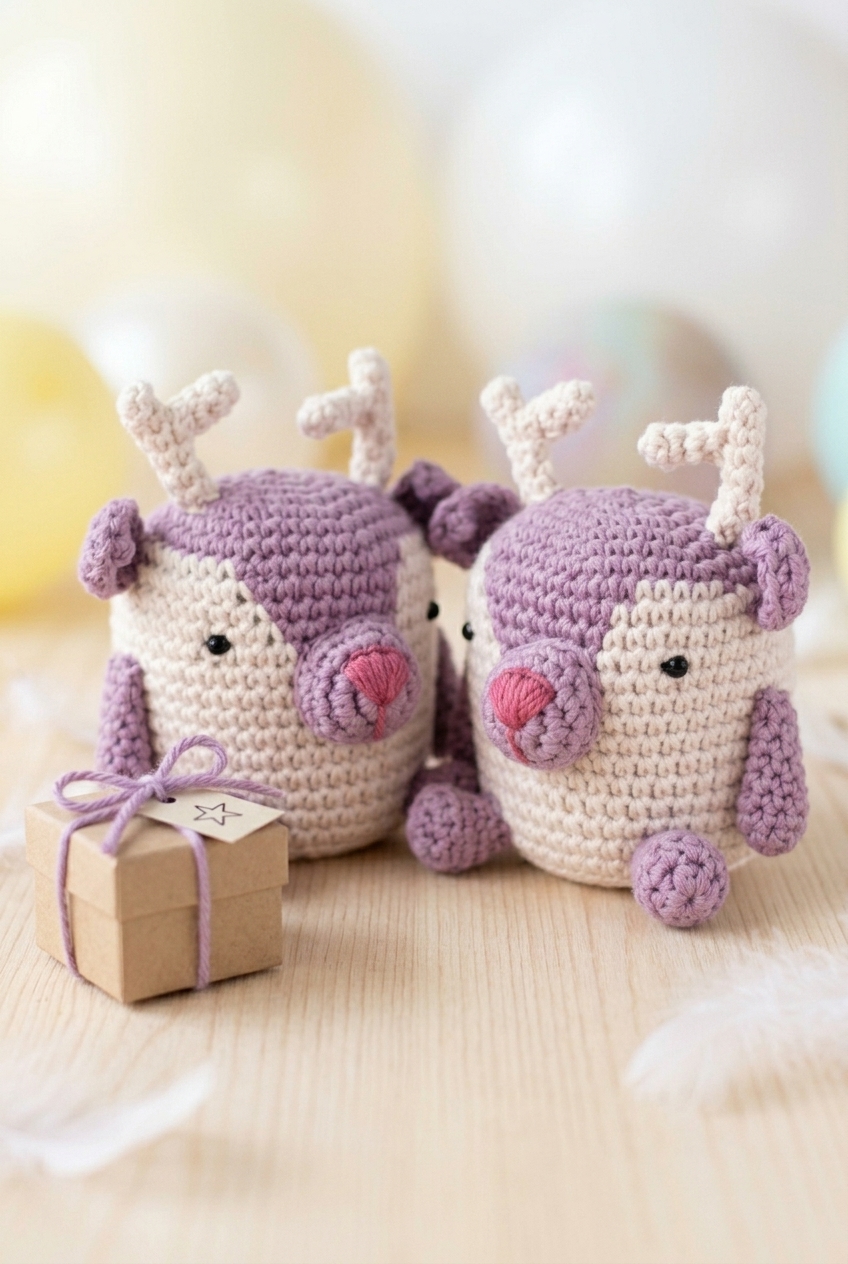
With all the pieces finished, it's time to put the reindeer together. I sew the feet onto the underside of the body first, stuffing each one slightly at the base before closing it down. The arms go on next, on either side of the upper body — I leave stuffing the arms to personal preference, since unstuffed ones tend to drape a bit more naturally. The nose gets centered on the front of the body with a little stuffing pushed in as I sew it down, and I use dark pink or red yarn to add the nose detail and mouth directly onto the nose piece before attaching it. The ears sit on either side of the head, and I pin them in place before committing to the position. For the antlers, I attach the small piece to the large piece at an angle first, then sew the assembled antler onto the top of the head. Getting the angle of the small tine right before you sew it down makes the whole antler read clearly, so it's worth taking a moment there.
Care Instructions
Hand washing is the safest option for this little reindeer. The stuffing inside can shift and clump if it gets tossed in a machine, and the color-work sections can distort if the fabric gets too rough a treatment. Squeeze out the water gently and reshape the body before laying it flat to dry. Keeping it away from direct heat while drying helps the stuffing stay evenly distributed.
Baby & Child Safety Notes
The eyes on this reindeer are made with black yarn sewn into tiny knots, so there are no hard plastic pieces to come loose. That said, if you're giving this to a very young child, check the seams on the nose, ears, and antlers regularly. Those are the pieces most likely to catch on things or get tugged. Stuff the pieces firmly enough that there's no loose fill shifting around inside, and make sure all yarn tails are woven in completely before it goes into little hands.
Frequently Asked Questions
How do the antlers actually go together?
Each antler is made of two separate tubes crocheted in rounds. The large piece is 6 rounds long and the small piece is 4 rounds. Once both are done, you sew the smaller tube onto the larger one at an angle before attaching the whole thing to the head. The angle is what gives it that branching antler look rather than just two straight sticks.
When do I stuff the body?
Round 27 is when the pattern tells you to stuff, right before the final decrease round closes everything up. Don't wait until after Round 28 — the hole gets too small to work with comfortably. Stuff it firmly enough that the body holds its shape but not so packed that it distorts the color-work on the sides.
What is the BLO round on the feet for?
Working Round 3 of the feet in back loops only creates a small ridge around the foot, which defines where the hoof shape begins. It's a simple technique but it makes a noticeable difference in how finished the feet look. Just insert your hook into the back loop only for every stitch in that round, then continue as normal from Round 4 onward.
Do I need to cut the yarn every time the color changes in the body?
No, and you really shouldn't. Carry the unused color loosely along the inside of the body during Rounds 8 through 22 instead of cutting and rejoining every round. It keeps the inside tidy and saves a lot of weaving in later. Just make sure you're not pulling the carried yarn too tight or it will pucker the fabric on the outside.
Can I use a magic ring instead of the ch-4 loop method?
Yes. The pattern explicitly says you can swap in a magic ring at any point where the ch-4 loop method is used. I find magic rings give a slightly tighter center, which works well for the smaller pieces like the arms and antlers. Either method works fine.
Before You Go
I'd love to see how your reindeer turns out, especially if you switch up the colors or try a different yarn. Drop a photo in the comments or tag me on Instagram so I can see it. And if you're saving patterns for the holiday season, this one pins really well, so feel free to add it to your crochet board for later.



Leave a Reply