
This little guy might be my favorite thing I've crocheted all year. The Seedling Amigurumi Crochet Pattern is one of those projects that comes together faster than you expect and ends up looking SO much more polished than the effort it takes. It's beginner-friendly, totally addictive, and honestly just a joy to work on start to finish.

Jump to:
About the Design
What I love about this one is how the construction is broken into separate pieces that all come together at the end. The little add-on details, like the belly patch, the collar ruffle, and the tiny horns, are worked independently and then attached. It sounds like extra steps, but it's actually what makes the whole thing feel so satisfying. Each piece is its own small win, and by the time you're sewing everything on, it really starts to feel like something.
I'd make this for any kid who loves soft, squishy things, but honestly it works just as well sitting on a shelf or a desk. It has that kind of quiet charm that appeals to adults too. Great for gifting, great for keeping.
Why You'll Want to Make This
This beginner-friendly amigurumi is a genuinely fun make that produces a seriously giftable result.
- Beginner Accessible: No advanced techniques here, so it's a great first amigurumi if you've been wanting to try the style.
- Quick Gratification: The individual pieces are small and fast to work up, so you're never stuck on one section for long.
- Perfect for Gifting: Finished size lands in that sweet spot, big enough to feel substantial, small enough to wrap up easily for birthdays or baby showers.
- Technique Building: Working separate attached pieces is a core amigurumi skill, and this pattern is a low-stakes way to get comfortable with it.
- Yarn Stash Friendly: You won't need much yardage, so it's a great way to use up yarn you already have sitting around.
Gather Your Supplies
Four colors, one hook, and a good handful of toy stuffing — that is the whole list.
- DK Weight Chenille Yarn (Light Green, Dark Green, Cream, and Black): Chenille is the right call here. That velvety, almost plush surface is exactly what gives this character its soft, tactile finish, and it holds its shape well enough for small amigurumi pieces like the arms and legs. You'll need four colors total. Yardage isn't specified in the pattern, but for a small amigurumi like this, budget somewhere around 50 to 80 meters of your main light green, 30 to 50 meters of dark green, and small amounts of cream and black. Black is only used for mouth embroidery, so a scrap will do.
- 3.50 mm Crochet Hook: A 3.50 mm hook keeps the stitches tight enough that the stuffing won't show through, which matters with chenille since the fabric can loosen up more than cotton or acrylic.
- 8 mm Toy Safety Eyes (x2): The pattern uses 8 mm eyes. Get these in before you close up the head — once the seam is done, there's no going back without cutting yarn.
- Toy Stuffing: Polyfil works well. Stuff as you go on the head and body, adding more before the opening gets too small to work with comfortably.
- Also needed: yarn needle, scissors, stitch marker
Alternative Yarn Suggestions
Chenille isn't always the easiest yarn to find, and it can be a bit tricky to frog if you make mistakes. If you'd rather work with something more forgiving, these are solid swaps.
- DK Weight Cotton: A mercerized DK cotton gives you clean stitch definition and holds its shape well in small pieces. It won't have the velvety look of chenille, but the finished amigurumi will still be neat and sturdy. Most DK cotton comes in around 200 to 250 meters per 100 g ball, so one ball of each main color is more than enough.
- DK Weight Acrylic: A smooth DK acrylic is probably the most widely available option and works no trouble at all for amigurumi. It's easy to frog, consistent to work with, and typically runs 280 to 300 meters per 100 g. The texture will be softer than cotton but won't replicate the chenille pile.
Key Information
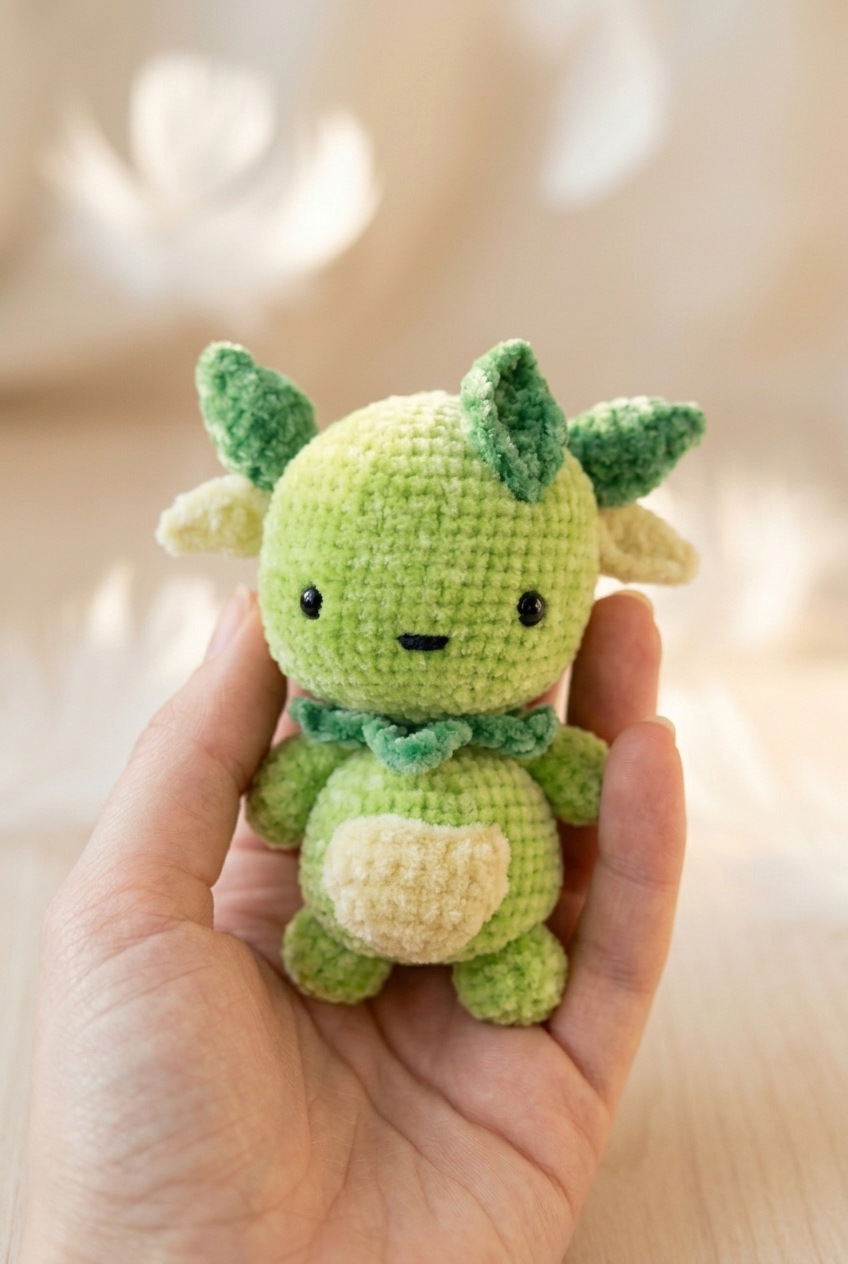
A soft chenille amigurumi worked in multiple colors, with a leaf necklace and decorative details added once the body is fully assembled.
| Skill Level | Beginner |
| Pattern Gauge | Gauge is not critical for this project. Use a hook size that creates a tight, firm fabric so stuffing does not show through. |
| Finished Size | Approx. 6–8 in (15–20 cm) tall (estimated from DK chenille, 3.50 mm hook, and stitch counts) |
| Yarn Weight | 3 Light / DK |
| Fiber | Not specified — chenille yarn (check the yarn label) |
| Terminology | US |
Abbreviations & Stitches Used
Short list, nothing unusual here.
- B = Black
- C = Cream
- ch = chain
- dc = double crochet
- DG = Dark Green
- hdc = half double crochet
- LG = Light Green
- sc = single crochet
- sc2tog = single crochet 2 together (decrease)
- sl st = slip stitch
- st(s) = stitch(es)
- tr = treble crochet
- * * = repeat between asterisks as stated
Special Stitches
- Picot (ch-2 picot): ch 2, sl st in first ch made.
The Critical Details
Chenille gives this character its soft, velvety look, but it does have a tendency to hide your stitches. Count carefully as you go, especially during decreases. Because the fabric is so plush, any gaps will show stuffing through, so keep your tension snug throughout.
Safety eyes need to go in before you close up the head. Once that opening is gone, there's no getting them in cleanly, so don't skip ahead. Get them positioned and secured while you still have room to work.
The face leaf, small leaves, and leaf necklace are all decorative. They're added after the main body is fully assembled, so you're not trying to attach anything while pieces are still open or unstuffed.
Crochet Instructions
Work through each piece of this Seedling Amigurumi Crochet Pattern in order, then assemble everything at the end.
Main Body (Head + Body in One Piece)
The head and body are worked as a single continuous piece, which keeps the shaping clean and means no seam between the two. Work in a continuous spiral throughout — do not join rounds.
Round 1: In LG, ch 4, sl st in first ch to form a loop, 7 sc in center of loop. (Magic ring can be used instead.) Do not join rounds. [7 sc]
Round 2: 2 sc in each st around. [14 sc]
Round 3: 1 sc in next st, 2 sc in next st repeat to end. [21 sc]
Round 4: 1 sc in next 2 sts, 2 sc in next st repeat to end. [28 sc]
Round 5: 1 sc in next 3 sts, 2 sc in next st repeat to end. [35 sc]
Round 6: 1 sc in next 4 sts, 2 sc in next st repeat to end. [42 sc]
Round 7: 1 sc in next 5 sts, 2 sc in next st repeat to end. [49 sc]
Round 8: 1 sc in next 6 sts, 2 sc in next st repeat to end. [56 sc]
Rounds 9–20: 1 sc in each st around. [56 sc] Twelve even rounds across the widest part of the head.
Round 21: 1 sc in next 6 sts, sc2tog repeat to end. [49 sc]
Round 22: 1 sc in next 5 sts, sc2tog repeat to end. [42 sc]
Round 23: 1 sc in next 4 sts, sc2tog repeat to end. [35 sc]
Round 24: 1 sc in next 3 sts, sc2tog repeat to end. [28 sc]
Round 25: 1 sc in next 2 sts, sc2tog repeat to end. [21 sc]
Round 26: 1 sc in next st, sc2tog repeat to end. [14 sc]
Round 27: 1 sc in each st around. Stuff head now. Add safety eyes between Rounds 16 & 17, 8–10 sts apart. [14 sc]
Stuff head now. Add safety eyes between Rounds 16 & 17, 8–10 sts apart.
Round 28: 1 sc in next st, 2 sc in next st repeat to end. [21 sc] The neck narrows and then expands again here — this is where the body begins to widen out from that narrow join.
Round 29: 1 sc in next 2 sts, 2 sc in next st repeat to end. [28 sc]
Round 30: 1 sc in next 3 sts, 2 sc in next st repeat to end. [35 sc]
Round 31: 1 sc in next 4 sts, 2 sc in next st repeat to end. [42 sc]
Rounds 32–41: 1 sc in each st around. [42 sc] Ten even rounds for the body.
Round 42: sc2tog repeat to end. [21 sc]
Round 43: sc2tog repeat to last st, 1 sc in last st. Stuff body now. [11 sc]
Stuff body now.
Round 44: sc2tog repeat to last st, 1 sc in last st. Fasten off, sew hole closed, tie in all ends. [6 sc]
Fasten off, sew hole closed, tie in all ends.
Arms (Make 2)
Make two arms. Work in a continuous spiral — do not join rounds. These are small and work up quickly.
Round 1: In LG, ch 4, sl st in first ch to form a loop, 6 sc in center. Do not join rounds. [6 sc]
Round 2: 2 sc in each st around. [12 sc]
Rounds 3–6: 1 sc in each st around. [12 sc]
Round 7: 1 sc in next st, sc2tog repeat to end. [8 sc]
Rounds 8–10: 1 sc in each st around. Fasten off, stuff slightly, fold flat at top and sew onto body. [8 sc]
Fasten off, stuff slightly, fold flat at top and sew onto body.
Legs (Make 2)
Make two legs. Work in a continuous spiral — do not join rounds.
Round 1: In LG, ch 4, sl st in first ch to form a loop, 7 sc in center. Do not join rounds. [7 sc]
Round 2: 2 sc in each st around. [14 sc]
Rounds 3–6: 1 sc in each st around. Fasten off, stuff slightly, sew onto body. [14 sc]
Fasten off, stuff slightly, sew onto body.
Large Leaves / Horns (Make 2)
These are worked in DG and sit on top of the head as the signature plant-like horns. Work in a continuous spiral — do not join rounds.
Round 1: In DG, ch 8, sl st in first ch to form a large loop. Ch 1. [8]
Round 2: Starting in same ch as previous sl st, 1 sc in each ch around. Do not join rounds. [8 sc]
Round 3: 1 sc in next st, 2 sc in next st repeat to end. [12 sc]
Rounds 4–5: 1 sc in each st around. [12 sc]
Round 6: 1 sc in next st, sc2tog repeat to end. [8 sc]
Round 7: 1 sc in each st around. [8 sc]
Round 8: sc2tog repeat to end. [4 sc]
Round 9: 1 sc in each st around. Fasten off, sew hole closed, stuff slightly and sew onto head. [4 sc]
Fasten off, sew hole closed, stuff slightly and sew onto head.
Small Leaves (Make 2)
These are worked in rows in color C, crocheting back along the foundation chain to create a two-sided leaf shape. They sit under the large leaves on the head.
Row 1: In C, ch 7, sl st in second ch from hook, 1 sc in next ch, 1 dc in next 2 chs, 1 sc in next ch, sl st in last ch. [6 sts]
Row 2: Crochet back along chains in the opposite direction: sl st in same last ch as previous sl st, 1 sc in next ch, 1 dc in next 2 chs, 1 sc in next ch, sl st in last ch, ch 2, sl st in first st from Row 1. Fasten off and sew onto head under large leaves.
Fasten off and sew onto head under large leaves.
Leaf Necklace
This decorative necklace is worked in DG in a single row along a foundation chain, with leaf points formed by the stitch combination. It wraps around the neck of the body.
Row 1: In DG, ch 21. Starting in second ch from hook: [1 sc, 1 hdc] in next ch, [1 dc, 1 tr, ch 2, sl st in top of previous tr, 1 dc] in next ch, [1 hdc, 1 sc] in next ch, sl st in next ch repeat to end. Fasten off and wrap around neck, sew into place.
Fasten off and wrap around neck, sew into place.
Face Leaf
This leaf is worked in DG across three rows, building up a fuller shape by working back along the foundation and then adding a final row of stitches. It gets sewn onto the face once complete.
Row 1: In DG, ch 9, sl st in second ch from hook, 1 sc in next ch, 1 hdc in next ch, 1 dc in next 2 chs, 1 hdc in next ch, 1 sc in next ch, sl st in last ch. [8 sts]
Row 2: Crochet back along chains in the opposite direction: sl st in same last ch as previous sl st, 1 sc in next ch, 1 hdc in next ch, 1 dc in next 2 chs, 1 hdc in next ch, 1 sc in next ch, sl st in last ch.
Row 3: Ch 1, sl st in next st (first st from Row 1), 1 sc in next st, 1 hdc in next st, 2 dc in next 2 sts, 1 hdc in next st, 1 sc in next st, sl st in last st. Fasten off and sew onto head.
Fasten off and sew onto head.
The pocket is worked flat in rows in color C, with a simple decrease at the top to give it a rounded finish. It gets sewn onto the front of the body.
Row 1: In C, ch 9, 1 sc in second ch from hook and in each ch along. TURN. [8 sc]
Row 2: 1 sc in each st along. TURN. [8 sc]
Row 3: 1 sc in each st along. TURN. [8 sc]
Row 4: 1 sc in each st along. TURN. [8 sc]
Row 5: 1 sc in each st along. TURN. [8 sc]
Row 6: sc2tog until end. TURN. [4 sc]
Row 7: sc2tog until end. Fasten off and sew onto body. [2 sc]
Fasten off and sew onto body.
Tail
The tail is worked in DG in a continuous spiral, tapering down in two stages. Do not join rounds.
Round 1: In DG, ch 16, sl st in first ch to form a large loop, ch 1, then starting in same ch as previous sl st. [16]
Rounds 2–4: 1 sc in each st around. Do not join rounds. [16 sc]
Round 5: 1 sc in next st, sc2tog repeat to last st, 1 sc in last st. [11 sc]
Rounds 6–9: 1 sc in each st around. [11 sc]
Round 10: sc2tog repeat to last st, 1 sc in last st. [6 sc]
Rounds 11–13: 1 sc in each st around. [6 sc]
Round 14: sc2tog repeat to end. Fasten off, sew hole closed, stuff slightly and sew onto body. [3 sc]
Fasten off, sew hole closed, stuff slightly and sew onto body.
Finishing Details
One last detail to bring the face to life before final assembly.
Step 1: In B, sew on a small mouth over 3 sts.
Putting It All Together
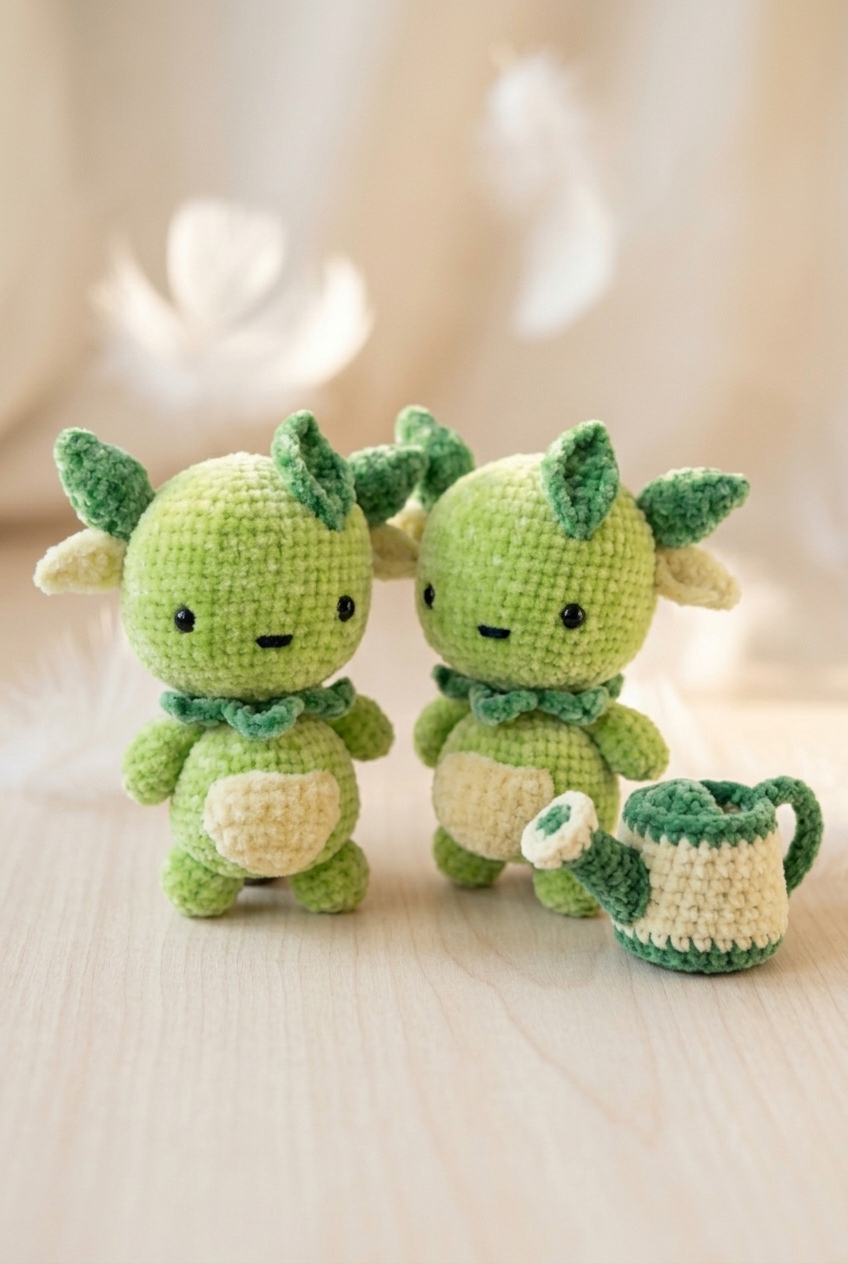
With all pieces finished, it's time to assemble the seedling. I start with the limbs: fold each arm flat at the top and sew it onto the sides of the body, then position the legs at the base and sew those on as well. Both get stuffed slightly before closing. The tail goes on the back of the body — stuff it lightly, sew the hole closed, and stitch it into place.
For the head decorations, I sew the small leaves onto the top of the head first, then position the large leaves directly over them and sew those down. The face leaf goes onto the front of the head wherever it looks right to you. The leaf necklace wraps around the neck area and gets sewn into place once you're happy with the positioning. The pocket sews flat onto the front of the body. Finally, I use color B to embroider a small mouth over 3 stitches on the face, just below the safety eyes.
Care Instructions
Chenille yarn can mat and flatten if you're rough with it, so I'd hand wash this little one in cool water with a gentle soap rather than tossing it in the machine. Press out the excess water with a towel instead of wringing, then leave it to air dry completely before letting kids play with it again. Air drying is especially important here because the heat from a dryer can warp the plastic safety eyes over time. Once it's dry, a light fluff with your fingers brings the chenille texture back nicely.
Baby & Child Safety Notes
The 8 mm safety eyes need to be secured before you close the head, and I mean FIRMLY locked in place. Give each one a good tug after you attach the backing to make sure it's not going anywhere. For children under three, I'd skip the safety eyes entirely and embroider the eyes instead, since no backing system is truly choking-proof for that age group. Also check the seams on the arms, legs, and tail periodically if this is going to a child who plays hard with their toys.
Frequently Asked Questions
When do I insert the safety eyes, and can I go back and add them later?
The safety eyes need to go in before you finish closing the head, specifically between Rounds 16 and 17, about 8 to 10 stitches apart. Once the head is closed and stuffed, you can't get the backings on properly. So don't skip that step in Round 27 when the pattern tells you to stuff the head and place the eyes. That's your only window.
The head and body are crocheted as one piece. How do I know when to stuff each section?
The head gets stuffed at Round 27, right before the body starts expanding again. Then the body gets stuffed at Round 43, just before you close it off. The pattern tells you exactly when at each point, but it's easy to miss if you're moving fast. I'd keep a stitch marker going so you always know where you are in the count.
How are the small leaves and face leaf made, and where do they go?
The small leaves are worked in Cream yarn in two rows along a foundation chain, then sewn onto the head underneath the large dark green leaf horns. The face leaf is a slightly larger version worked in Dark Green across three rows and sewn directly onto the head. Both are flat decorative pieces added after the main body is fully assembled.
Does the leaf necklace actually stay on, or will it need to be sewn down?
It gets sewn into place, so yes, it's attached permanently rather than just looped around the neck. You wrap it around and stitch it down after fastening off. It's not removable once it's on, which keeps it from getting pulled off during play.
Is chenille yarn difficult to work with for this kind of project?
It's not difficult, but it does hide your stitches more than cotton or acrylic would. Counting carefully matters more with chenille because you can't always see where one stitch ends and the next begins. The payoff is that the finished toy has a really soft, velvety feel that works beautifully for a character like this.
How much stuffing should I use for the arms and legs?
Stuff them slightly, not firmly. The arms and legs are small pieces and overstuffing makes them stiff and hard to position when you sew them on. A light fill is enough to give them a little shape without fighting you during assembly.
Now It's Your Turn!
I'd love to see your finished Seedling come to life, so if you make one, please tag me on Instagram or drop a photo in the comments below. These little plant characters are so fun to style once all the details are on, and I always think the leaf necklace is what really pulls the whole thing together. If you're saving this for later, pin it to your amigurumi board so it doesn't get lost in your feed, and let me know in the comments if you made any changes to the colors or sizing.



Leave a Reply