This free Chicken Crochet Pattern gives you a sweet little stuffed chick you can stitch up in an afternoon, and it makes the most adorable Easter basket addition or spring gift I can think of right now.

Jump to:
About This Project
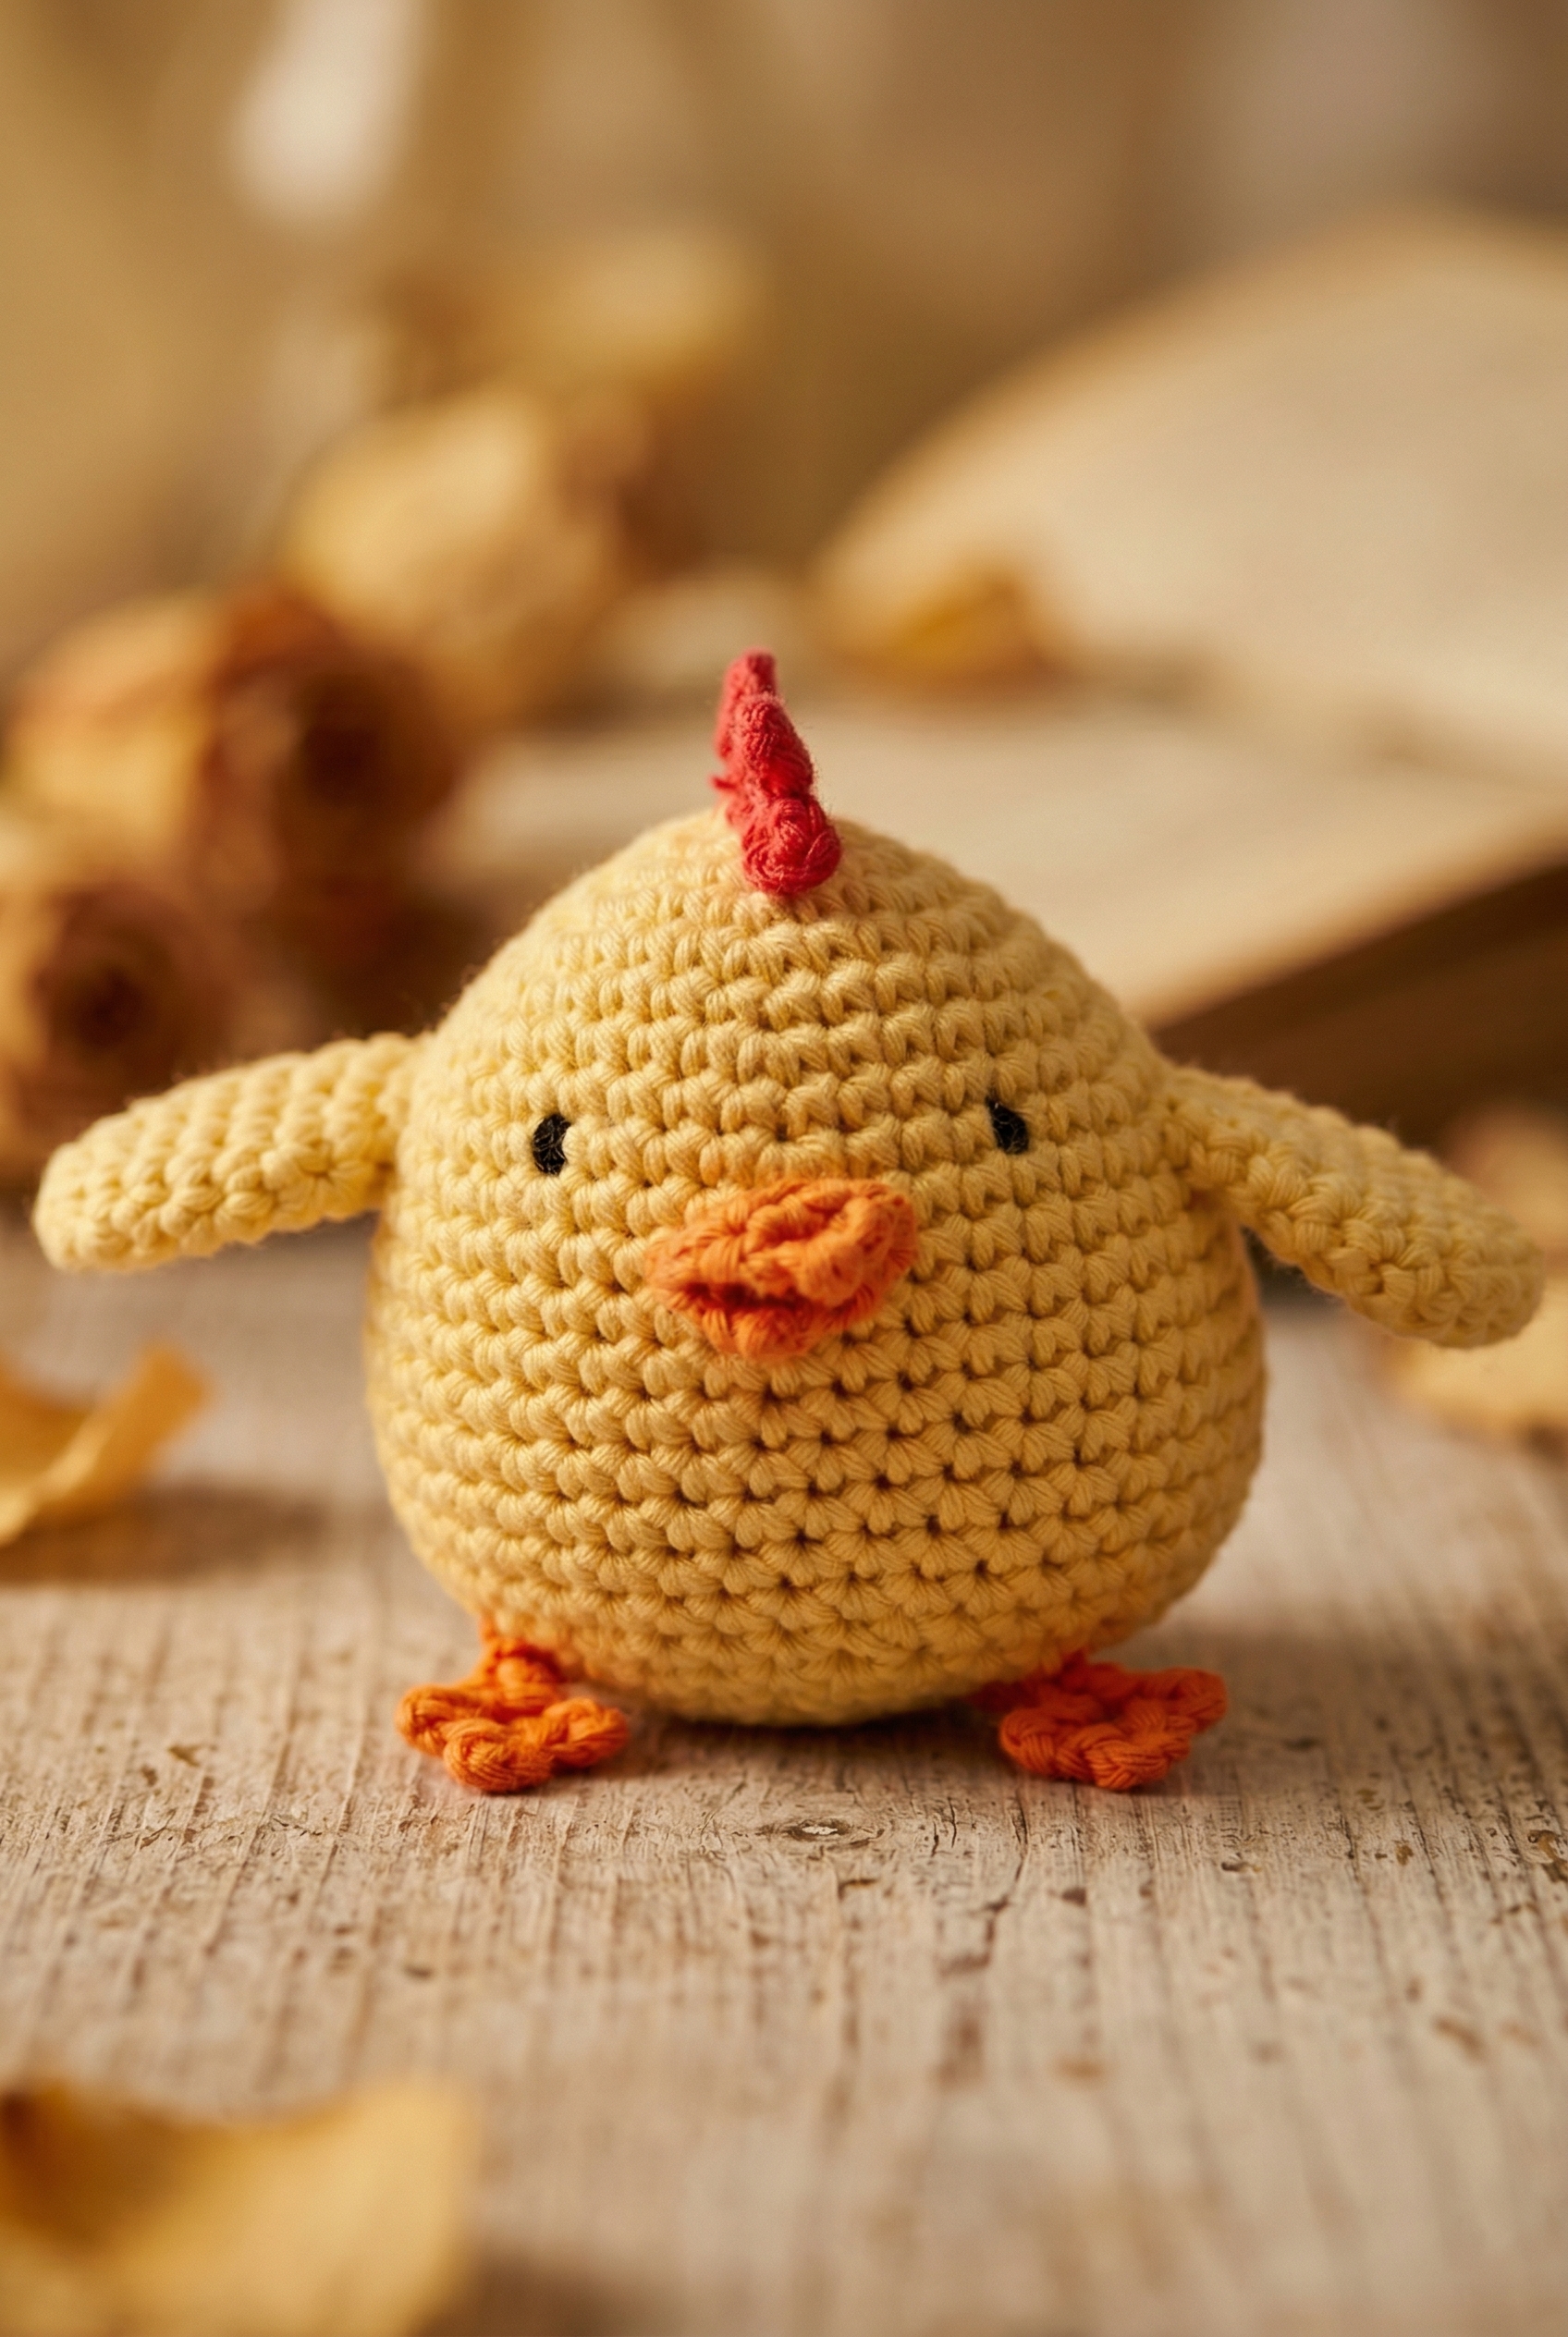
This little guy is a round, slightly oval-bodied chick worked in pale yellow yarn, and I am really pleased with how compact and tidy he turned out. He has tiny stitched black eyes, a small orange beak, little orange feet, a stubby orange tail, and two short wings that stick out just enough to give him some personality. The detail I keep coming back to is the red comb sitting on top of his head. It pulls the whole look together and makes him read instantly as a chicken rather than just a generic bird, I think.
Why You Need This on Your Hook
This cheerful little chick is a fast, satisfying make with a big payoff.
- Quick to finish: The small finished size means you can realistically complete this in a single sitting without losing momentum.
- Beginner-accessible construction: The body is worked in simple rounds, so there are no complicated shaping techniques to figure out as you go.
- Loads of gifting potential: A finished chick this size fits perfectly into Easter baskets, works as a baby shower gift, or just makes someone's day for no reason at all.
Materials You'll Need
Most of this little chicken uses just one main color, so the orange, red, and black are really just scraps from your stash.
- DK weight 100% cotton yarn: I reach for a DK cotton for amigurumi like this because it gives you a firm, tight fabric that hides the stuffing well and holds its shape once the piece is finished. Cotton doesn't have much stretch, which is actually what you want here. You'll need about 50 g of vanilla for the head, body, and wings, plus small leftover amounts of orange, red, and black for the beak, legs, cockscomb, and eyes.
- Crochet hooks: 4 mm / G6 and 3 mm / C: The smaller hook is there to keep your stitches tight so the stuffing doesn't show through, which matters more with cotton than it would with a fuzzy or textured yarn. The larger hook comes in handy for any looser sections or if your tension runs tight by nature.
- Poly stuffing: You'll want to have this within reach as you go. Stuff the body before the opening gets too small to work with comfortably.
- Also needed: stitch marker, tapestry needle, scissors
Key Information
Everything you need to know before you cast on, all in one spot.
| Skill Level | Level 2 — Easy |
| Pattern Gauge | 16 sc = width 10 cm / 4'' |
| Finished Size | approx. height 12 cm / 4¾'' |
| Yarn Weight | 3 Light / DK |
| Fiber | 100% Cotton |
| Terminology | US |
Abbreviations & Stitches Used
Keep this list open while you work.
- beg = beginning
- ch = chain
- rep = repeat
- rnd = round
- row = row
- sc = single crochet
- sl st = slip stitch
- st(s) = stitch(es)
- tog = together
- yo = yarn over
- sc2tog = single crochet 2 together
Special Stitches
- Magic circle: Wrap yarn around finger to form a loop, insert hook into loop, yo and pull up a loop, ch 1, work required sc into loop; pull yarn tail to close loop.
- Work in the round in a circle (continuous spiral): Do not join. After last sc of the rnd, continue with 1 sc in next st (first sc of next rnd). Place a marker between last and first st of rnd.
- sc2tog: Insert hook in next st, yo and pull up a loop; insert hook in next st, yo and pull up a loop; yo and pull through all 3 loops on hook.
Read Before Starting
I work this piece entirely in the round as a continuous spiral, so there's no joining at the end of each round. Don't skip the stitch marker. Move it up every round or you'll lose your place pretty quickly. When the rounds start decreasing, the fabric pulls in fast, so I'd suggest stuffing as you go rather than waiting until the end. The gauge here is measured flat across single crochet stitches, and because this is amigurumi, a slightly tighter tension than usual is actually what you want. It keeps the stuffing from showing through.
Let's Make the Chicken Crochet Pattern
Work through each piece in order and the assembly comes together quickly at the end.
Chicken Body and Head
This piece is the whole bird: head and body worked in one continuous shape from the top down. Start with vanilla yarn and a 4 mm / G/6 hook, and open with a magic circle.
Round 1: 6 sc in magic circle. [6]
Round 2: 2 sc in each sc around. [12]
Round 3: *1 sc in next sc, 2 sc in next sc* repeat around. [18]
Round 4: *1 sc in next 2 sc, 2 sc in next sc* repeat around. [24]
Round 5: *1 sc in next 3 sc, 2 sc in next sc* repeat around. [30]
Round 6: Sc in each sc around. [30]
Round 7: *1 sc in next 4 sc, 2 sc in next sc* repeat around. [36]
Round 8: Sc in each sc around. [36]
Round 9: *1 sc in next 5 sc, 2 sc in next sc* repeat around. [42]
Rounds 10–17: Sc in each sc around. [42] These eight even rounds build out the body. It's a good stretch to check that your tension is consistent before the decreases start.
Round 18: *1 sc in next 19 sc, sc2tog* repeat once more. [40] This is a very gradual decrease, just two stitches removed across the whole round, so the shaping is subtle here.
Round 19: *1 sc in next 3 sc, sc2tog* repeat around. [32]
Round 20: Sc in each sc around. [32]
Round 21: *1 sc in next 2 sc, sc2tog* repeat around. [24]
Round 22: Sc in each sc around. [24]
Round 23: *1 sc in next sc, sc2tog* repeat around. [16]
Round 24: Sc in each sc around. [16]
Fill with poly stuffing.
Round 25: Sc2tog around (work all sc tog 2 by 2), finish with 1 sl st in next sc. [8] Stuff firmly before this round closes things up too much to get your hand inside comfortably.
Cut yarn and pull it through the remaining sts and tighten tog, fasten tightly.
Wings (Make 2)
With vanilla yarn and a 4 mm / G/6 hook, make a magic circle. You're making two of these, so it's worth working them side by side so they come out the same size.
Round 1: 4 sc in magic circle. [4]
Round 2: 2 sc in each sc around. [8]
Round 3: *1 sc in next sc, 2 sc in next sc* repeat around. [12]
Round 4: *1 sc in next 2 sc, 2 sc in next sc* repeat around. [16]
Rounds 5–7: Sc in each sc around. [16]
Round 8: *1 sc in next 2 sc, sc2tog* repeat around. [12]
Round 9: Sc in each sc around, finish with 1 sl st in next sc. [12] The wings aren't stuffed, so leave them flat when you close off.
Cut yarn and leave 20 cm / 8'' for assembly.
Beak
Switch to orange yarn and a 3 mm / C hook for this piece. The beak is worked in rows, building up from a single stitch and then tapering back down to one.
Row 1: Ch 2, 1 sc in 2nd ch from hook, turn. [1]
Row 2: Ch 1, 2 sc in sc, turn. [2]
Row 3: Ch 1, 2 sc in each sc, turn. [4]
Row 4: Ch 1, 2 sc in 1st sc, 1 sc in next 2 sc, 2 sc in last sc, turn. [6]
Row 5: Ch 1, skip 1st sc, 1 sc in next 4 sc, turn. [4] From here the beak narrows back down. The skipped stitch at the start of each row is what creates the taper.
Row 6: Ch 1, skip 1st sc, 1 sc in next 2 sc, turn. [2]
Row 7: Ch 1, skip 1st sc, 1 sc in last sc. [1]
Cut yarn and leave 20 cm / 8'' for assembly.
Legs (Make 2)
Use orange yarn and a 3 mm / C hook. Make two. Each leg is a single continuous construction worked from a foundation chain, so there are no numbered rounds or rows here.
Chain 10, then sl st in the 5th chain from the hook to form the first toe. *Ch 4, sl st in same ch* repeat once more to add the second toe off the same point. Then sl st in each remaining chain on the foundation chain, working back to the beginning. That last section is the leg itself. The toes branch off at the far end and the leg shank runs back toward where you started.
Cut yarn and leave 20 cm / 8'' for assembly.
Cockscomb
Switch to red yarn and a 3 mm / C hook. Like the legs, this is one continuous piece worked from a chain with no separate rounds or rows.
Chain 10. Sl st in the 7th chain from the hook to form the first bump of the comb. *Ch 5, sl st in next ch* repeat once more for the second bump. Then ch 6 and sl st in the last chain to finish the third. The three loops sit along the top and the tail end of the chain is what you'll use to anchor it to the head.
Cut yarn and leave 20 cm / 8'' for assembly.
Putting It All Together
All the pieces are done. Now it's just a matter of attaching everything in the right order and the chicken starts to look like itself pretty fast.
Place the wings flat against each side of the body and sew them on with neat little stitches using the long tail you left. Keep them symmetrical and positioned roughly in the middle of the body. The flat, unstuffed shape means they'll lie naturally against the sides without needing to be pinned into a specific angle.
Sew the cockscomb at the top of the head. Center it along the crown and work the tail end of the yarn down through the head to anchor it securely. The three loops should face upward.
Fold the beak in the middle and sew it to the front of the head. Folding it brings the two halves together so it reads as a proper beak shape rather than a flat piece. Position it roughly centered on the face, just below where you'll place the eyes.
Sew on eyes with left-over black yarn. I use a yarn needle and make small tight stitches to form each eye, pulling the yarn through to the back and knotting it off inside the head so the knot doesn't show. Placement is everything here: take a moment to pin or hold them in place before committing.
Sew the legs under the chicken. Space them evenly so the bird sits level. The long tail on each leg gives you enough yarn to stitch through the base of the body a few times and tie off inside.
If you enjoy this stuffed chick, you might also like my Easter chicken ornaments — a completely different take on the chicken idea, designed as small hanging decorations rather than a toy.
Baby & Child Safety Notes
If this chicken is going to a young child, skip the yarn eyes and use embroidered eyes only, the way I described above with the black yarn. Small attached pieces like the beak, legs, and cockscomb should all be sewn on very firmly and tested with a firm tug before handing the toy over. Weave in every end securely and trim close so nothing can be pulled loose. For children under three, it's worth going over every attachment point twice.

Frequently Asked Questions
What hook size do I need for this chicken pattern?
I use a 4 mm (G/6) hook for the main body parts and a 3 mm (C) hook for the smaller details. Switching between the two makes a real difference in how tight and tidy the smaller pieces look, so it's worth keeping both on hand before you start.
What yarn weight works best for this pattern?
DK weight (Light 3) is what I use here. It gives the finished chicken a nice structure without being too stiff, and the stitch definition comes out really clean at that weight.
How big does the finished chicken turn out?
Mine came out at about 12 cm (4 ¾ inches) tall. That's roughly the size of a large egg, so it's a pretty compact little thing. Gauge and how firmly you stuff it can nudge that number slightly in either direction.
Is this pattern suitable for a beginner?
It's listed as Level 2 Easy, so you'll want to be comfortable with the basics before jumping in. If you can work in the round and do a magic ring without too much fussing, you'll be fine. Total beginner? Maybe crochet one or two simpler rounds-based projects first.
Can I make this chicken larger or smaller?
You can go up a hook size and use a heavier yarn to get a bigger chicken, or drop down in hook and yarn weight to shrink it. Just know the proportions of the separate pieces will shift a little, so some assembly adjustments might be needed. I haven't tested every size combination, so some trial and error involved.
Now It's Your Turn!
I'd love to see your finished chicken, so if you make one, tag me on social media or drop a photo in the comments. These little amigurumi are SO satisfying to finish, and I'm always curious what color combinations people reach for. If you're saving patterns to come back to later, go ahead and pin this one to your crochet board on Pinterest so you can find it when you're ready to pick up your hook.
🐔 More amigurumi animals to try: The Baby Chick is a perfect companion to the Chicken — make both for a farmyard set! And if you want more animal projects, the Raccoon Plushie and Turtle Amigurumi are both great next makes.


Leave a Reply