
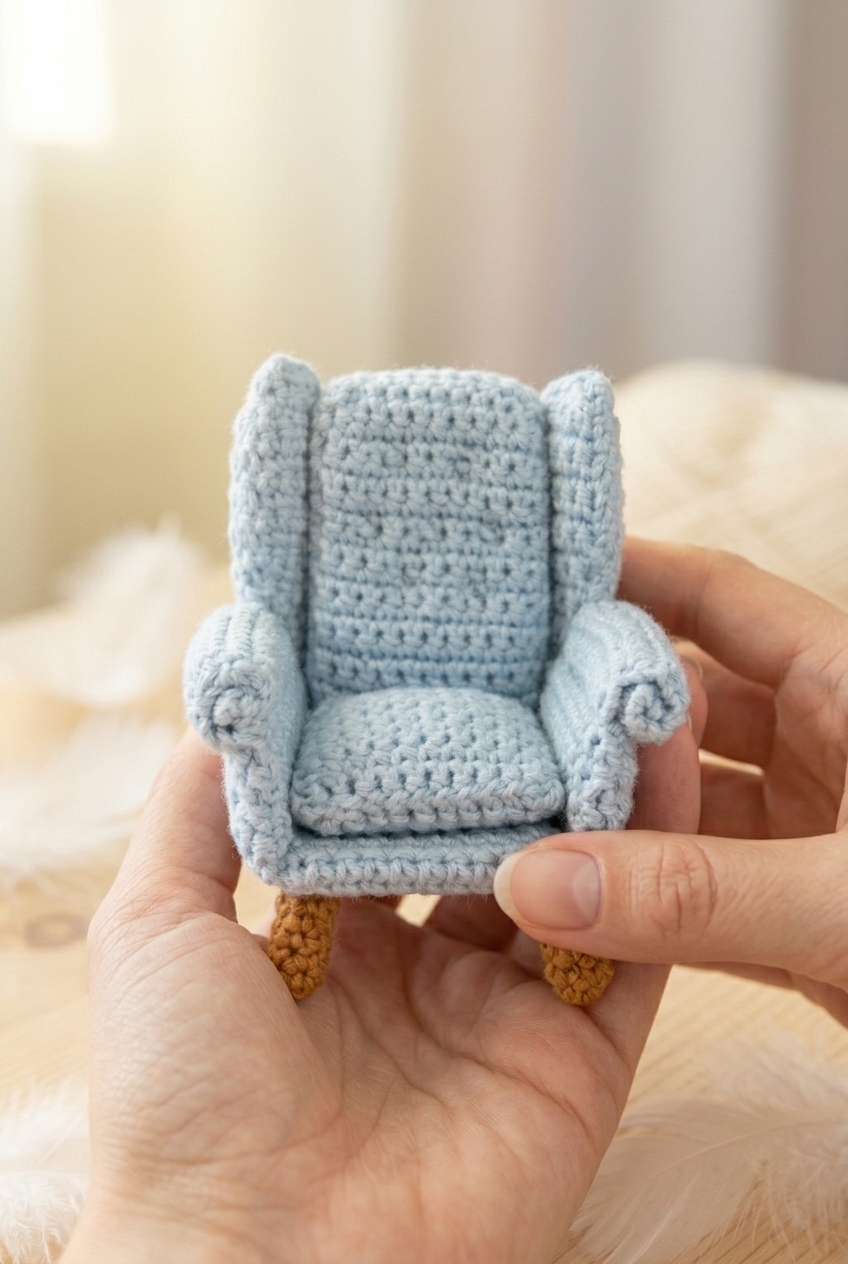
Miniature Armchair Crochet Pattern might just be my favorite thing I've made all year. It's a 1:12 scale armchair, so we're talking true dollhouse size, and it is SO satisfying to hold in your hand when it's done. Beginner-friendly construction, a really clever little build, and honestly a perfect project if you want to try something completely different from the usual scarves and dishcloths.

Jump to:
Behind the Pattern
What I love about this one is how much it feels like a tiny puzzle. Each piece of the chair comes together separately and then gets assembled, so you're not trying to work some complicated construction all at once. It clicks. And when you put it all together and set it down on a shelf, it just looks like a real piece of furniture. That never gets old for me.
I'd make this for anyone who collects miniatures, keeps a dollhouse, or just wants something genuinely unique to display. It also makes a really thoughtful handmade gift, the kind that makes people go "wait, you made that?" It suits any occasion where you want to give something small but clearly took effort and care.
Why This Pattern Stands Out
This tiny armchair delivers a wow-worthy result with beginner-level stitches and minimal materials.
- True Beginner Build: No advanced techniques required, just basic stitches used in a clever way.
- Quick Time Investment: Small scale means you can finish this in a single sitting or a short weekend.
- Gifting Potential: It's the kind of handmade gift that genuinely surprises people, perfect for miniature collectors or dollhouse enthusiasts.
- Technique Learning Value: Working in small scale is great practice for shaping and assembly skills you'll use in bigger projects later.
- Yarn Stash Friendly: The tiny size means you only need small amounts of yarn, so it's a great scrap yarn project.
Materials You'll Need
The cardboard and skewers are the surprise here — this is more of a craft project than a pure crochet one.
- Sport Weight Yarn (Weight 2 Fine): For a 1:12 scale miniature sofa, sport weight is about as chunky as you want to go. Anything heavier and the piece loses its detail and starts looking lumpy at this tiny scale. The fiber isn't specified in the pattern, so check your label and go with whatever you have on hand in a color you like. You won't need much — a rough estimate of 15 to 25 meters should cover the whole project, but wind off a small amount first and see how far it takes you.
- 2.00 mm Crochet Hook: A 2.00 mm pairs well with sport weight at this scale. It keeps the fabric tight enough that the stuffing doesn't show through, and you get clean stitch definition on something this small.
- Toy Stuffing: Use a small pinch inside the cushion section before the opening closes up. You really don't need much — overstuffing a piece this size makes it stiff and hard to shape around the cardboard panels.
- Cardboard (3–4 mm thickness): This is the structural backbone of the whole sofa. You'll need to cut the following panels: one Seat Cushion Panel at 4 cm x 4.4 cm, two Base/Back Panels at 7 cm x 4 cm each, two Arm Rest Panels at 7 cm x 2 cm each, and two Top Side Panels at 5.5 cm x 1.7 cm each. Cereal box cardboard is usually too thin, so go for something with a bit more rigidity.
- Wooden Skewers or Toothpicks: These get cut down into 16 tiny feet, each 1.5 cm long. Toothpicks are the right diameter and already close to the right length, so they're the easier option of the two.
- Also needed: yarn needle, scissors
Project Info
A fully stuffed and structured miniature sofa, built to 1:12 scale with cardboard panels and tiny wooden feet.
| Skill Level | Beginner |
| Pattern Gauge | Gauge is not critical for this project. Use a hook size that creates a tight, firm fabric so stuffing does not show through. |
| Finished Size | Scale: 1:12 Miniature |
| Yarn Weight | 2 Fine / Sport |
| Fiber | Not specified — check the yarn label |
| Terminology | US |
Abbreviations & Stitches Used
Short list — mostly single crochet and a decrease.
- ch = chain
- sc = single crochet
- sc2tog = single crochet 2 together (decrease)
- sl st = slip stitch
- st(s) = stitch(es)
- * * = repeat instructions between * * as directed
Special Stitches
- Magic ring: Use a magic ring, 6 sc in ring.
Pattern Notes
This is a structured build, not just a crocheted shape. The sofa gets its form from cardboard panels inserted into each section before seaming. Before you start crocheting, cut your cardboard pieces: 1 seat cushion panel (4 cm x 4.4 cm), 2 base/back panels (7 cm x 4 cm), 2 arm rest panels (7 cm x 2 cm), and 2 top side panels (5.5 cm x 1.7 cm). You'll also need 16 wooden feet pieces cut to 1.5 cm each from skewers or toothpicks. Four pieces go into each foot to give them enough bulk to stand up properly.
The arm rests are worked flat. Rows 8 through 22 roll up and get sewn in place to form the rounded arm shape. Pay attention to which direction you roll each one — the skipped stitches from Row 8 sit at the back of the chair, and the two arm rests are mirror images of each other. The lower half folds over the arm rest cardboard panel, gets a very light stuffing, and the edges are sewn closed before attaching to the main chair along the back and base.
The top side panels work the same way: two crocheted pieces sandwich one cardboard panel, get a small amount of stuffing, and sew closed. These attach along the skipped stitches from Row 8 of the arm rest sides and to the back panel.
The back cushion gets a tufted finish. Cut 7 short yarn lengths, tie 3 knots in the center of each, then sew the ends into the cushion and pull tight to form studs: 2 at the top, 3 in the middle, 2 at the bottom. Leave a few rows clear at the bottom since that area sits behind the seat cushion and won't be visible.
Tension matters here even without a formal gauge. A loose fabric will let the cardboard panels and stuffing show through, so work snugly. If your stitches look open, go down a hook size.
Miniature Armchair Crochet Pattern Instructions
Work through each piece in order and you'll have everything you need to assemble a sturdy little armchair with structured panels, cushions, and four feet.
Back Panel
This is the structural backbone of the chair. It gets folded over a cardboard insert, so the fabric needs to be firm and even throughout — consistent tension here makes the finished chair sit square.
Row 1: 12 sc foundation sts. [12 sc] TURN
Alt Row 1: Ch 13, sc in 2nd ch from hook and in each ch across. [12 sc]
Rows 2–20: Sc in each st across. [12 sc] TURN
Row 21: Sc2tog, sc in next 8 sts, sc2tog. [10 sc] TURN These decreases at both ends mark the fold point at the center of the panel.
Row 22: 2 sc in next st, sc in next 8 sts, 2 sc in next st. [12 sc] TURN The count is restored here, and you're back to the full width for the second half of the panel.
Rows 23–42: Sc in each st across. [12 sc] TURN
Fasten off. Fold in half over back panel cardboard piece, sew up edges.
Base Panel
The base panel forms the floor of the chair and is worked the same way as the back panel, just without the fold-point shaping. It also wraps around a cardboard insert.
Row 1: 12 sc foundation sts. [12 sc] TURN
Alt Row 1: Ch 13, sc in 2nd ch from hook and in each ch across. [12 sc]
Rows 2–42: Sc in each st across. [12 sc] TURN
Fasten off. Fold in half over base panel cardboard piece, sew up edges.
Back Cushion
The back cushion sits against the back panel and gets stuffed, so it has a bit of dimension to it. Unlike the panels, this one starts narrower and expands before settling into the long straight section.
Row 1: 10 sc foundation sts. [10 sc] TURN
Alt Row 1: Ch 11, sc in 2nd ch from hook and in each ch across. [10 sc]
Row 2: 2 sc in next st, sc in next 8 sts, 2 sc in next st. [12 sc] TURN
Rows 3–20: Sc in each st across. [12 sc] TURN
Row 21: Sc2tog, sc in next 8 sts, sc2tog. [10 sc] TURN
Row 22: 2 sc in next st, sc in next 8 sts, 2 sc in next st. [12 sc] TURN
Rows 23–41: Sc in each st across. [12 sc] TURN
Row 42: Sc2tog, sc in next 8 sts, sc2tog. [10 sc]
Fold in half, stuff, sew up edges.
Fasten off. Fold in half, stuff, sew up edges.
Seat Cushion
The seat cushion is shorter than the back cushion but constructed the same way — start narrow, expand, work straight, then close it up with stuffing inside.
Row 1: 10 sc foundation sts. [10 sc] TURN
Alt Row 1: Ch 11, sc in 2nd ch from hook and in each ch across. [10 sc]
Row 2: 2 sc in next st, sc in next 8 sts, 2 sc in next st. [12 sc] TURN
Rows 3–15: Sc in each st across. [12 sc] TURN
Row 16: Sc2tog, sc in next 8 sts, sc2tog. [10 sc] TURN
Row 17: 2 sc in next st, sc in next 8 sts, 2 sc in next st. [12 sc] TURN
Rows 18–30: Sc in each st across. [12 sc] TURN
Row 31: Sc2tog, sc in next 8 sts, sc2tog. [10 sc]
Fold in half, stuff, sew up edges.
Fasten off. Fold in half, stuff, sew up edges.
Arm Rest Sides
Make 2. These are the most involved pieces to work — each arm rest side has a section that gets skipped mid-piece, then you rejoin to work the underside separately. Take your time with the rejoin in Row 23; it's straightforward once you find the right spot in the foundation chain.
Row 1: 20 sc foundation sts. [20 sc] TURN
Alt Row 1: Ch 21, sc in 2nd ch from hook and in each ch across. [20 sc]
Rows 2–7: Sc in each st across. [20 sc] TURN
Row 8: Sc in next 14 sts, skip remaining sts. [14 sc] TURN The 6 skipped stitches at the end of this row create the opening where the top side panel will eventually attach.
Rows 9–22: Sc in each st across. [14 sc] Fasten off.
Row 23: Rejoin yarn in beginning ch from Row 1, sc in each ch across. [20 sc] TURN You're working into the other side of the foundation chain here, picking up those original loops to build the underside of the arm rest.
Rows 24–29: Sc in each st across. [20 sc] TURN
Fasten off.
Top Sides
Make 4. These small shaped pieces cap the tops of the arm rests. They're worked in pairs — two pieces sandwich a cardboard insert — so you'll end up with two finished top sides total, one for each arm.
Row 1: 5 sc foundation sts. [5 sc] TURN
Alt Row 1: Ch 6, sc in 2nd ch from hook and in each ch across. [5 sc]
Rows 2–4: Sc in each st across. [5 sc] TURN
Row 5: 2 sc in next st, sc in last 4 sts. [6 sc] TURN
Row 6: Sc in each st across. [6 sc] TURN
Row 7: 2 sc in next st, sc in last 5 sts. [7 sc] TURN
Rows 8–14: Sc in each st across. [7 sc] TURN
Row 15: Sc2tog, sc in last 5 sts. [6 sc] TURN
Row 16: Sc in first 4 sts, sc2tog. [5 sc] Fasten off.
Fasten off.
Feet
Make 4. These are worked in continuous rounds without joining. Each foot gets stuffed with wooden feet pieces before being sewn to the chair, so they have real weight and stability to them.
Round 1: Ch 4, sl st in first ch to form a loop, 6 sc in center of loop. [6 sc] Do not join rounds.
Alt Round 1: Use a magic ring, 6 sc in ring. [6 sc]
Rounds 2–6: Sc in each st around. [6 sc]
Fasten off.
Final Touches
With all the pieces finished, it's time to put the chair together. Start by sewing the back panel and base panel to each other to form the main chair frame — these two stiff, cardboard-reinforced pieces are the foundation everything else attaches to.
For each arm rest: take 2 top side pieces, place them over 1 top side panel cardboard piece, stuff very slightly, and sew up the edges to close. Then sew each assembled top side to the main chair along the skipped stitches from Row 8 of the arm rest side and to the back panel. The gap you left in Row 8 is exactly where this piece is meant to land.
The back cushion and seat cushion get sewn directly onto the chair frame — the back cushion against the back panel, the seat cushion on the base. I sew these on last so they cover any visible seams from the structural pieces underneath.
For the feet: stuff each one with 4 wooden feet pieces, then sew them to the underside corners of the main chair. The wooden inserts give each foot its weight, so make sure they're fully inside before closing up.
What is the cardboard for, and does the thickness really matter?
The cardboard panels are what give the chair its structure. Without them, the pieces would be too floppy to hold the armchair shape. I use 3 to 4 mm thick cardboard, and that range does matter at this scale. Thinner cardboard tends to bow once the crochet is stretched over it, and thicker than 4 mm makes the finished piece feel blocky.
How do I make the wooden feet? Do I need to buy anything special?
The feet are crocheted tubes, and you stuff each one with four pieces cut from wooden skewers or toothpicks before sewing them closed. No special purchase needed. Standard toothpicks cut to size work fine. The wood gives each foot enough rigidity to actually support the chair without collapsing.
The arm rest section has a row where you skip stitches and come back later. What is that doing?
Row 8 of the arm rest sides stops at 14 stitches and leaves the remaining stitches unworked. That creates the opening where the top side piece will sit. You come back later and rejoin yarn to work those skipped stitches separately. It is the main shaping move in the whole pattern, so read ahead before you get there.
Why do I need to make four top side pieces instead of two?
Each arm rest uses two top side pieces sandwiched around one cardboard panel. You place the cardboard between them, add just a tiny bit of stuffing, and sew the edges shut. Four pieces total, two per arm. The slight stuffing keeps the top from going flat against the cardboard.
Can I use a different hook size or yarn weight to make a larger version?
Going up in hook size and yarn weight would scale the chair up, but the cardboard panel dimensions would need to change too since those are sized to match the crocheted pieces at the 2 mm hook and sport weight combination. It is doable, but it requires recalculating every panel measurements rather than just swapping materials.
Before You Go
This little armchair is one of those projects that looks impossibly fiddly from the outside but actually comes together in a really satisfying order once you work through each piece. If you make one, I would love to see it. Tag me on Instagram or drop a photo in the comments. And if you are building out a whole 1:12 scale room, save this one to Pinterest so you can find it again when you are ready for the next piece of furniture.


Leave a Reply