
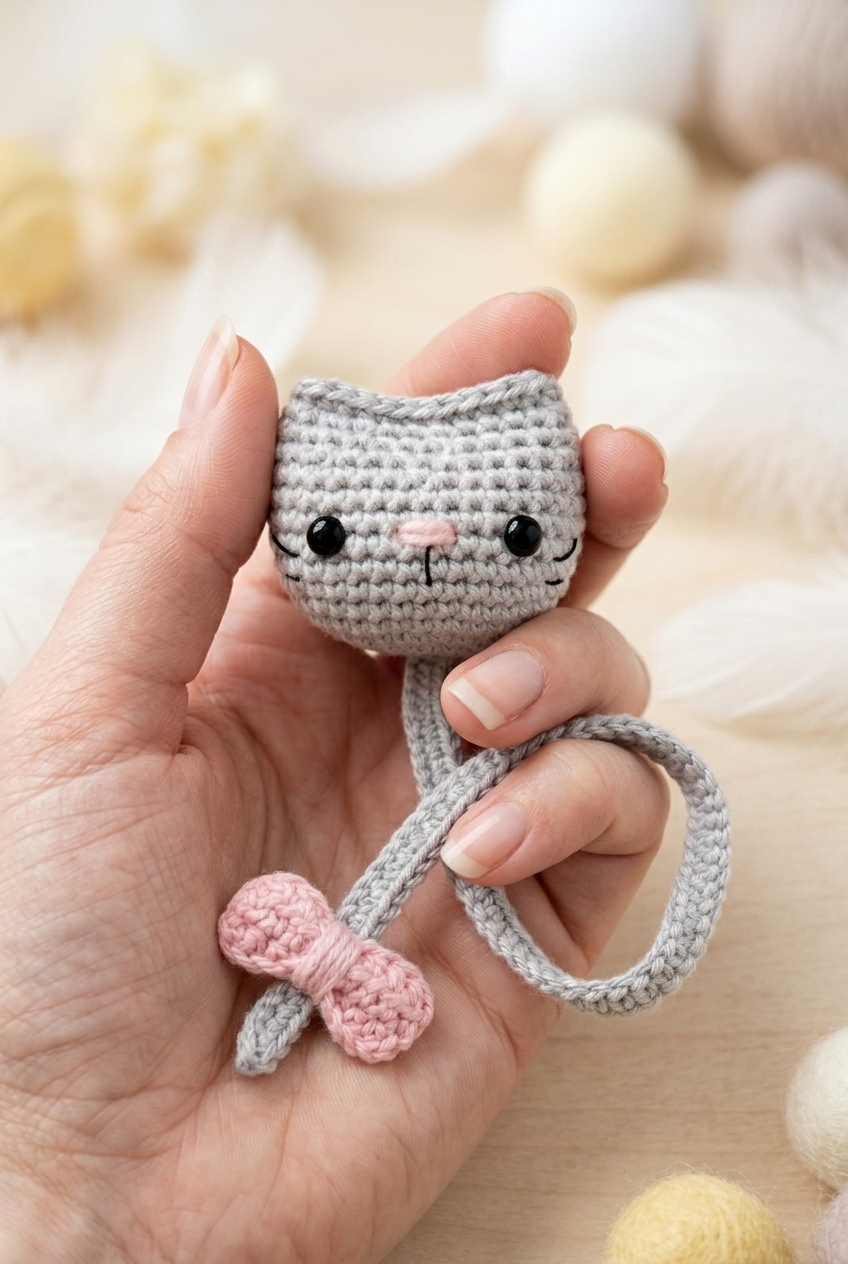
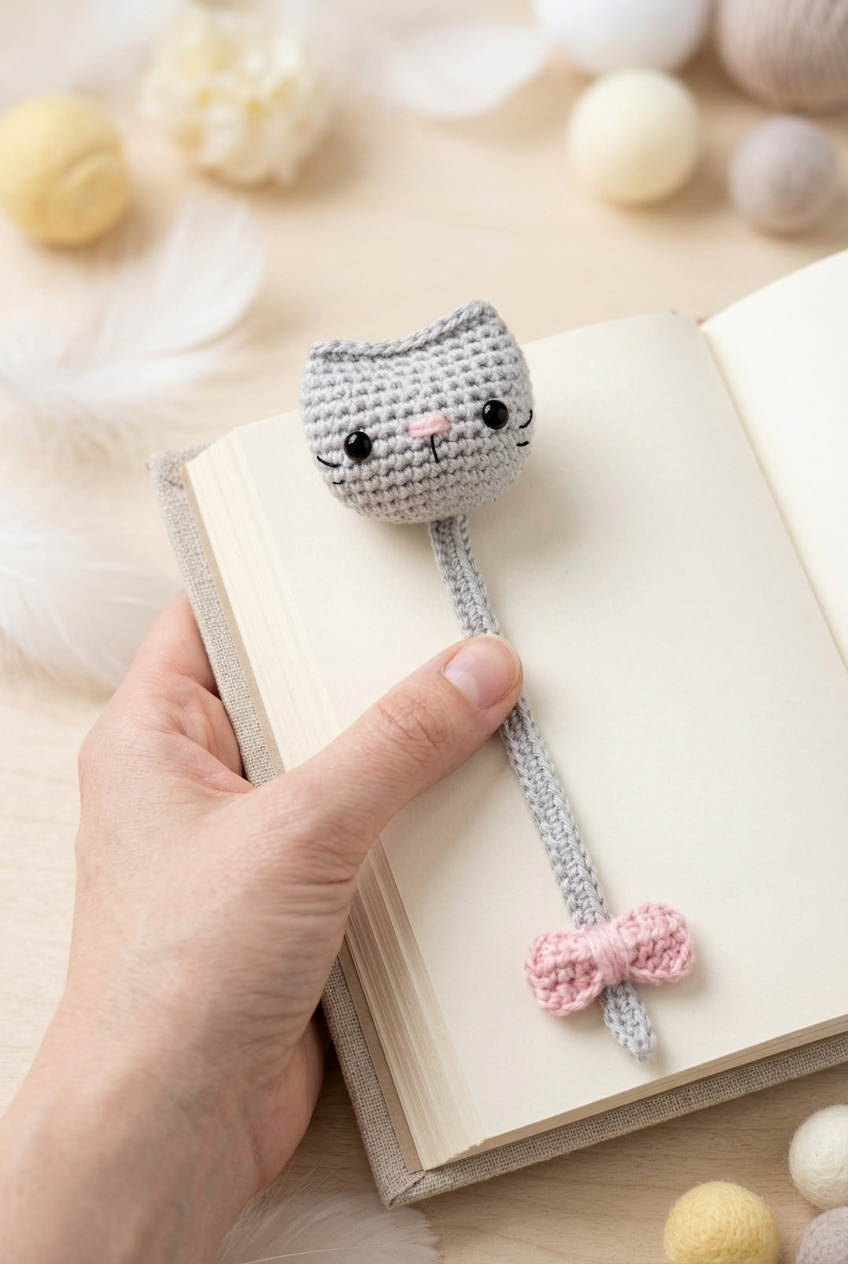
If you've been looking for a quick little make that's actually useful AND adorable, this Cat Bookmark Crochet Pattern is it. It's an easy accessory that works up fast, makes a seriously sweet handmade gift, and gives cat lovers something to smile at every time they open a book.

Jump to:
The Inspiration
I made this one because I wanted something small I could finish in a single sitting. Bookmarks are pretty underrated as crochet projects honestly. They're portable, they're practical, and people genuinely USE them, which means your handmade work actually gets seen on a regular basis instead of sitting in a drawer.
The cat design was a natural fit. There's something really satisfying about how the little head and the cord come together as one cohesive piece, and the bow detail near the bottom is the kind of finishing touch that takes it from cute to something you'd actually want to wrap up and give someone. I'd make this for a bookworm friend, a teacher, a kid who just got into reading. It suits pretty much any occasion where a thoughtful, handmade small gift makes sense.
Why This Pattern Stands Out
A practical, personality-packed project that's perfect for gifting and finishes fast.
- Skill Level: Rated easy, so newer crocheters will have no trouble at all working through this one.
- Quick Time Investment: Small enough to finish in one sitting, which makes it a great pick when you want a win without a big commitment.
- Gifting Potential: Cat lovers are everywhere, and a handmade bookmark is the kind of gift that actually gets used and appreciated.
- Technique Value: You get to practice working in the round for the head piece, which is a really useful skill to build on for future amigurumi projects.
- Low Materials Cost: This uses a small amount of yarn, so it's a great stash-buster and an easy one to make in multiples.
Your Supply List
This is a great excuse to dig into those DK cotton scraps, because you really don't need much of any one color.
- DK Weight 100% Cotton Yarn (Main and Contrast Colors): Cotton is the right call here. It holds stitch definition really well at this small scale, so the shaping of the cat body and ears comes through cleanly instead of getting lost in a fuzzy or stretchy fiber. A DK cotton also has just enough structure to keep the finished piece from going limp. You'll need DK weight yarn in your main color and a contrast color for the bow, plus a small separate amount of pink DK for the nose. Exact yardage isn't specified in the pattern, but this is a small amigurumi-style project, so scraps or partial balls are more than enough for all three.
- 2.5 mm Crochet Hook: A 2.5 mm keeps the fabric tight enough that the polyester fiberfill won't show through the stitches, which matters a lot on a small stuffed piece like this.
- 6 mm Safety Eyes: The pattern uses 6 mm. Go with locking safety eyes specifically, not the sew-on kind, since you'll be inserting them before the piece closes up and they need to stay put.
- Polyester Fiberfill: You won't need a lot. Stuff the body as you go, before the opening gets too small to work with. A small handful is usually enough for a piece this size.
- Black Embroidery Floss: This is for the whiskers and mouth embroidery. Floss gives you a finer line than yarn would, so the face details stay delicate and don't overpower the small scale of the head.
- Also needed: stitch marker, yarn needle, scissors
Pattern Overview
A quick cotton accessory worked in the round, with a tail length you can tweak to suit.
| Skill Level | Easy |
| Pattern Gauge | Gauge is not critical for this project. Use a hook size that creates a neat fabric; changing yarn and hook size will change the finished size. |
| Finished Size | Approximately 12" (30.5 cm) long. Size may vary depending on tension and materials used. |
| Yarn Weight | 3 Light / DK |
| Fiber | 100% Cotton |
| Terminology | US |
Abbreviations & Stitches Used
Short list — you've probably used most of these before.
- ch = chain
- sc = single crochet
- hdc = half double crochet
- inc = increase (2 sc in same st)
- invdec = invisible decrease (insert hook in front loop only of next 2 sts, yarn over, pull through 2 loops, yarn over, pull through 2 loops)
- sl st = slip stitch
- st(s) = stitch(es)
Special Stitches
- Magic Ring: Work the first round stitches into an adjustable loop (magic ring), then pull the tail to close the center.
- Invisible Decrease (invdec): Insert hook in front loop only of next 2 sts, yarn over, pull through 2 loops, yarn over, pull through 2 loops.
The Critical Details
The pieces are worked in a continuous spiral, so don't join at the end of each round. Drop a stitch marker into the first stitch of every round and move it up as you go — it's easy to lose your place otherwise. Gauge isn't something to stress over here, but your hook and yarn choice will affect the finished size, so keep that in mind if you're substituting. The tail length is adjustable: add or subtract chains at the start to get the length you want.
How to Make the Cat Bookmark Crochet Pattern
Follow the sections below in order to complete your cat bookmark crochet pattern, from the head through to the bow attachment.
Crocheting the Head
The head is worked in continuous rounds from a magic ring, expanding outward and then decreasing to shape the cat's face. This is the main body of the bookmark, so take your time getting the shaping right.
Round 1: 6 sc in magic ring. [6 sc]
Round 2: [inc] x6. [12 sc]
Round 3: [sc, inc] x6. [18 sc]
Round 4: sc, inc, [2 sc, inc] x5, sc. [24 sc]
Round 5: [3 sc, inc] x6. [30 sc]
Round 6: 2 sc, inc, [4 sc, inc] x5, 2 sc. [36 sc]
Rounds 7–12: [sc] x36. [36 sc] Six even rounds with no shaping — this is where the head builds its depth before the decreases begin.
Round 13: 5 sc, invdec, [10 sc, invdec] x2, 5 sc. [33 sc] The invisible decrease (invdec) keeps the shaping clean on the right side of the fabric.
Round 14: [9 sc, invdec] x3. [30 sc]
Round 15: 4 sc, invdec, [8 sc, invdec] x2, 4 sc. [27 sc]
Insert safety eyes between Round 10 and Round 11, 7 sts apart. Press the opening together to check position before attaching backs.
Begin stuffing and continue to stuff as you go.
Round 16: [7 sc, invdec] x3. [24 sc]
Round 17: [sc] x8, leave the rest of the sts unworked, do not fasten off. [8 sc]
Press the opening together and sc through both sides to close (11–12 sts). Fasten off and weave in end.
Gently press down in the centre to create a more defined cat shape.
Adding the Face Details
The face details are embroidered directly onto the head after it's closed. A little patience here goes a long way — the nose and whiskers are what really bring the cat to life.
Step 1: Using pink DK yarn, sew a nose between Round 10 and Round 11, centered between the eyes (approximately 2 sts long). Sew over it 3 times or until you have your desired look.
Step 2: Using a single strand of black embroidery floss, sew 2 whiskers on either side of the eyes and a vertical stitch down from the nose for the mouth.
Making the Tail
The tail is worked directly from the magic ring at the base of the head, forming a long chain that becomes the bookmark itself. Work with the cat facing down toward you throughout this section.
Step 1: With the cat facing down towards you, insert your hook into a stitch on the right and bring it out through the centre of the magic ring. Place yarn on hook and draw through.
Step 2: ch 71.
Step 3: sc in second ch from hook and in each ch across. [70 sc]
Step 4: Insert hook through the centre of the magic ring and bring it out one stitch over. Fasten off and weave in ends.
Step 5: Gently pull and stretch the tail to minimize any curling.
Crocheting the Bow
The bow is worked flat in rows and kept intentionally small. It attaches to the tail later, so set it aside once it's done.
Row 1: ch 10, hdc in second ch from hook and in each ch across. [8 hdc] The chain-10 gives you 9 stitches to work into, but working into the second chain from the hook brings you back to 8 hdc.
Rows 2–3: ch 1, turn, [hdc] x8. [8 hdc]
Fasten off and weave in ends.
Shaping and Attaching the Bow
This section takes the flat rectangle you just made and turns it into a proper bow before sewing it onto the bookmark. The wrapping step is the key part — take your time getting it snug.
Step 1: Pinch together in the centre. Using a long length of yarn in the same colour (approximately 15"), tie it around the middle to hold the shape. Wrap the tails around the middle to form the bow centre (approximately 5–6 times) and tie the ends in a knot at the back. Weave in ends.
Step 2: Using a piece of yarn the same colour as your bookmark, sew the bow to the bookmark approximately 3.75" from the end of the tail.
Care Instructions
Because the bookmark is made with 100% cotton yarn, it holds up well to hand washing in cool water. Lay it flat to dry so the tail doesn't stretch out of shape. The safety eyes are fine with gentle washing, but I'd skip the dryer entirely. If the tail gets a little curly after washing, just give it a gentle tug and smooth it out while it's still damp.
Frequently Asked Questions
When do I insert the safety eyes?
Insert the safety eyes between Round 10 and Round 11, 7 stitches apart, before you close up the head. I always press the opening together first to check the placement — it's much easier to adjust at that stage than after the backs are on. Once the backs are secured, they're not coming off, so take a moment to get the position right before you commit.
How do I stop the tail from curling?
After you finish crocheting the tail, gently pull and stretch it to minimize the curl. Cotton has a bit of memory to it, so a firm, steady stretch along the length usually does the trick. If it curls again after washing, dampen it slightly and stretch it out while it dries flat.
Can I adjust the length of the tail?
Yes, and it's straightforward to do. The tail is worked as a chain, so adding or subtracting chains changes the finished length. The sample tail is 71 chains, giving you 70 sc and a finished bookmark around 12 inches long. Go shorter for a smaller book, or add more chains if you want extra length to hang out of a thicker one.
Does the hook size matter much for this pattern?
Gauge isn't critical here, so the 2.5 mm hook is a starting point rather than a hard rule. A different hook or yarn weight will change the finished size, but the construction still works the same way. If you want a bookmark close to 12 inches, stick with DK weight cotton and a similar hook size.
How firmly should I stuff the head?
I stuff mine fairly firmly so the head holds its round shape and doesn't look deflated once it's closed. The pattern has you begin stuffing partway through the decreases and continue as you go, so you can keep adding small amounts and checking as you close it up. Just don't overstuff to the point where the stitches gap open.
Where exactly does the bow get attached?
Sew the bow onto the tail approximately 3.75 inches from the end of the tail. Use a length of yarn in the same colour as your bookmark so the attachment stitches blend in. The bow itself is finished by wrapping the yarn tails around the centre about 5 to 6 times before knotting at the back.
Now It's Your Turn!
I'd love to see what colours you choose for your cat bookmark — the stormy grey and blush pink combo is one of my favourites, but honestly this little guy looks great in almost any colour pairing. If you make one, tag me on Instagram or drop a photo in the comments below. And if you want to save this pattern for later, pinning it to your crochet board is the easiest way to find it again when you need a quick handmade gift idea.


Leave a Reply