
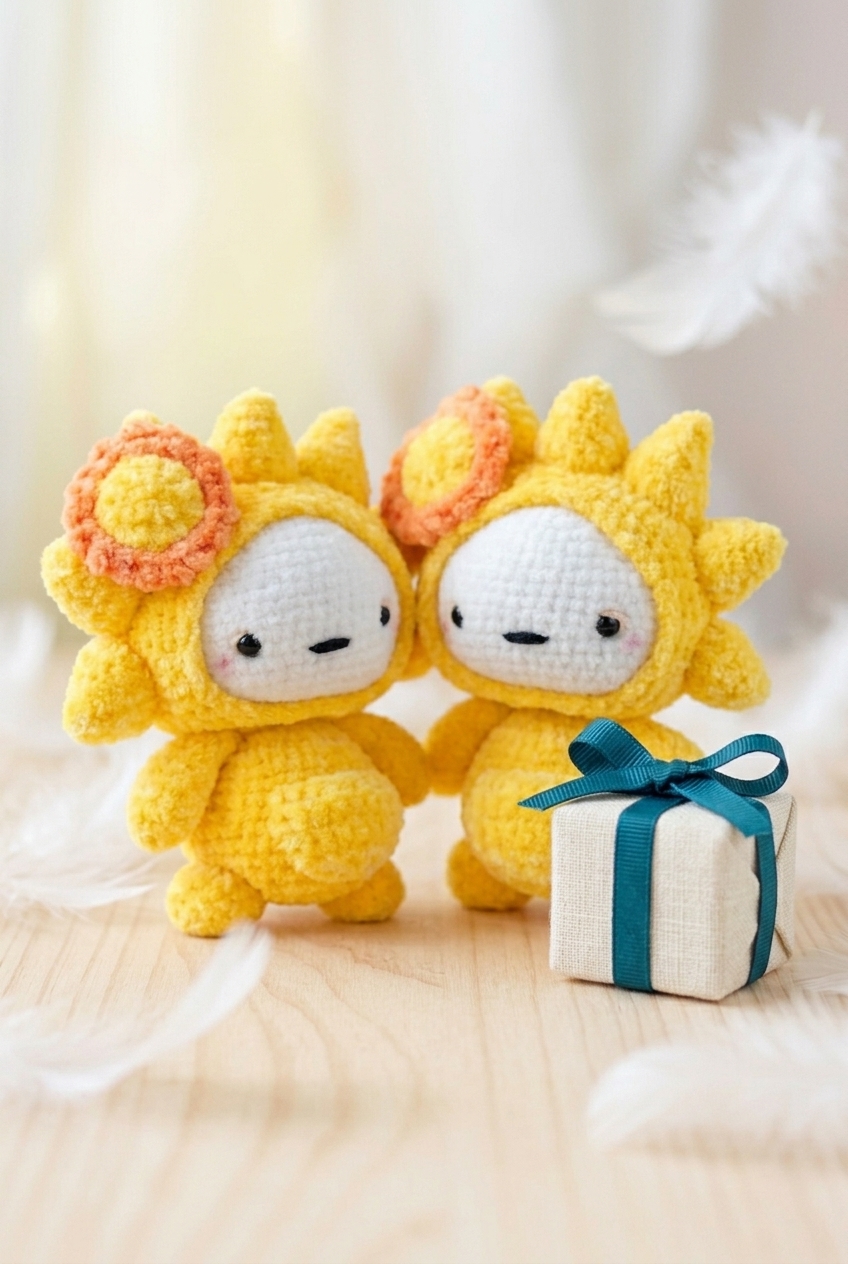
The Lumiling Amigurumi Doll Crochet Pattern is one of those projects I kept coming back to finish because I was just so excited to see it come together. It's beginner-friendly, full of personality, and honestly makes the most charming little gift.

Jump to:
About the Design
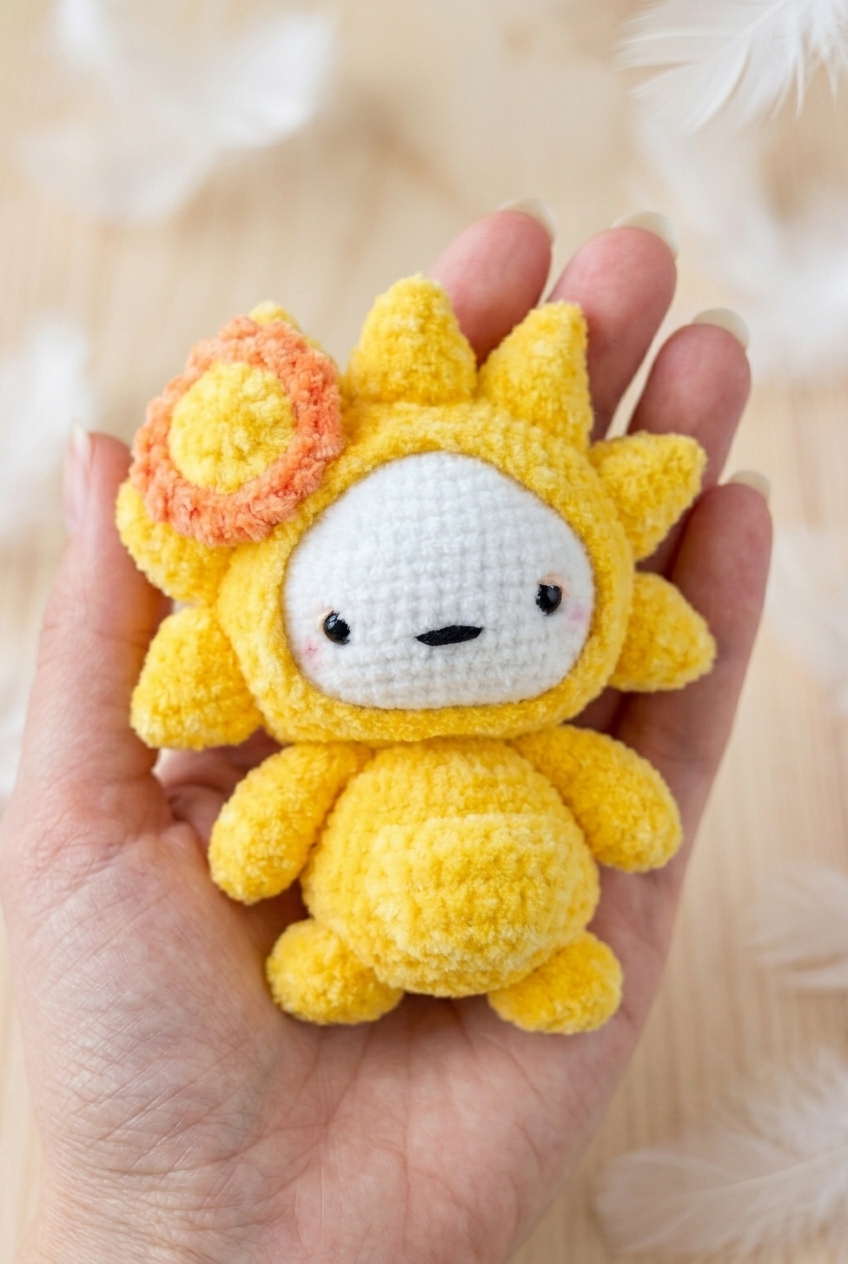
What I love most about this doll is how much character it packs into such a compact little project. The construction is really satisfying, especially the hood detail, which gives the whole thing a playful, whimsical feel that you don't always get with simpler amigurumi patterns. It's the kind of thing that looks like it took way more skill than it actually did.
I'd make this for a kid in a heartbeat, but honestly it's just as good sitting on a shelf or a desk. It has that sweet spot of being simple enough to finish in a reasonable amount of time, but interesting enough that you're not bored halfway through. The little embellishment on the hood is such a nice finishing touch.
Why You'll Want to Make This
This cheerful little doll is the perfect beginner amigurumi with real wow-factor results.
- Beginner Friendly: No advanced techniques here, so it's a great first amigurumi if you've been wanting to try one.
- Great Gift Option: It's the kind of handmade gift that actually gets kept, not just politely accepted.
- Quick Enough to Repeat: Once you've made one, you'll want to make a few more for everyone you know.
- Technique Learning Value: You'll practice shaping, embellishment attachment, and facial embroidery, all in one small project.
- Year-Round Appeal: No seasonal limitations, so it's a solid go-to whenever you need a thoughtful handmade item.
What You'll Need
Yellow does most of the heavy lifting here, with orange, peach, and black coming in just for the finishing details.
- DK Weight Chenille Yarn: Chenille is the right call for this project because that velvety, plush texture is a big part of what makes the finished piece feel special. It's soft against the fabric and holds the amigurumi shape without being stiff. You'll use yellow for almost everything: the body, arms, legs, hood, all seven spikes, the pocket, the tail, and the sunflower center. Orange covers the sunflower petals, and you'll only need a small amount of peach and black for embroidery at the end. Yardage isn't specified in the pattern, but for a project this size, budget around 150 to 200 meters of yellow and maybe 20 to 30 meters of orange. Peach and black are basically scraps.
- 3.50 mm Crochet Hook: This size pairs well with DK chenille. Going smaller keeps the fabric tight enough that the stuffing won't show through, which matters more with chenille than it does with smoother yarns.
- Toy Safety Eyes (8 mm, x2): The 8 mm size is what the pattern uses. Get these in before you close up the head because once that opening is gone, there's no going back.
- Toy Stuffing: Stuff as you go on the smaller pieces like the arms and legs, since those openings close up fast. The head and body give you a bit more room to work with.
- Pink Make-Up Eyeshadow or Pink Pastel Dust: This is for the blush cheeks. You only need a tiny amount. A cheap eyeshadow compact works perfectly fine, and a dry brush or cotton swab is all you need to apply it.
- Also needed: yarn needle, scissors, stitch marker
Alternative Yarn Suggestions
Chenille can be a little tricky to frog if you make mistakes, and it's not always easy to find in every color. If you want a similar softness with a bit more forgiveness, these are worth considering.
- DK Weight Velvet Yarn: Very similar in feel to chenille and widely available. It gives you that same soft, plush finish and tends to be a bit more consistent stitch to stitch, which some people find easier to work with.
- DK Weight Acrylic Yarn: A standard DK acrylic won't have the velvety texture, but it's easy to find, easy to frog, and holds its shape well. The finished piece will look a little different, more matte and structured, but it works.
Key Information
A chenille dinosaur hood with seven sewn-on spikes and a peach face opening worked in rounds, then rows, then rounds again.
| Skill Level | Beginner |
| Pattern Gauge | Gauge is not critical for this project. Use a hook size that creates a tight, firm fabric so stuffing does not show through. |
| Yarn Weight | 3 Light / DK |
| Fiber | Chenille (fiber content not specified — check the yarn label) |
| Terminology | US |
Stitch Guide & Abbreviations
All standard stitches, nothing unusual here.
- B = Black
- ch = chain
- dc = double crochet
- hdc = half double crochet
- O = Orange
- P = Peach
- sc = single crochet
- sc2tog = single crochet 2 together (decrease)
- sl st = slip stitch
- st(s) = stitch(es)
- Y = Yellow
- * * = repeat between asterisks as stated
Read Before Starting
Chenille is the right call for this one. It gives the finished hood that soft, velvety texture that makes it actually pleasant to wear or display, and it photographs beautifully. Just know that chenille can be a little harder to frog than standard yarn, so take your time counting stitches as you go.
The hood construction shifts partway through. It starts in rounds, then switches to flat rows for rounds 12 through 17 to shape the face opening, then rejoins back into rounds to finish. Keep a stitch marker handy for the round sections so you don't lose your place at the join.
All seven spikes are made separately and sewn onto the hood once it's complete. The head portion is worked as an amigurumi piece: safety eyes go in before you close it up. Don't skip that step or you'll be unpicking the seam. Insert and secure both 8 mm safety eyes while you still have enough of an opening to work with.
Four colors are used throughout: Yellow (Y), Orange (O), Peach (P), and Black (B). The pattern uses US terminology throughout.
Step-by-Step Instructions
Here's how I work through each piece of this Lumiling Amigurumi Doll Crochet Pattern, from the body all the way to the finishing details.
Main Body
The main body is worked in continuous rounds — no joining at the end of each round. I start with the head, work through the shaping, and then continue straight into the body without cutting the yarn. Keep a stitch marker handy so you always know where your round begins.
Round 1: In Y, ch 4, sl st in first ch to form a loop, 7 sc in center of loop. [7 sc] Do not join rounds. (Magic ring can be used instead.)
Round 2: 2 sc in each st around. [14 sc]
Round 3: *1 sc in next st, 2 sc in next st* repeat around. [21 sc]
Round 4: *1 sc in next 2 sts, 2 sc in next st* repeat around. [28 sc]
Round 5: *1 sc in next 3 sts, 2 sc in next st* repeat around. [35 sc]
Round 6: *1 sc in next 4 sts, 2 sc in next st* repeat around. [42 sc]
Round 7: *1 sc in next 5 sts, 2 sc in next st* repeat around. [49 sc]
Round 8: *1 sc in next 6 sts, 2 sc in next st* repeat around. [56 sc]
Rounds 9–20: 1 sc in each st around. [56 sc]
Round 21: *1 sc in next 6 sts, sc2tog* repeat around. [49 sc]
Round 22: *1 sc in next 5 sts, sc2tog* repeat around. [42 sc]
Round 23: *1 sc in next 4 sts, sc2tog* repeat around. [35 sc]
Round 24: *1 sc in next 3 sts, sc2tog* repeat around. [28 sc]
Round 25: *1 sc in next 2 sts, sc2tog* repeat around. [21 sc]
Round 26: *1 sc in next st, sc2tog* repeat around. [14 sc]
Round 27: 1 sc in each st around. [14 sc] Stuff head now. Add safety eyes between Rounds 15 & 16, 8–10 sts apart.
Stuff head now. Add safety eyes between Rounds 15 & 16, 8–10 sts apart. Don't skip the eyes before closing further — once the opening gets too small, getting the posts through cleanly becomes a real struggle.
Round 28: *1 sc in next st, 2 sc in next st* repeat around. [21 sc]
Round 29: *1 sc in next 2 sts, 2 sc in next st* repeat around. [28 sc]
Round 30: *1 sc in next 3 sts, 2 sc in next st* repeat around. [35 sc]
Round 31: *1 sc in next 4 sts, 2 sc in next st* repeat around. [42 sc]
Rounds 32–41: 1 sc in each st around. [42 sc]
Round 42: sc2tog repeat to end. [21 sc]
Round 43: sc2tog repeat to last st, 1 sc in last st. [11 sc] Stuff body now.
Stuff body now. Get the stuffing in before the opening closes any further.
Round 44: sc2tog repeat to last st, 1 sc in last st. [6 sc] Fasten off, sew hole closed, tie in all ends.
Fasten off, sew hole closed, tie in all ends.
Arms
Make 2. These are worked in continuous rounds, no joining. They're small and work up fast — I do both at the same time so I don't forget to make the second one.
Round 1: In Y, ch 4, sl st in first ch to form a loop, 6 sc in center. [6 sc] Do not join rounds.
Round 2: 2 sc in each st around. [12 sc]
Rounds 3–6: 1 sc in each st around. [12 sc]
Round 7: *1 sc in next st, sc2tog* repeat around. [8 sc]
Rounds 8–10: 1 sc in each st around. [8 sc] Fasten off, stuff slightly, fold flat at top and sew onto body.
Fasten off, stuff slightly, fold flat at top and sew onto body.
Legs
Make 2. Worked in continuous rounds. These are even quicker than the arms — just a few rounds of shaping and then straight sides.
Round 1: In Y, ch 4, sl st in first ch to form a loop, 7 sc in center. [7 sc] Do not join rounds.
Round 2: 2 sc in each st around. [14 sc]
Rounds 3–6: 1 sc in each st around. [14 sc] Fasten off, stuff slightly, sew onto body.
Fasten off, stuff slightly, sew onto body.
Hood
The hood starts in continuous rounds and then switches to flat rows partway through to create the face opening, before rejoining into rounds again to finish the brim. Keep your stitch marker in place through the round section — you'll need to know exactly where you are when you make the switch to rows.
Round 1: In Y, ch 4, sl st in first ch to form a loop, 7 sc in center. [7 sc] Do not join rounds.
Round 2: 2 sc in each st around. [14 sc]
Round 3: *1 sc in next st, 2 sc in next st* repeat around. [21 sc]
Round 4: *1 sc in next 2 sts, 2 sc in next st* repeat around. [28 sc]
Round 5: *1 sc in next 3 sts, 2 sc in next st* repeat around. [35 sc]
Round 6: *1 sc in next 4 sts, 2 sc in next st* repeat around. [42 sc]
Round 7: *1 sc in next 5 sts, 2 sc in next st* repeat around. [49 sc]
Round 8: *1 sc in next 6 sts, 2 sc in next st* repeat around. [56 sc]
Rounds 9–11: 1 sc in each st around. [56 sc]
Row 12: Ch 1, turn, 1 sc in next 48 sts. [48 sc] This is where you leave rounds behind and start working back and forth. The remaining 8 sts are left unworked — they'll become part of the face opening.
Row 13: Ch 1, turn, 1 sc in next 48 sts. [48 sc]
Row 14: Ch 1, turn, 1 sc in next 48 sts. [48 sc]
Row 15: Ch 1, turn, 1 sc in next 48 sts. [48 sc]
Row 16: Ch 1, turn, 1 sc in next 48 sts. [48 sc]
Row 17: Ch 1, turn, 1 sc in next 48 sts. [48 sc]
Round 18: Ch 8, join with opposite side, 1 sc in next 48 sts. [56 sc] The ch 8 bridges the gap across the face opening and brings you back into rounds.
Round 19: 1 sc in next 8 chs, 1 sc in next 48 sts. [56 sc]
Round 20: *1 sc in next 6 sts, sc2tog* repeat around. [49 sc]
Round 21: *1 sc in next 5 sts, sc2tog* repeat around. [42 sc]
Round 22: *1 sc in next 4 sts, sc2tog* repeat around. [35 sc]
Round 23: 1 sl st in each st around. [35 sl st] Fasten off, tie in all ends. Place over head.
Fasten off, tie in all ends. Place over head.
Spikes
Make 7. These are worked in continuous rounds and start from a large chain loop rather than a small center ring — that's what gives the base its wider opening. Once all seven are done, they get sewn onto the hood.
Round 1: In Y, ch 16, sl st in first ch to form a large loop. [16 ch] Ch 1.
Round 2: Starting in same ch as previous sl st, 1 sc in each ch around. [16 sc] Do not join rounds.
Round 3: *1 sc in next 2 sts, sc2tog* repeat around. [12 sc]
Round 4: 1 sc in each st around. [12 sc]
Round 5: *1 sc in next st, sc2tog* repeat around. [8 sc]
Round 6: 1 sc in each st around. [8 sc]
Round 7: sc2tog repeat to end. [4 sc] Fasten off, sew hole closed, stuff slightly, and sew onto hood.
Fasten off, sew hole closed, stuff slightly, and sew onto hood.
The pocket is worked flat in rows. It's a simple rectangle that tapers at the top — straightforward to make, and a sweet little detail on the finished doll.
Row 1: In Y, ch 9, 1 sc in second ch from hook and in each ch along. [8 sc] Turn.
Row 2: 1 sc in each st along. [8 sc] Turn.
Row 3: 1 sc in each st along. [8 sc] Turn.
Row 4: 1 sc in each st along. [8 sc] Turn.
Row 5: 1 sc in each st along. [8 sc] Turn.
Row 6: sc2tog until end. [4 sc] Turn.
Row 7: sc2tog until end. [2 sc] Fasten off and sew onto body.
Fasten off and sew onto body.
Tail
The tail is worked in continuous rounds and starts from a chain loop, similar to the spikes. It tapers gradually over several rounds with even sections between each decrease round — I stuff it lightly as I go so it holds its shape.
Round 1: In Y, ch 15, sl st in first ch to form a loop. [15 ch] Ch 1, then starting in same ch as previous sl st...
Rounds 2–4: 1 sc in each st around. [15 sc] Do not join rounds.
Round 5: *1 sc in next 3 sts, sc2tog* repeat around. [12 sc]
Rounds 6–7: 1 sc in each st around. [12 sc]
Round 8: *1 sc in next 2 sts, sc2tog* repeat around. [9 sc]
Rounds 9–10: 1 sc in each st around. [9 sc]
Round 11: *1 sc in next st, sc2tog* repeat around. [6 sc]
Rounds 12–13: 1 sc in each st around. [6 sc]
Round 14: sc2tog repeat to end. [3 sc] Fasten off, sew hole closed, stuff slightly, and sew onto body.
Fasten off, sew hole closed, stuff slightly, and sew onto body.
Sunflower
The sunflower is a small joined motif worked in two colors. The center is worked in Y, and then the petals are added in O — have both colors ready before you start. This one joins at the end of each round, so it works a little differently from the rest of the pieces.
Round 1: In Y, ch 4, sl st in first ch to form a loop, 8 hdc in center, sl st in first hdc to join. [8 hdc]
Round 2: Ch 1, starting in same st as previous sl st, 2 sc in each st around, sl st in first sc to join. [16 sc]
Round 3: In O, *ch 5, sl st in next st* repeat around. [16 petals] Fasten off and sew onto hood. Switch to O here before working the petals. Each ch 5 loop forms one petal — work all the way around and then fasten off.
Fasten off and sew onto hood.
Finishing Details
These last few steps bring the doll's face to life. Take your time here — small embroidery details like the mouth and eyelids make a big difference in the final look.
Step 1: In B, sew on a small mouth over 3–4 sts.
Step 2: In P, sew on eyelids above the safety eyes.
Step 3: Use a little pink make-up eyeshadow or pink pastel dust to add blush cheeks.
Fasten off, weave in ends.
Putting It All Together
Once all the pieces are finished, it's time to assemble the doll. I sew the arms onto the sides of the body, folding each one flat at the top before stitching it down so they sit neatly. The legs go on at the base of the body — stuff them slightly before sewing so they hold their shape. The tail gets sewn onto the back of the body, stuffed lightly. The pocket I sew onto the front of the body wherever it looks right to you. For the hood, place it over the doll's head to check the fit, then sew the spikes onto the top of the hood — spacing all seven evenly around. The sunflower goes onto the hood as a decorative detail. Once everything is attached, go back and check that all your sewn joins feel secure before calling it done.
Care Instructions
Chenille yarn and toy stuffing don't love a rough wash cycle. Hand wash the finished doll in cool water with a gentle soap, then press out the excess water carefully without wringing. Lay it flat to dry away from direct heat. The safety eyes can technically handle moisture, but heat is what causes problems, so keep it away from dryers and radiators. If the chenille starts to look a little flat after washing, just fluff it gently with your fingers while it's still slightly damp.
Baby & Child Safety Notes
This doll uses 8 mm toy safety eyes, and while they're called "safety" eyes, they're still a choking hazard for very young children. If you're making this for a child under three, swap the safety eyes out for embroidered eyes instead. Before gifting, tug firmly on the safety eyes, the spikes, the sunflower, the arms, and the legs. Any piece that shifts or comes loose needs to be re-secured before the doll goes to a child. Also check the seams on the body and hood after stuffing. Chenille can be forgiving to work with, but the seams still need to be tight.
Frequently Asked Questions
When exactly do I insert the safety eyes?
Insert and secure the safety eyes before you finish closing the head. The pattern places them between Rounds 15 and 16, about 8 to 10 stitches apart. Once the head is fully closed, you can't get back in to set them, so don't skip past Round 27 without doing this first.
Why does the hood switch from rounds to rows partway through?
The rows in Rounds 12 through 17 create the face opening. Working flat for those six rows leaves a gap at the front of the hood, which is then bridged with a chain in Round 18 to rejoin into rounds. It's what gives the hood that framed opening rather than a fully closed shape.
How are the spikes attached, and does it matter where I place them?
All 7 spikes are crocheted separately, stuffed slightly, and then sewn onto the hood after it's finished. The pattern doesn't specify exact placement, so you have some freedom there. I'd suggest spacing them evenly across the top of the hood before committing to any of them, just to see how the arrangement looks.
Is the main body and head crocheted as one piece or separately?
It's all one continuous piece. The body and head are worked together in rounds from start to finish, with the head section at the top and the body below. You stuff the head at Round 27 and the body at Round 43, both before closing up the relevant section.
What is the pink pastel dust for, and can I skip it?
It's used to add blush cheeks to the doll's face. You can use pink makeup eyeshadow or pink pastel dust, just a small amount brushed onto the cheeks. You can skip it if you prefer a cleaner look, but it does add a lot of character to the finished face.
Before You Go
I hope you have the best time making your Lumiling doll. There's something about that little chenille hood with all its spikes that just gets me every time. If you make one, I'd love to see it, so come tag me on Instagram or drop a photo in the comments below. And if you're saving this for later, pinning it to your amigurumi board is a great way to keep it handy for when you're ready to start.


Leave a Reply