The Frog Bucket Hat Crochet Pattern is exactly the kind of project that looks impressive but is actually a pretty satisfying make once you get into the rhythm of it. It's an intermediate-level pattern, so you'll want some basic hat construction under your belt before diving in, but nothing here is going to stop you in your tracks.

Jump to:
About the Design
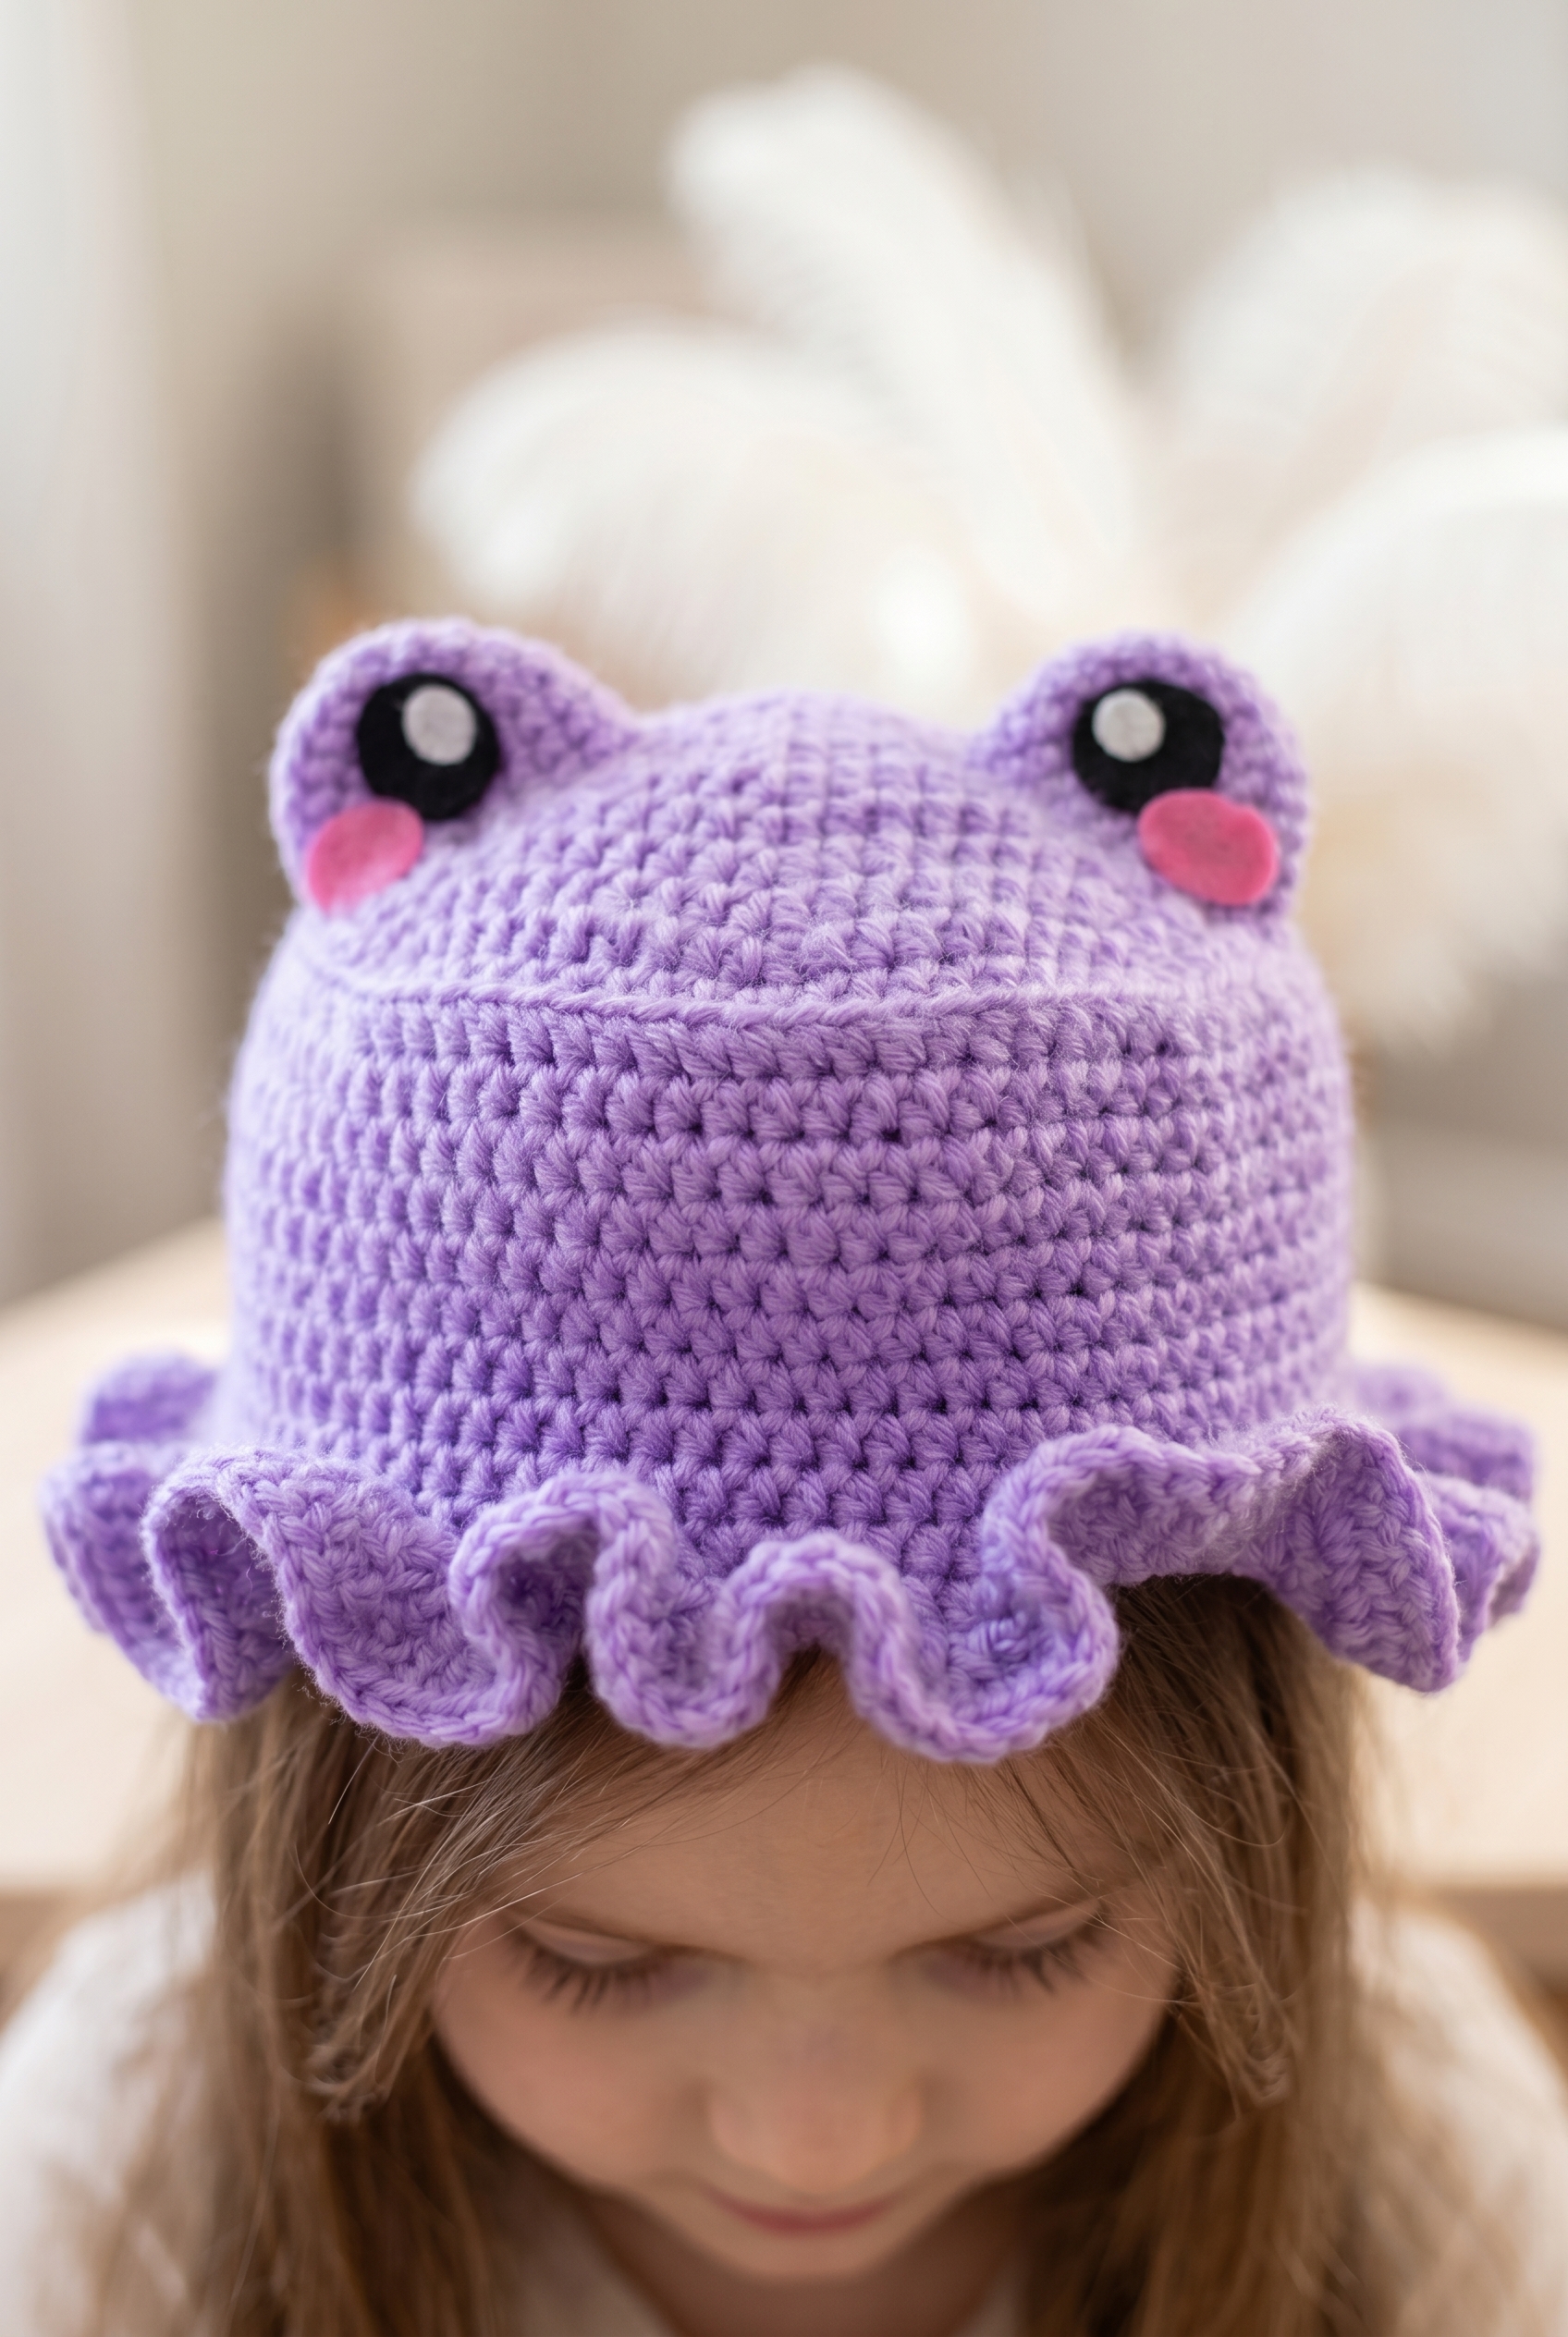
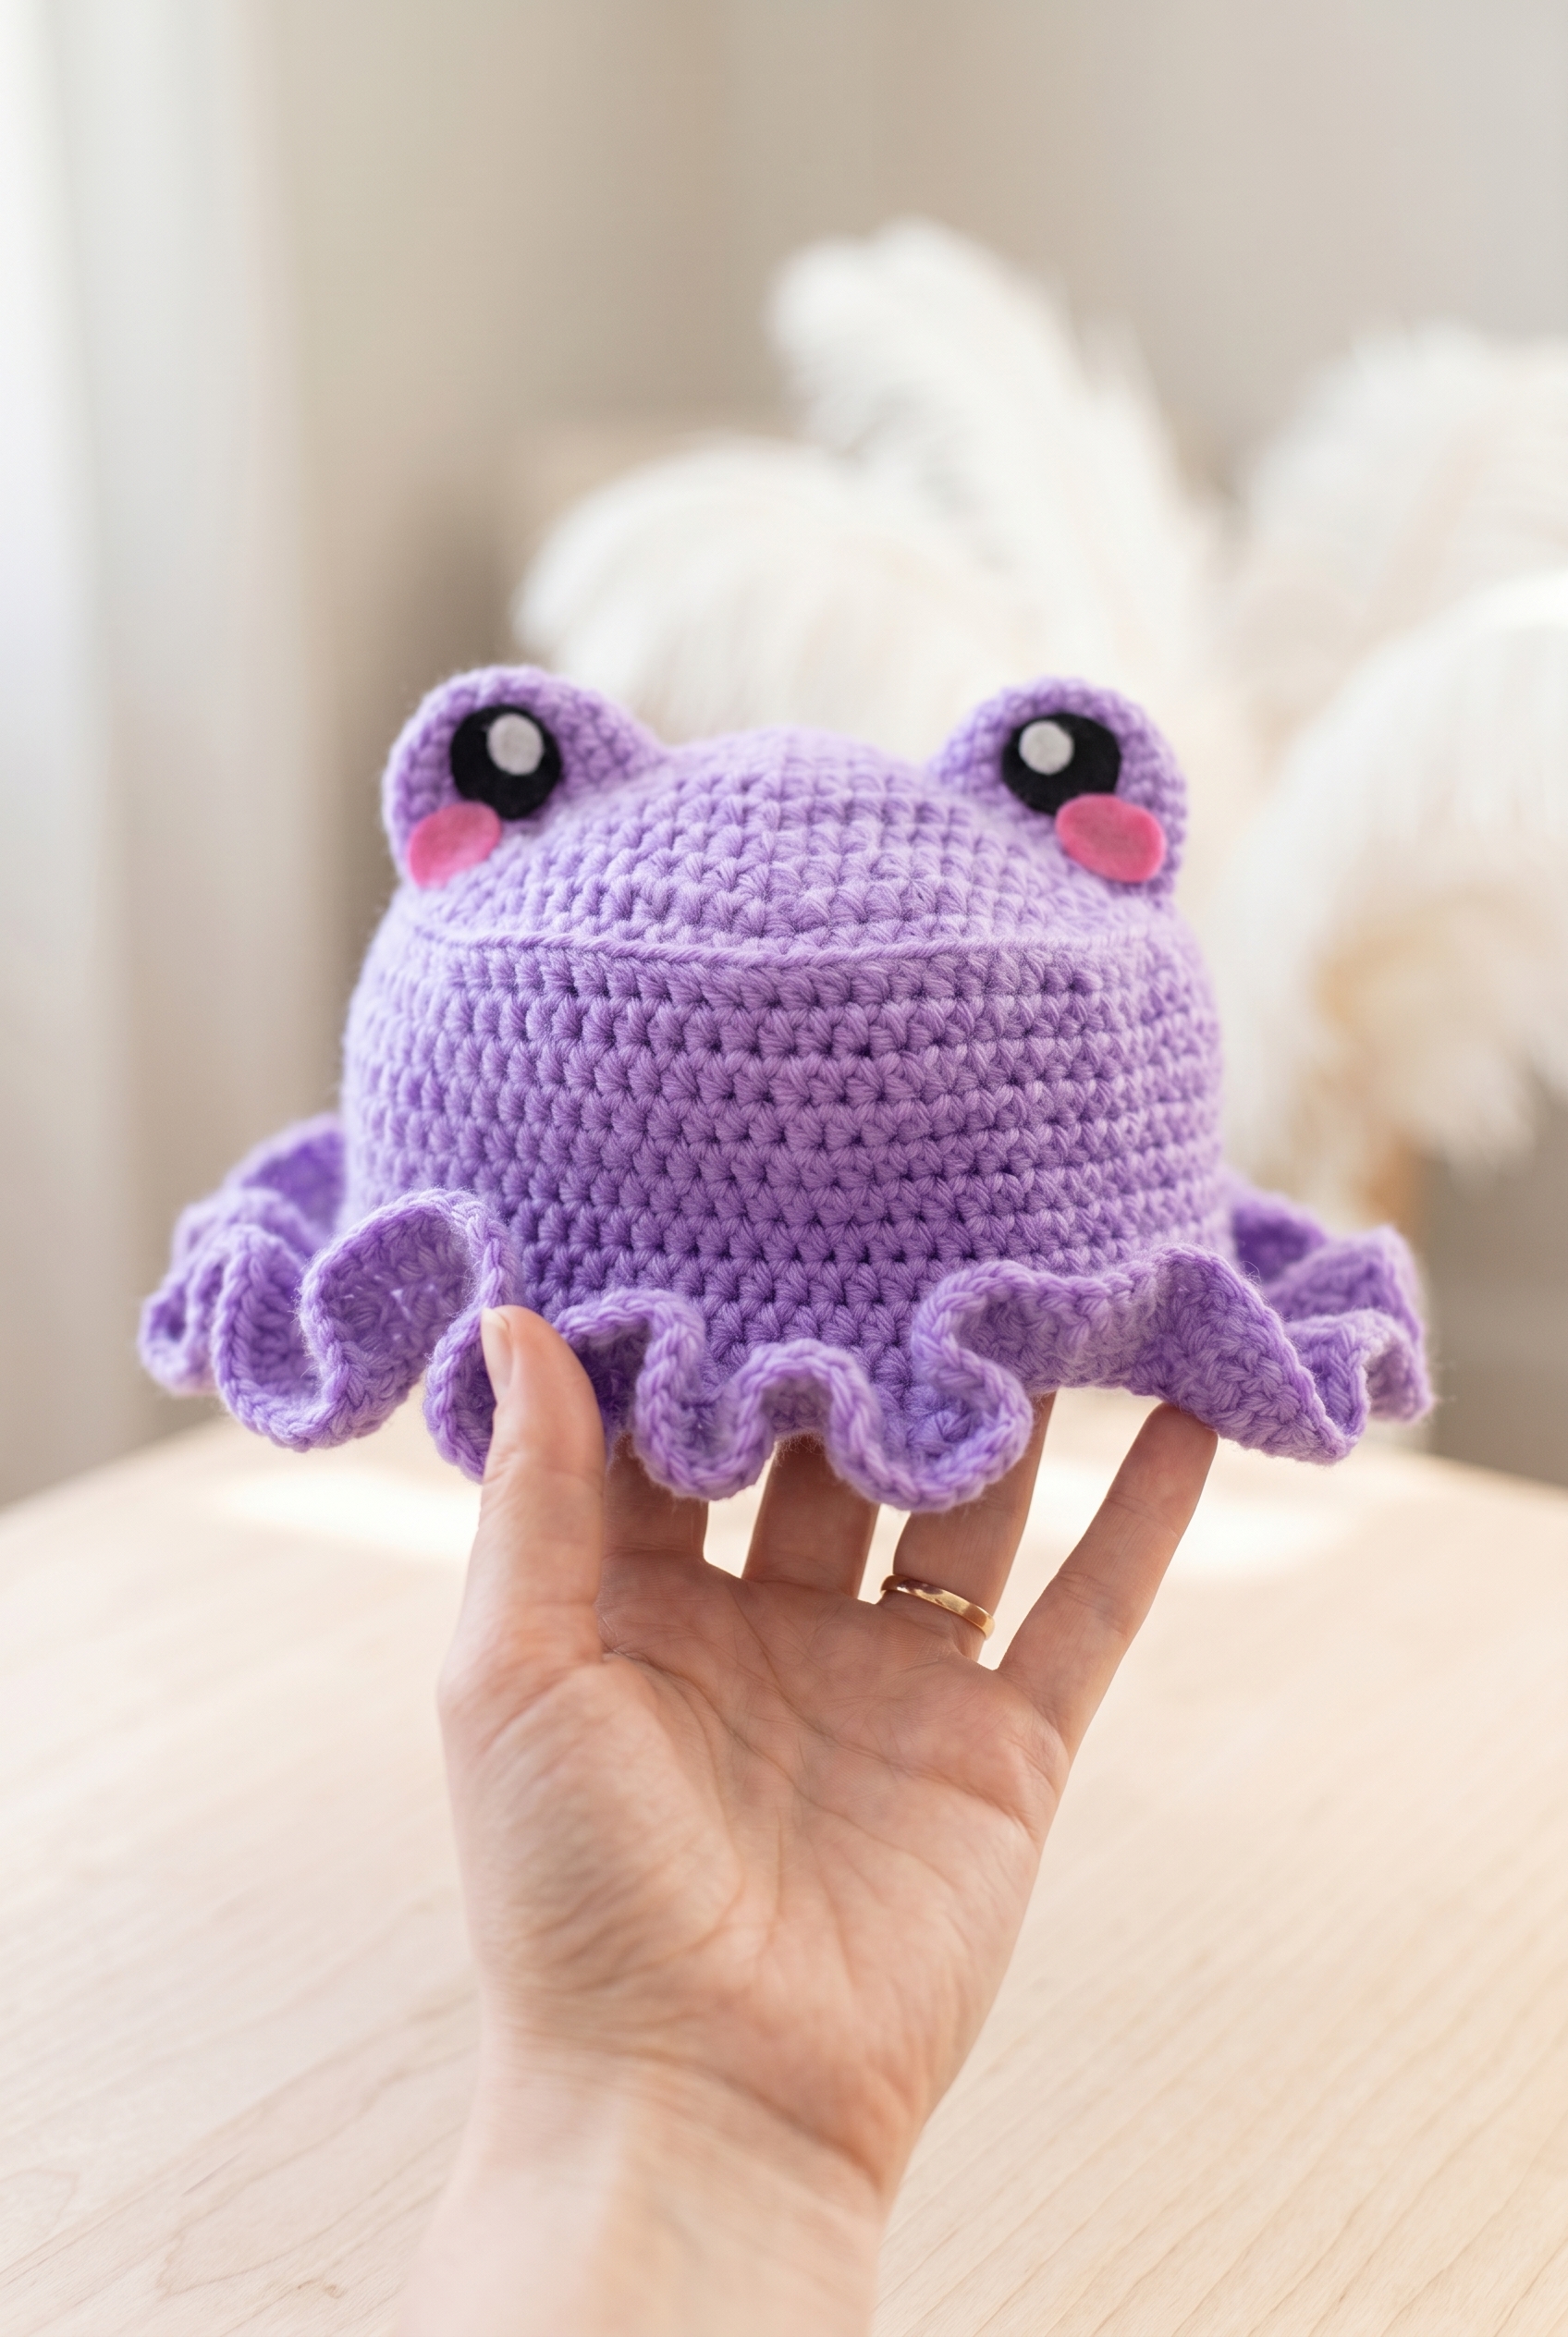
What I love about this design is how much character comes through in the details. The little face elements, the eyes, the cheeks, the smile, they're all worked separately and attached, which means you can really take your time placing them until the expression looks just right. I spent probably more time than I should admit just moving the eyes around before committing. The bucket hat silhouette is a classic, and putting a frog face on it turns something totally wearable into something that also makes people stop and ask where you got it.
This is the kind of thing I'd make for a kid who's at that age where they want everything to have a face on it, but honestly, adults have been requesting this one too. It works for anyone who leans into a fun, playful style. A birthday gift, a photo prop, something to wear to a farmer's market on a cool morning. It fits right into all of those.
Why You'll Love This Pattern
The frog face details make this hat a guaranteed conversation starter every single time.
- Intermediate skill level: You'll need some hat construction experience, but nothing here requires advanced techniques.
- Worked in pieces: The face elements are made separately and attached, so you get full control over the final expression.
- Great for gifting: This one lands well with kids and adults alike, which makes it a flexible option when you need a handmade gift.
- Technique building: If you haven't done much surface embellishment or appliqué work on hats before, this pattern is a solid way to practice it.
- Wearable and fun: It's a functional hat that actually gets worn, not just admired on a shelf.
Gather Your Supplies
You will need a hot glue gun for this one, so dig it out before you start.
- Worsted Weight Yarn (Color A, Purple): Worsted weight is the right call here. It works up quickly and gives the hat enough structure to hold its shape without being stiff. For a small project like a bucket hat, you're probably looking at somewhere in the range of 50 to 100 yards for the main color, but check your gauge and adjust from there since the pattern doesn't specify a yardage amount.
- 4 mm Crochet Hook: A 4 mm pairs well with worsted weight and gives you a fabric that's firm enough to keep the hat from flopping around. Pretty standard pairing for this yarn weight.
- Black Felt: Used for the eye circles and the optional smile. Cut these out carefully since small felt pieces are where the whole face comes together.
- White Felt: The white circles sit behind the black eye pieces to give the eyes that classic layered look.
- Pink Felt: Cut into small ovals for the cheeks. The size is up to you depending on how much expression you want on the finished piece.
- Hot Glue: This is what holds all the felt pieces in place on the hat. Use it sparingly so it doesn't bleed through or show around the edges of the felt.
- Also needed: scissors, tapestry needle
Color Sequence & Yarn Changes
Purple is the only crocheted color here, so there are no yarn changes to manage during the actual hat construction. The black, white, and pink all come in through the felt pieces at the end, which keeps the whole process pretty clean.
At a Glance
A smiley face bucket hat worked in the round, with felt facial features you can swap out for safety eyes, embroidery, or surface crochet.
| Skill Level | Intermediate |
| Pattern Gauge | Approx. 4.5 hdc x 3.5 rounds = 1 inch with 4 mm hook (worsted yarn) |
| Finished Size | Hat size not specified; eyes are about an inch in diameter; cheeks are about an inch wide and a bit more than half an inch tall; smile is about 2 ½" long and a quarter inch thick. |
| Yarn Weight | 4 Medium / Worsted |
| Terminology | US |
Abbreviations & Stitches Used
Nothing unusual here, just the standard crew.
- beg = beginning
- BLO = back loop only
- ch = chain
- dc = double crochet
- FLO = front loop only
- FO = fasten off
- hdc = half double crochet
- inc = increase (work 2 sts in the same st, as directed)
- MR = magic ring
- rnd = round
- sc = single crochet
- sl st = slip stitch
- st = stitch
Before You Begin
The hat is worked in continuous rounds from the top down. The crown section uses hdc throughout, and all increases there are worked as 2 hdc in the same stitch. When you get to the brim, the stitch switches to dc, and increases become 2 dc in the same stitch. Those two sections handle their increases differently, so it's worth keeping that in mind as you move between them.
The ch 2 at the beginning of a round counts as the last stitch of that round. Most of the time it's acting as the second stitch of the last increase. That trips people up at first, but once you see it in context it makes sense.
For the facial features: I used felt for the eyes, cheeks, and smile, and that's what I'd recommend starting with. It's easy to cut to shape and position before you commit. That said, you've got options. Eyes can be safety eyes or crocheted circles about an inch across. Cheeks can be crocheted or embroidered ovals. The smile works well as embroidery or surface crochet in black yarn if you'd rather skip the felt entirely.
The eye bumps (if your pattern includes raised sections for the eyes) get sewn directly across from each other on the sides near the top of the hat. I didn't stuff mine. It looked too puffy and felt strange to wear. You can try stuffing if you want more dimension, but I'd test it on before deciding. I pushed mine in slightly to make them a little concave, which gave a better result than leaving them fully rounded out.
The Pattern
Here's everything you need to crochet your own frog bucket hat, worked from the top down in joined rounds.
Bucket Hat
This section builds the crown of the hat from the center out. Work entirely in color A — you'll be increasing every round until you hit your full stitch count, then move on to the sides.
Round 1: In a MR, ch 2, 7 hdc. Sl st in ch to join. [8 hdc]
Round 2: Ch 2, *inc* x8. Sl st in ch to join. [16 hdc]
Round 3: Ch 2, *hdc, inc* x8. Sl st in ch to join. [24 hdc]
Round 4: Ch 2, *2 hdc, inc* x8. Sl st in ch to join. [32 hdc]
Round 5: Ch 2, *3 hdc, inc* x8. Sl st in ch to join. [40 hdc]
Round 6: Ch 2, *4 hdc, inc* x8. Sl st in ch to join. [48 hdc]
Round 7: Ch 2, *5 hdc, inc* x8. Sl st in ch to join. [56 hdc]
Round 8: Ch 2, *6 hdc, inc* x8. Sl st in ch to join. [64 hdc]
Round 9: Ch 2, *7 hdc, inc* x8. Sl st in ch to join. [72 hdc]
Round 10: Ch 2, *8 hdc, inc* x8. Sl st in ch to join. [80 hdc]
Sides of the Hat
Now you'll drop straight down to form the body of the hat. Round 11 is worked in the back loops only — that single BLO round creates the ridge that separates the crown from the sides, and the front loops left behind on that round are what you'll pick up later for the brim.
Rounds 11–20: Round 11: Ch 2, in BLO, hdc around. Sl st in ch to join. [80 hdc] Round 12: Ch 2, in both loops, hdc around. Sl st in ch to join. [80 hdc] Round 13: Ch 2, in both loops, hdc around. Sl st in ch to join. [80 hdc] Round 14: Ch 2, in both loops, hdc around. Sl st in ch to join. [80 hdc] Round 15: Ch 2, in both loops, hdc around. Sl st in ch to join. [80 hdc] Round 16: Ch 2, in both loops, hdc around. Sl st in ch to join. [80 hdc] Round 17: Ch 2, in both loops, hdc around. Sl st in ch to join. [80 hdc] Round 18: Ch 2, in both loops, hdc around. Sl st in ch to join. [80 hdc] Round 19: Ch 2, in both loops, hdc around. Sl st in ch to join. [80 hdc] Round 20: Ch 2, in both loops, hdc around. Sl st in ch to join. [80 hdc]
Brim
The brim fans out from the hat using the free front loops left by Round 11. You'll switch to dc here and increase aggressively over three rounds to get that wide, floppy brim shape.
Round 21: Ch 2, in FLO, *3 dc, inc* x20. Sl st in ch to join. [100 dc] Working into the front loops of Round 11 here — make sure you're picking up the right row or the brim won't sit cleanly.
Round 22: Ch 2, in both loops, *dc, inc*. Sl st in ch to join. [150 dc]
Round 23: Ch 2, *inc* around. Sl st in ch to join. [300 dc]
FO and weave in ends.
Eye Bumps
Make 2. These are the raised dome pieces that give the hat its frog character — worked in the round and left open at the bottom for sewing onto the hat.
Round 1: In a MR, sc 6. [6 sc]
Round 2: Inc around. [12 sc]
Round 3: *sc, inc* x6. [18 sc]
Round 4: *2 sc, inc* x6. [24 sc]
Rounds 5–8: Round 5: Sc around. [24 sc] Round 6: Sc around. [24 sc] Round 7: Sc around. [24 sc] Round 8: Sc around. [24 sc] These even rounds build the depth of the bump before you sew it down.
FO, cut a long tail for sewing.
Eyes
Make 2. These are the flat eye details that sit on top of the eye bumps — you've got a few options depending on what materials you have on hand.
Step 1: I made my eyes with felt, but you could use safety eyes or crochet similar sized circles.
Step 2: With the black felt (or crochet with black yarn), cut/crochet 2 circles about an inch in diameter.
Step 3: With the white felt (or crochet with white yarn), cut/crochet 2 circles a little less than half an inch in diameter.
Step 4: Attach the black circles first, then the white ones (I used hot glue) on top.
Cheeks
Make 2. These little oval cheeks go just below the eyes and pull the whole frog face together.
Step 1: I made my cheeks with felt, but you could crochet or embroider on or crochet similar sized ovals.
Step 2: With the pink felt (or crochet with pink yarn), cut or crochet 2 felt ovals about an inch wide and a bit more than half an inch tall.
Step 3: Attach the cheeks under the eyes (I used hot glue) just slightly overlapping.
Smile (Optional)
This step is optional, but it really does make the frog feel more expressive. Felt is the quickest route, though embroidery or surface crochet both work fine.
Step 1: I made my smile with felt, but you could embroider or surface crochet with black yarn to make yours.
Step 2: Cut (or embroider/crochet) a quarter inch thick line with felt that curves for a smile. It should be about 2 ½" long.
Step 3: Attach the smile onto the hat (I used hot glue) towards the top of the sides.
Finishing
With all the pieces made, it's time to put the frog face together. Start with the eye bumps: sew them directly across from each other on the sides of the top of the hat. I position them symmetrically and use the long tail I left when fastening off to stitch them down securely. Once the bumps are set, attach the black felt circles onto each bump, then the white circles on top. The cheeks go just under the eyes, slightly overlapping, and the smile sits towards the top of the sides of the hat. I use hot glue for all the felt pieces, but fabric glue or a few hand stitches work too if you'd rather skip the glue gun.
Blocking
Hats can benefit from a light block to even out the brim and help the sides sit smoothly. Since the fiber isn't specified, check your yarn label before getting it wet. If it's acrylic, I'd skip wet blocking entirely and just steam the brim from a few inches away to coax it flat. If it's wool or a blend, a damp block works well: get the hat damp, shape it over a bowl or balloon that's close to head size, and let it dry completely. The brim on this one has a LOT of stitches in Round 23, so giving it a little help lying flat is worth the extra step.
Care Instructions
The biggest thing to keep in mind with this hat is the felt and hot glue used for the face details. Those do not survive a washing machine. If the hat needs cleaning, spot clean the yarn sections with a damp cloth and mild soap, and avoid getting the eyes, cheeks, and smile wet at all if you can help it. Hot glue can loosen with heat, so keep it away from dryers and direct sunlight for long periods. If a piece pops off, it's easy enough to re-glue.
Baby & Child Safety Notes
If you're making this hat for a young child, the felt pieces and hot glue assembly are the main thing to think about. Hot glue holds well, but it's not indestructible, and small felt pieces that come loose are a choking hazard. For kids under three, I'd either skip the face details entirely, embroider the features directly onto the hat, or use surface crochet instead of felt so everything is fully secured. The eye bumps are sewn on, so check those seams before putting the hat on a little one and give them a tug now and then to make sure they're still tight.
Frequently Asked Questions
Do I have to use felt for the eyes, cheeks, and smile?
Felt is just what I used because it was fast and easy to cut into shapes. You can absolutely crochet the eye circles with black and white yarn, embroider the cheeks on, or surface crochet the smile with black yarn. The pattern even mentions those options directly. Felt gives you clean edges without any extra crocheting, but it does mean the face details aren't washable.
What are the eye bumps and do they need to be stuffed?
The eye bumps are small crocheted domes worked in rounds that you sew onto the top of the hat to give the frog that classic bulgy-eye look. They don't get stuffed. They're just a shallow cup shape, and once sewn down, they hold their form on their own. The felt eye circles get hot-glued on top of them after they're attached to the hat.
Why does the brim end up with so many stitches?
Round 23 doubles every stitch around, which takes you from 150 to 300 stitches. That's intentional. All those extra stitches are what give the brim its wide, floppy drape instead of sitting stiff and flat. It can feel a little wild to work through, but the result is a brim that flops nicely and frames the face well.
What does the ch 2 at the beginning of each round actually do?
In this pattern, the ch 2 counts as the LAST stitch of the round, not the first. That's different from how a lot of patterns handle it, so it trips people up. Most of the time it acts as the second stitch of the final increase in that round. The pattern notes call this out specifically, so keep that in mind when you're counting your stitches at the end of each round.
Where exactly do the eye bumps get sewn on?
They go directly across from each other on the sides of the top of the hat. Think of the very top surface, and place one on each side so they're symmetrical. Once they're sewn down, you layer the felt pieces on top with hot glue: black circle first, then the smaller white circle on top of that.
🐸 Love character hats? Check out the Octopus Bucket Hat — it uses the same bucket hat construction with a completely different personality on top. Want to level up the half double crochet skills you practiced here? The How to Half Double Crochet guide covers everything step by step.
Final Thoughts
This hat is one of those projects that gets a reaction every single time someone sees it, and I love that about it. The purple with the little frog face just works. If you make one, tag me on social media so I can see your version. I'm especially curious what colors people reach for, because I feel like this frog could live in a LOT of different colorways. Save this to your Pinterest boards if you want to come back to it later, and drop a comment below if you run into any questions while you're working through it.


Leave a Reply