This Small Storage Basket Crochet Pattern has been a really satisfying one to work up. It's compact, it comes together quickly, and the finished piece is actually useful around the house. If you've got a few hours and want something that feels complete by the end of the day, this is a good one to pick up.

Jump to:
The Inspiration
I wanted something small enough to sit on a shelf or a nightstand without taking over the whole surface. There are so many little things that just float around the house with nowhere to land, and I kept thinking a tiny lidded basket would actually solve that. The lid detail is what I kept coming back to as I was designing this. It makes the whole thing feel intentional, like a finished object rather than just a bowl. I'd make this for a friend as a gift without hesitation, especially if they're someone who appreciates handmade things that are also practical.
What Makes This Pattern Special
A lidded basket this small is genuinely useful and finishes in a single sitting.
- Skill Level: Easy. No complicated stitch work here, so it's a low-stress make even if you're still building confidence.
- Quick to Finish. The small size means you're not committing to a long-haul project, which makes it a great one to pick up between bigger things.
- Lidded Design. The lid is what sets this apart from a basic open basket, and it's not difficult to make at all.
- Great for Gifting. Small, handmade, and practical. It lands well as a gift for pretty much anyone.
- Yarn-Friendly. Because it's so small, it's a perfect way to use up yarn you already have sitting around without needing a full skein.
Your Supply List
This is a great excuse to dig into those DK scraps you have been saving for no particular reason.
- DK Weight 100% Cotton Yarn: A DK cotton is the right call here because it holds its structure well in the round, which matters for a little basket that needs to actually stand up and keep its shape. Cotton doesn't have much stretch, so the sides stay firm without any fuss. Since this pattern is designed around leftover yarn, you don't need a full skein of anything. Whatever scraps you have on hand in beige or any colors you like will do the job.
- 4 mm Crochet Hook: A 4 mm hook pairs well with DK cotton and gives you a tight enough gauge that the basket walls hold their form. Go too large and the fabric gets floppy; this size keeps things tidy.
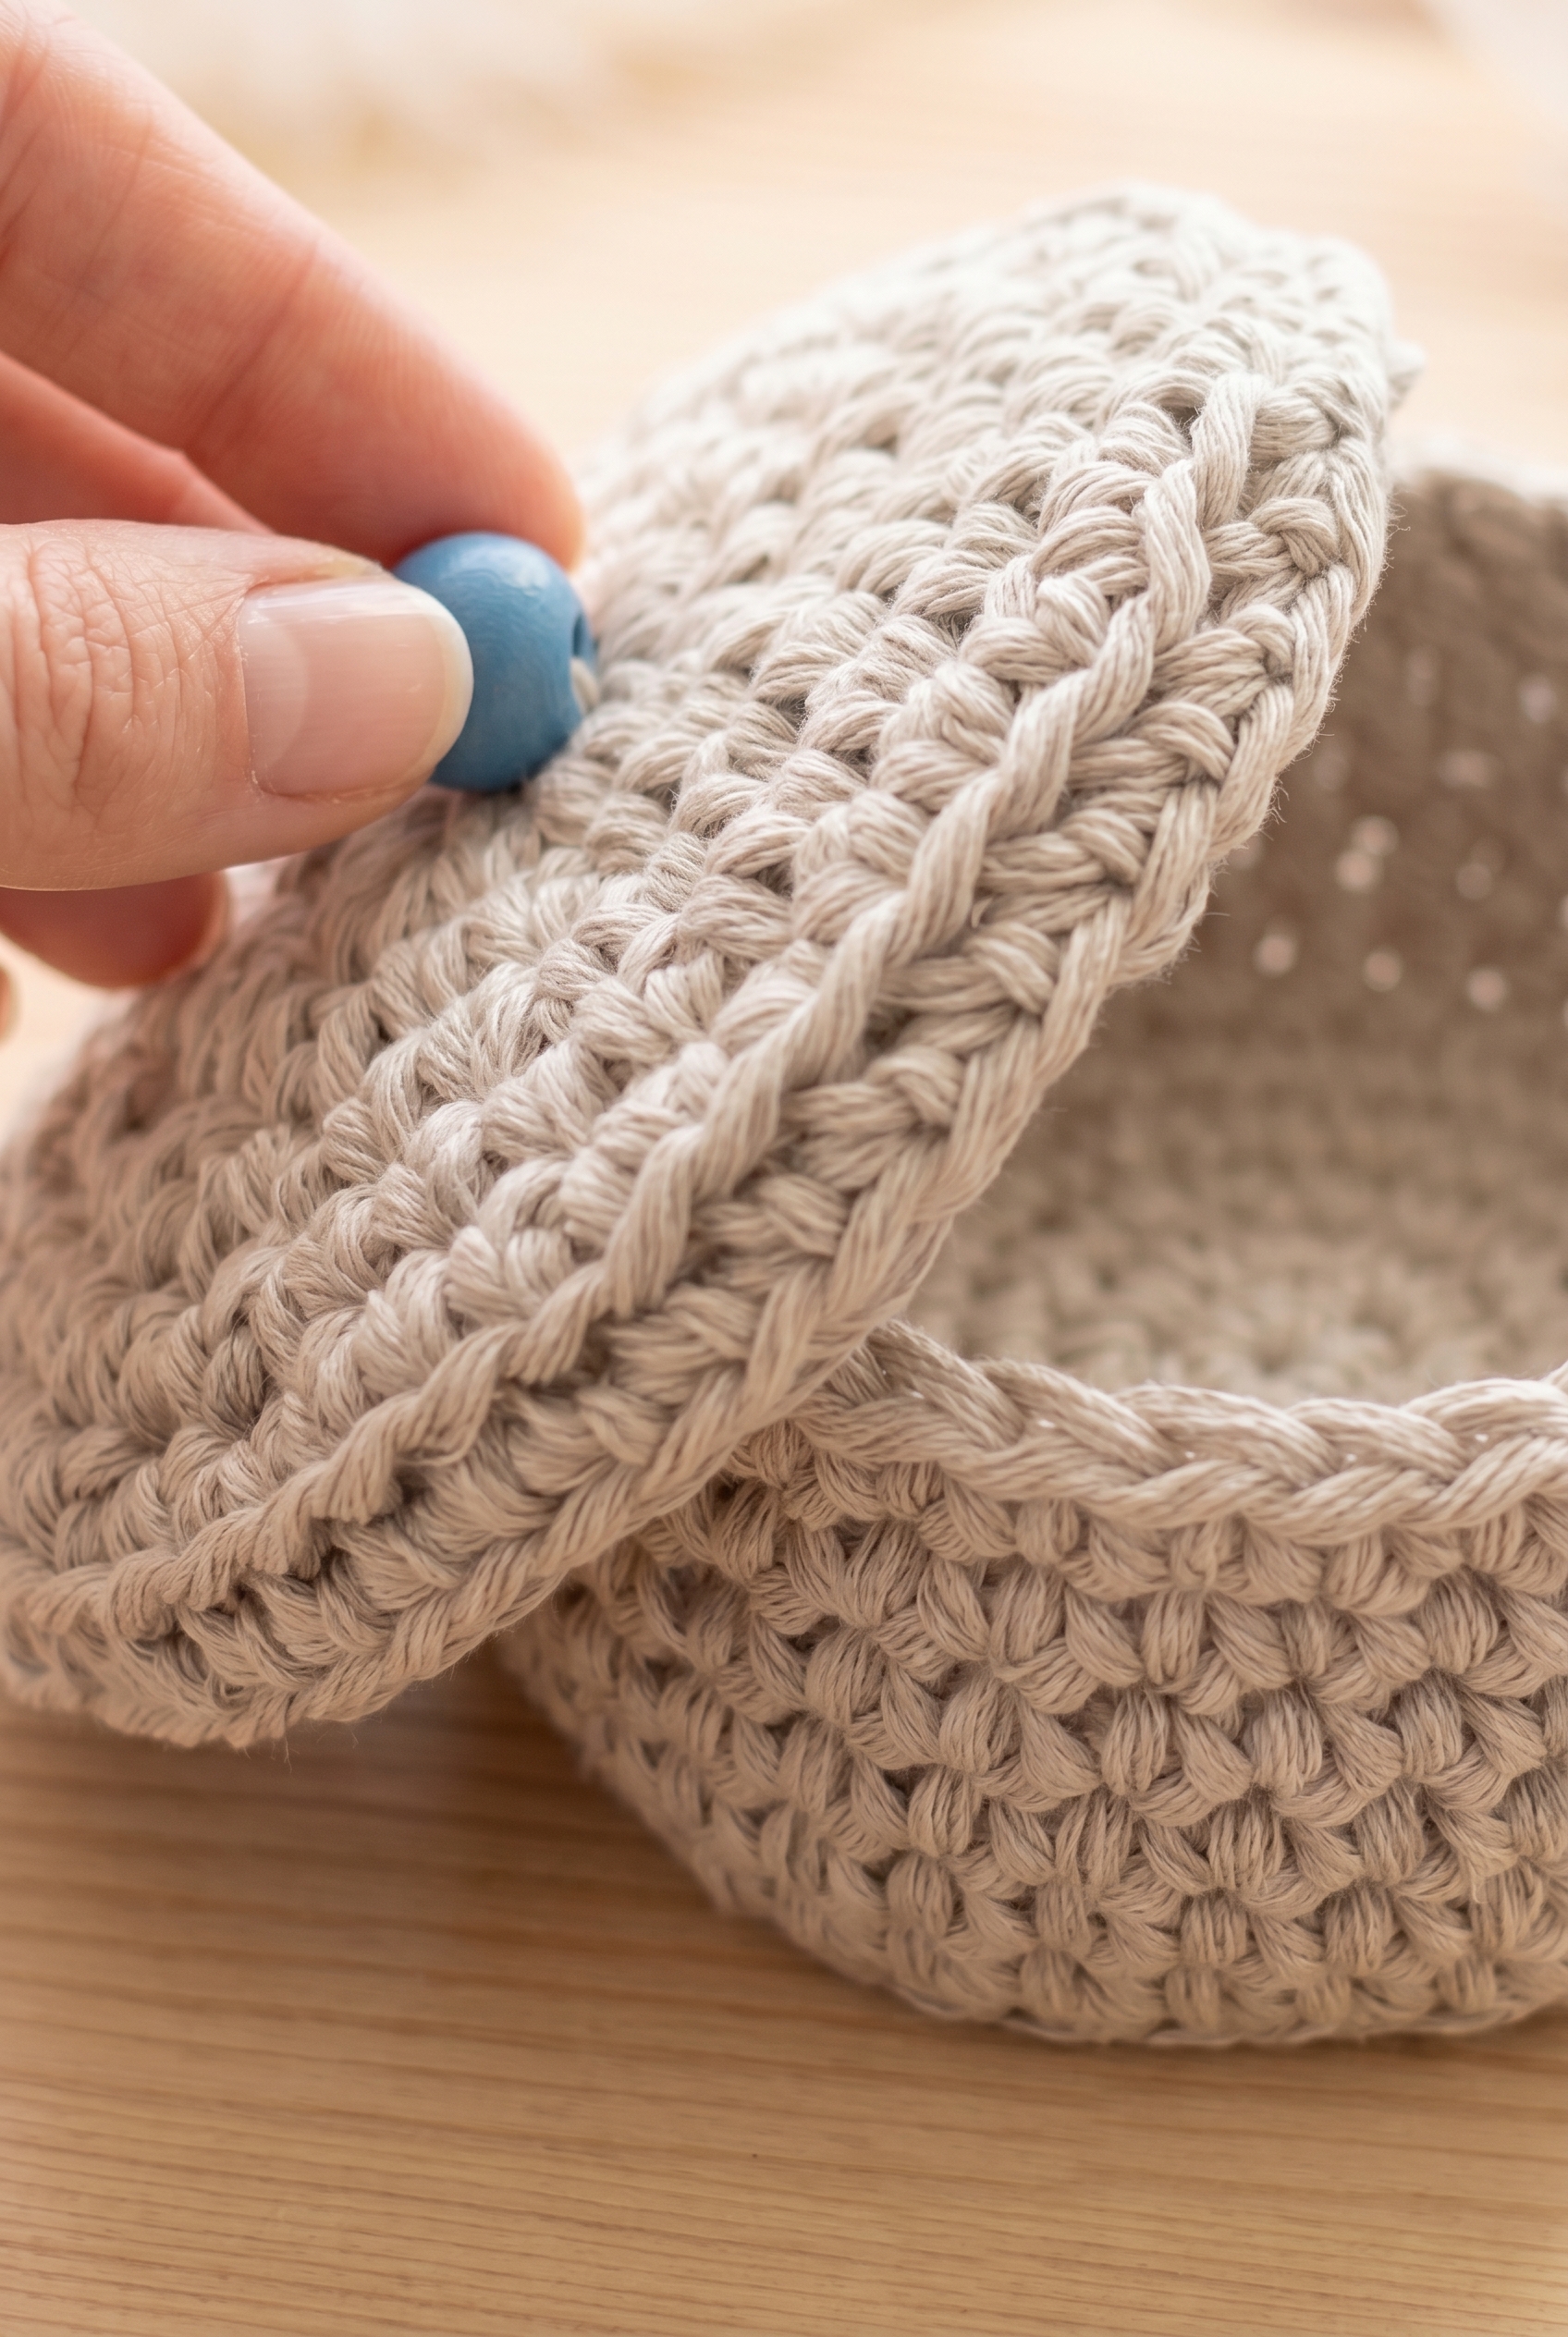
- 10 mm Wood Pearl: This is the detail that finishes the basket off, so it's worth having on hand before you start. You'll sew it on at the end using a sewing needle and a bit of thread or yarn tail.
- Also needed: sewing needle, scissors, tapestry needle
Alternative Yarn Suggestions
The pattern notes mention you can use 8/8 cotton or a double strand of 8/4 cotton, so there's some flexibility in what you reach for. Both options get you to a similar fabric weight and stiffness.
- 8/8 Cotton (single strand): This is a thicker cotton cord that works at a similar gauge and gives the basket a slightly more structured, sturdy feel. Good if you want the sides to be really firm.
- 8/4 Cotton (doubled): Thinner on its own, but working with two strands brings it up to the right weight. It's a practical option if that's what you already have in your stash, and the doubled strand actually gives a nice dense fabric.

Quick Details
A tiny cotton basket that's genuinely useful on a desk or nightstand, and a great way to use up leftover DK yarn.
| Skill Level | Easy |
| Pattern Gauge | Gauge is not critical for this project. Use a hook size that creates a firm fabric so the basket holds its shape. |
| Finished Size | The storage basket is about 2 6/8" in diameter and 2" high. |
| Yarn Weight | 3 Light / DK |
| Fiber | 100% Cotton |
| Terminology | US |
Stitches & Abbreviations
Short list. You probably know all of these already.
- BLO = back loop only
- MR = magic ring
- inc = increase (work 2 sc in same st)
- sc = single crochet
- sl st = slip stitch
- st = stitch
- sts = stitches
Read Before Starting
The basket is worked in rounds from the bottom up. I start with a magic ring for the base, then work outward and upward, so there's no seaming involved at all. The BLO rounds are what give the sides that clean, defined ridge where the base meets the walls.
This is a great scrap project. Any leftover DK cotton will work, and you can also use 8/8 cotton or a double strand of 8/4 cotton if that's what you have on hand. The main thing to pay attention to is tension. Cotton doesn't have much give, so if your fabric is coming out floppy, go down a hook size. The basket needs to hold its shape on its own.
Let's Make the Small Storage Basket Crochet Pattern
This basket works up in two separate pieces — a bottom and a top — that come together at the end.
The Bottom
I start with the bottom, working in rounds from a magic ring out to a flat circle, then build up the sides. The BLO round is what creates that defined edge where the base meets the walls.
Round 1: 7 sc in MR. [7]
Round 2: inc in every st. [14]
Round 3: *sc, inc* repeat 7 times. [21]
Round 4: *sc, inc, sc* repeat 7 times. [28]
Round 5: *3 sc, inc* repeat 7 times. [35]
Round 6: BLO, sc in every st. [35] Working through the back loop only here creates a ridge that gives the basket its shape — the unused front loops form a neat lip at the base of the walls.
Rounds 7–11: sc in every st. [35] Five straight rounds of single crochet to build up the sides.
Round 12: sc in every st, end with a sl st. [35] Cut yarn and weave in end.
Cut yarn and weave in end.
The Top
The top piece follows the same flat circle construction as the bottom through round 5, then gets one extra increase round before the BLO round closes it out. This piece sits over the basket as a lid.
Round 1: 7 sc in MR. [7]
Round 2: inc in every st. [14]
Round 3: *sc, inc* repeat 7 times. [21]
Round 4: *sc, inc, sc* repeat 7 times. [28]
Round 5: *3 sc, inc* repeat 7 times. [35]
Round 6: *2 sc, inc, 2 sc* repeat 7 times. [42] One more increase round before the edge — the top needs to be slightly wider than the bottom so it sits over it properly.
Round 7: BLO, sc in every st. [42] Cut yarn and weave in end.
Cut yarn and weave in end.
Finishing
With both pieces complete, I sew the wood pearl in the middle of the top. It acts as a pull for the lid, so I make sure it's centered and secured firmly before weaving in that last end.
Care Instructions
Because this basket is 100% cotton, it handles washing pretty well. I'd machine wash it on a gentle cycle in cold water, then reshape it by hand while it's still damp and let it air dry. The wood pearl is the one thing to watch: I'd avoid soaking it or putting it through a hot dryer cycle, since that can cause the wood to crack or the sewing thread to weaken over time. Spot cleaning around the pearl is the safer call if it just needs a quick refresh.
Frequently Asked Questions
What does the BLO round actually do in this basket?
Working into the back loops only in Round 6 of the bottom section creates that clean folded ridge where the sides begin to rise up. It's what gives the basket its defined base-to-wall transition instead of a gradual curve. Without it, the sides would just kind of drift upward and the shape would be much softer and less structured.
The pattern has a separate top and bottom piece. How do they connect?
They're two separate crocheted circles. The bottom piece forms the actual basket, and the top piece sits over it like a lid. The wood pearl gets sewn into the center of the top piece, which acts as a small pull to lift it off. It's a simple construction but it works really well for a tiny storage basket.
Can I use a different cotton yarn for this? The pattern mentions 8/8 or 8/4 cotton.
Yes. The pattern is designed for DK weight cotton, but it also notes you can use 8/8 cotton or a double strand of 8/4 cotton. I'd just keep the 4 mm hook and check that your finished bottom circle is sitting flat before moving into the sides. Cotton is the right fiber choice here since it holds the basket shape well.
How do I attach the wood pearl securely so it doesn't pull loose?
Use a sewing needle and a length of strong thread or a few plies of your cotton yarn. I stitch through the pearl hole several times and then knot off securely on the back side of the top piece. Going through the pearl at least four or five times gives it enough hold that it won't wiggle loose with regular use.
How much yarn do I actually need? I want to use up scraps.
This basket is specifically designed for leftover yarn, so the amounts are small. The finished basket is only about 2 and three-quarter inches wide and 2 inches tall, so you're not working with much yardage at all. A few small scraps in the same weight are enough. It's a good way to use up the tail ends of DK cotton balls that aren't big enough for anything else.
Final Thoughts
There's something really satisfying about turning a handful of leftover cotton yarn into something this tidy and useful. I keep mine on my desk for holding small notions, but honestly it would look just as good on a nightstand or vanity. If you make one, I'd love to see it: come tag me on Instagram or drop a photo in the comments below. And if you want to save this for later, the Pinterest button is right there waiting for you.
🧺 More home storage crochet: The Pantry Basket with Handle and Fruit & Vegetable Bag make great companions to this basket for a coordinated kitchen set.


Leave a Reply